Advanced training Wheels
Abstract
We are making bike training wheels to help stabilize and support an 11 year old boy. The boy suffers from seizures and his medicine makes him shaky. The purpose of this project is to provide some stability when he shakes too much, and to keep the bike upright in the case of an absence seizure. Commercial training wheels are not designed to hold someone of his size, nor would any be suitable for him as he grows.
Team members
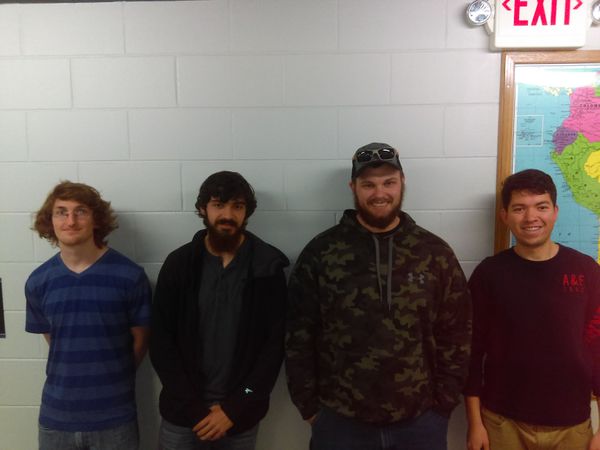
- Appearance (from left to right): Jonathan Adams, Kyler Layne, Tristan Dawson, Brian Ochoa
Problem Statement/overview of the need
We are needing to make bike training wheels to help stabilize and support an 11 year old boy. The boy suffers from seizures and his medicine makes him shaky. The purpose of this project is to provide some stability when he shakes too much, and to keep the bike upright in the case of an absence seizure. Commercial training wheels are not designed to hold someone of his size, nor would any be suitable for him as he grows. Our 3 concept designs involved A-Arms with either springs or air shocks. The Suspension system needs to be able to compress or react to any obstacle that it would cross over. Also, the boy should be able to use these training wheels no matter his age, so the wheel height needs to be adjustable by a slot system. The set should be interchangeable with any bike he rides.
Design Specifications
Quantitative:
- Fatigue Strength-The bike will need to handle speeds of 20+ mph, hills at 60 degree angles, and normal vibrations
- Weight*- needs to be rigid but not massive, allow for easy steering, easy acceleration.
- Cost- Affordable and reliable.
- Turn radius-the higher the speed or smaller the turn radius, the more lean is required.
Qualitative:
- Adjustable to larger bikes and heavier weight
- Paintable Material- TTU colors,Chrome, Gloss
- Performance setting- Rural country, a lot of hills, rugged terrain, various slopes, large pasture.
- Safety- The boy riding the bike is at risk of falling, the bike needs to counter his weight for stability.
- Squeakiness-sound pollution kept to a minimum
Background research
Adult Training Wheels:
- http://www.hayneedle.com/product/heavydutyadultbicyclestabilizerwheels.cfm?ltype=child&tid=BIKE001-1
These are costly, too heavy (16lbs), and have no give. These would break and wouldn't work well on the uneven ground ours would need to work on.
- 1.Current Solutions- Adult training wheels with stronger steel, better design restricting strain due to stress. Trike allows for easy,quick fix. Links are welded=stronger.
- 2.Constraints - Adult training wheels lack in suspension if taken off road and little dampening provided due to vibration. Little adjustablity to wheel height.
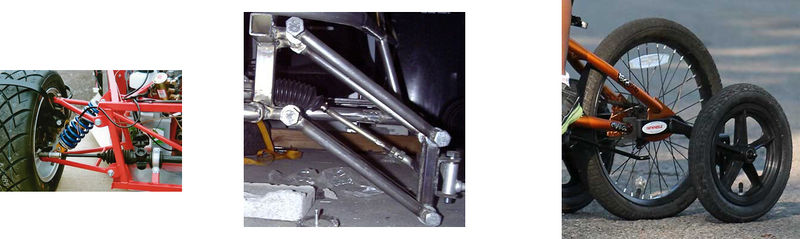
- 3.Advanced training Wheel concept- Center of mass stays in center unlike trike, Suspension system: 2 A-arms, Spring coil or Shock Suspension,slot-pin change in wheel height. Increased balance and lean capability's.
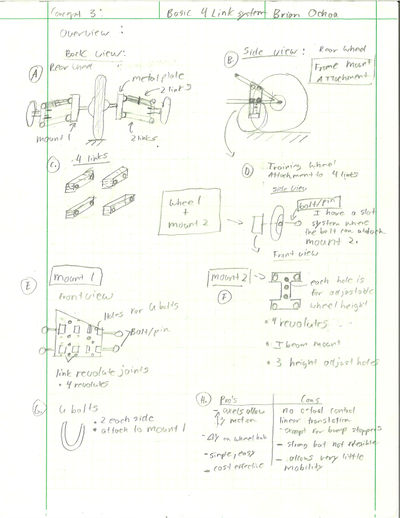
Conceptual Design
Design Concept 1
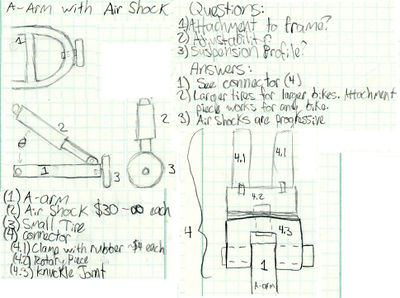
This Stability Wheel setup has an A-arm and an air shock. Air shocks are great because the spring profile is progressive. The first few inches of compression will be really soft, so going over bumpy surfaces won't cause the biker to be thrown. It should help with shakiness some, but no so forceful as to prevent the biker from intentionally leaning through a turn. As the angle increases, the spring force increases exponentially until it hits a impactless dead stop, keeping the bike from falling over. I've been told that air shocks feel buttery smooth on scenic mountain trails. The A-arm itself is better than a a single binary link because the
Design Concept 2
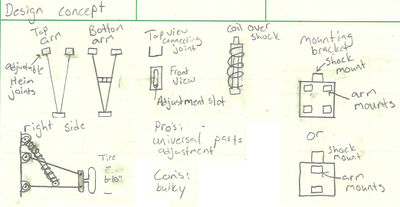
The setup will have twin a arms and a coil over shock. Using this design we will be able to control the rebound of the shock ( how fast it returns to the ground) and we can preload the spring to a certain pressure. This will allow it to go over bumps and dips while keeping the bike up-right and it would also have a bottom out point to keep the bike from turning over.
Design Concept 3
The third design has four main differences than the first two designs,
1. No shock or spring. I will be using bump stoppers to limit "y "motion.
2. I have no A-Arm links to my revolute joints. I have4 standard binary links.
3. First mounting plate is not a square to fit into our specific bike but adaptable to most bike frames.
4. second mounting plate is "I" shaped to attach links to revolutes. No ball joints on wheel hub. simple pin slot system for wheel height adjustment.
Evaluate concepts/select candidate
| Concept 1: | Concept 2: | Concept 3: | |
|---|---|---|---|
| Cost | 4 | 4 | 5 |
| Weight | 5 | 4 | 3 |
| Strength | 4 | 4 | 5 |
| Adjustable | 5 | 5 | 2 |
| Stabilizing | 5 | 5 | 1 |
| Total/Possible | 23/25 | 22/25 | 16/25 |
| % Total | 92 | 88 | 64 |
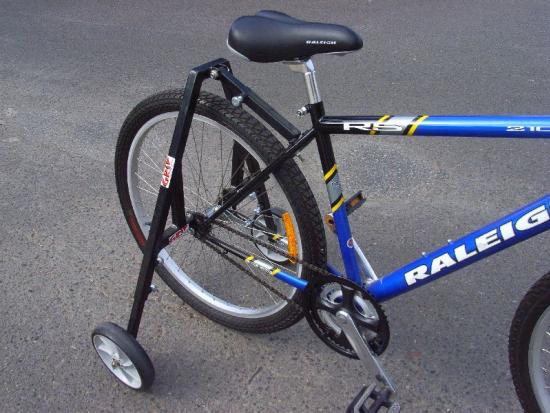
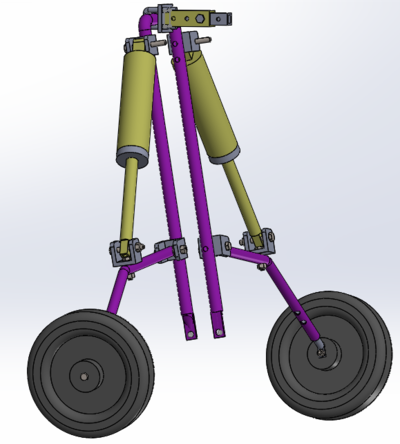
Detailed Design
Description of selected design
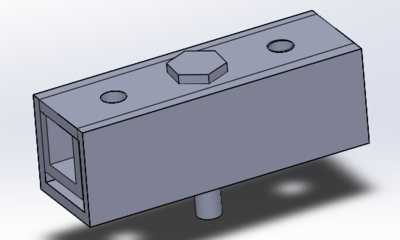
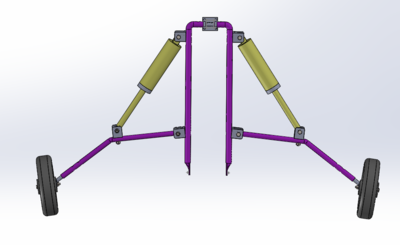
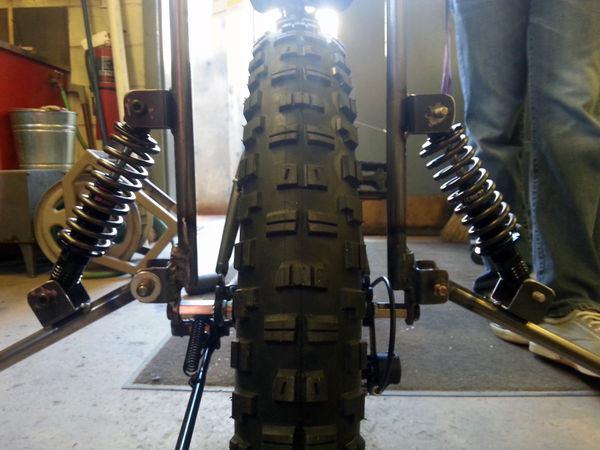
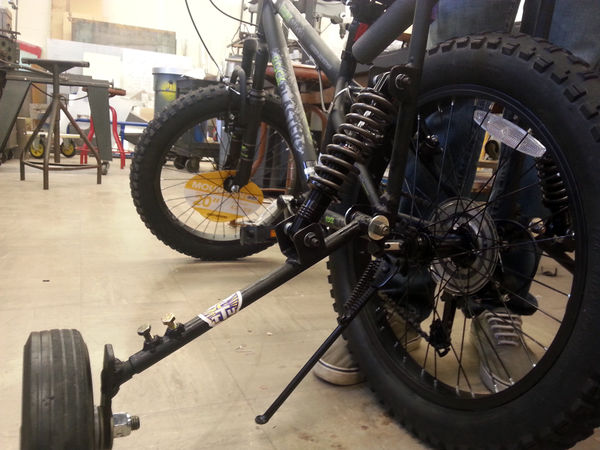
Our Design consists of a wishbone shaped pipe going over the back tire and attaching to each spoke. Off of this wishbone the shocks and arms will be attached and then attached to the training wheels.
Detailed description of selected design
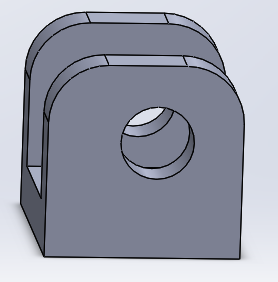
The wishbone design will consist of a 5/8 in. pipe bent around the rear tire with each end bolted to the spokes. Off of the peak of the wishbone, a support will stick out and be attached to the frame of the bike with a locking collar. On each side of the wishbone, the top of a shock will be attached and the lower end will drop down and be attached to an arm that is connected to the wishbone at a lower point. The arm will then sweep down and be attached to a 9 in. training wheel.
Analysis
Analysis Performed Include: Mechanism Modeling, Force Analysis, and
Engineering analysis 1: Loops, Mobility, and Force
With the unknown's being components of the same vector, finding the unknowns as functions of the inputs was trivial.
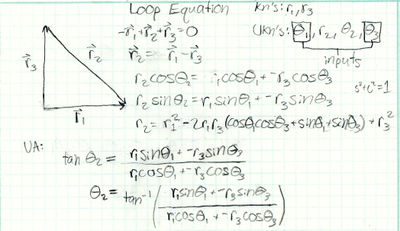
Mobility analysis shows that the mechanism will have 2 degrees of freedom. One DOF will be the idle freedom of the small training wheel on the right. The other DOF will be the rotation of the mechanism.
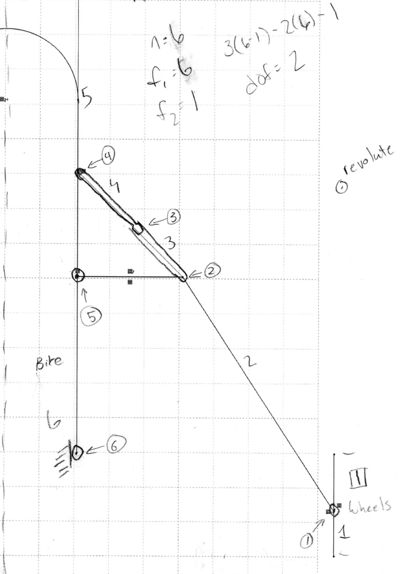
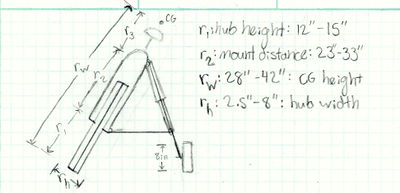
Since the consumer will grow to an adult size and presumably still want to enjoy biking, the Training Wheels need to be designed to work for bikes of all sizes. These numbers are the ranges for various lengths on bikes. R_1 is the hub height, roughly where our lower arm will be mounted. R_2 is roughly the span from the hub to the shock mount. This range of numbers was needed to determine optimal shock length and travel. R_w is the length from the ground to a little over the rider's belly button, where the center of gravity is. R_h is the width of the hub of the wheel. This was needed to determine the best width range for the wishbone. These number ranges were collected from various sites on bikes and their geometry.
Engineering analysis 2: Shear Analysis
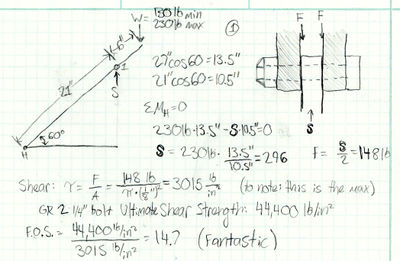
Shear Analysis on the Shock Mount to the upper wishbone shows that the bolt in the hinge won't shear. The capital S is the force from the suspension. Given the max expected weight, the suspension would have to supply about 300 lbf. This is a bit higher than than the weight due to leverage.
Engineering analysis 3
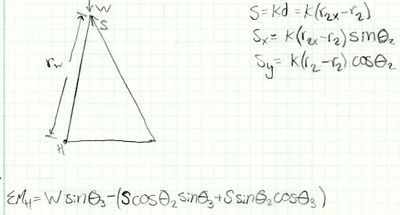
These vectors are defined by the first picture in this analysis. The S is the suspension force, and W is the weight. The r_2x in S is the neutral length of the suspension.
CAD Drawings
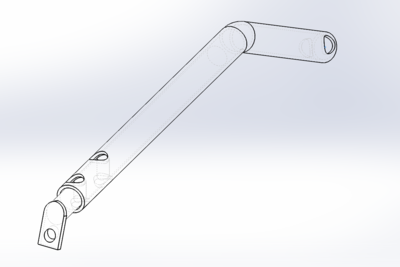
The lower arm assembly consists of 2 separate parts: an outer arm connecting to the wishbone link and inner arm connected to the wheel. The inner arm(extension) allow for 2 points of wheel height adjustment and will be joint using a pin system(bolt- nut). The outer arm will have a revolute joint bracket welded onto it for shock attachment. This revolute joint is where the shock will compress to allow the arm to pivot causing the wheel to be raised.

The wishbone link has three separate parts, one extension inside the top portion of the wishbone to adjust width of wishbone using a pin system(bolt- nut), the two other parts are the left and right side of wishbone. The assembled wishbone with have two point of connection, bottom end connects to wheel center and top end will have " U bolt metal plate bracket" it will have a hinge revolute attaching wishbone to another link that allows for extension connected to the bike.
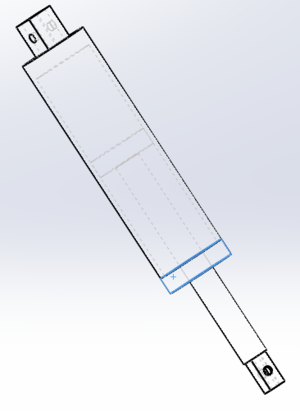
The air shock will be connection between wishbone and Lower arm. The top bracket joint connected to wishbone will be adjustable.
Extension consists of 2 rectangular prisms that concentric with each other that will adjust distance between wishbone and bike using pin system(bolt nut). joints(2)- " U bolt metal plate bracket" it will have a hinge revolute and and revolute joint bracket.
Bill of Materials
| Item | Quanity | Price | Source |
|---|---|---|---|
| 3/4x.065x108 tubing | 1 | 51.03 | McMaster-Carr |
| bolts and nuts | 2.25lb | $10.55 | Tractor Supply |
| 3/4x24 Flat Bar | 1 | $14.23 | McMaster-Carr |
| 7/8x36 Steel Rod | 1 | $32.22 | McMaster-Carr |
| 3/8 Washer | 20 | $2.40 | Tractor Supply |
| Air Shocks | 2 | 90 | amazon |
| 8in wheels | 2 | $33.98 | Tractor supply |
| Misc. | $ 30 | ||
| Total Price | $264.41 |
Fabrication Process
 Diagrams must be drawn if we are to build anything!
 Holes are being milled. Many links means many revolutes which means many many holes!
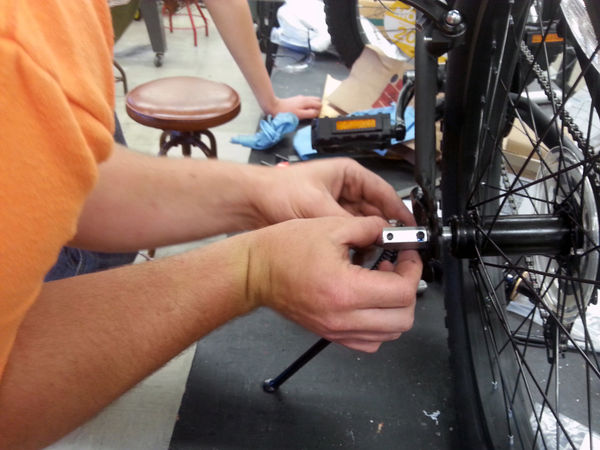 This piece allows us to attach the training wheels at the bottom to the hub.
 The bottom links are being attached. Many many washers are needed to minimize resistance.
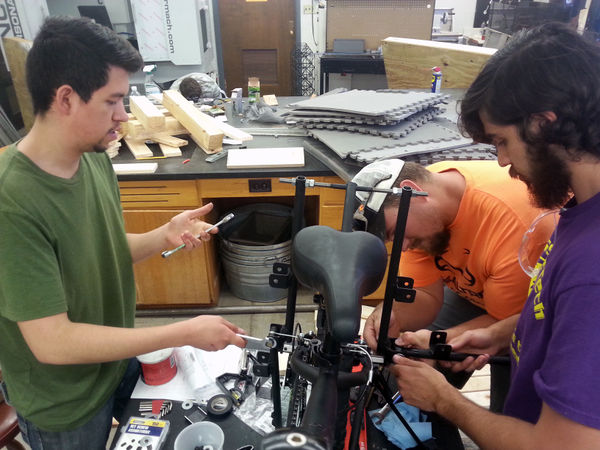
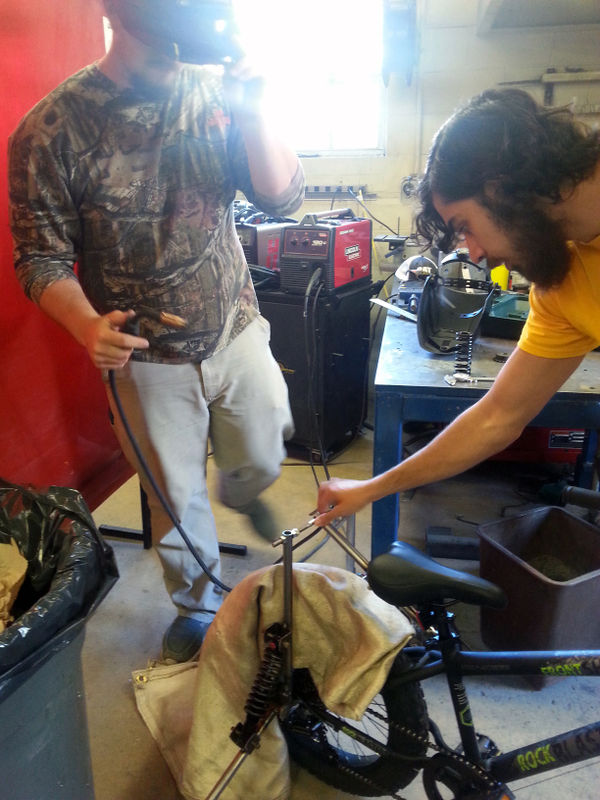 A wobbly piece is about to be welded into permanent non-wobblyness.
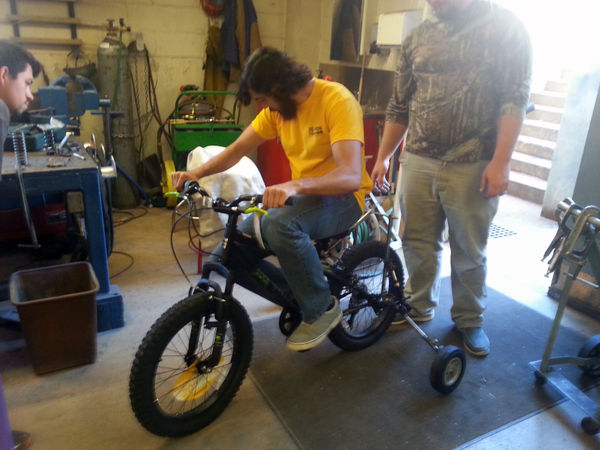 "To tip, or not to tip. That is the question." ~ A wise engineer who tested his products.
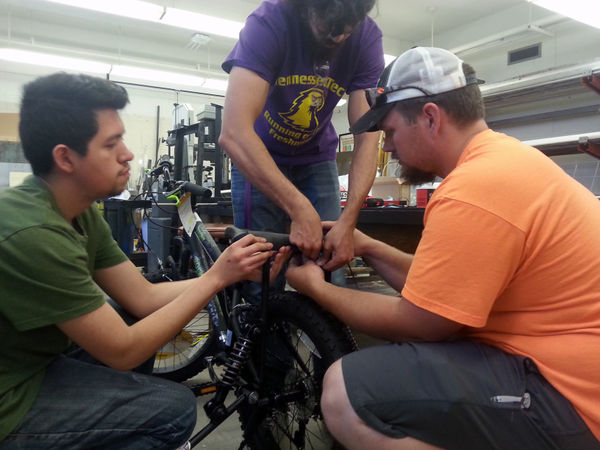 Sharp edges and jutty bolts must be covered with some nice foam (pipe insulator). Teamwork!
Testing and implementation
Describe testing, delivery, how used/received by the family
Testing- 3 point inspection test.
Test 1: High speed of 10 mph to test forces like weight,friction, and drag.
Road surfaces and on rough terrain(aka grassy mud unlevel ground)
Test 2: Braking and steep turns to check for applied stresses on focus fracture points and joints.
Test 3: The lean test to evaluate lean angle of 30 degrees and shock force of 300 Ibs. Purpose allow for shock travel( compression and extension) to absorb impacts.
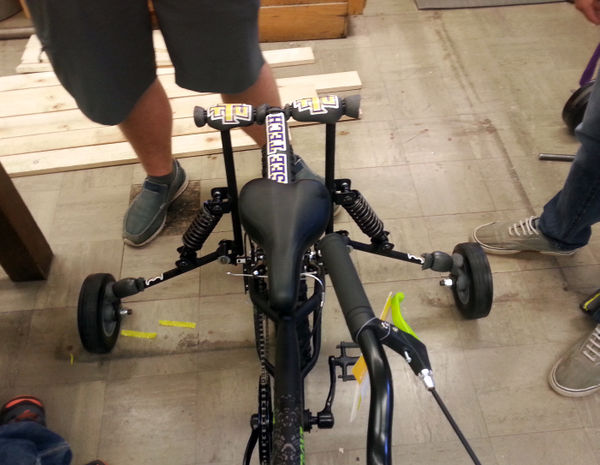
Photos of Completed design
Instructions for safe use
Primary Rules:
1. Do not stick your fingers in the coils.
2. Do not stick your fingers in the mechanisms.
3. Periodically check that all bolted on pieces are still bolted on tight.
4. Avoid rusting.
5. Apply lubricant as needed.
Secondary Rules:
1. Do not eat the training wheels.
2. Do not ride off cliffs.
3. Do not drink and drive.
4. Do not hit 88 miles per hour.
5. Avoid tipping.
7. In case of failure, remove all TTU stickers.
8. Avoid approaching lightspeed.