Assisted reach and grasp
Contents |
Abstract
Design a device that helps a child with Erb's Palsy in their right arm to be able to function more independently as she grows older. We plan to make everyday chores, such as washing her hair, easier to tackle and less rigorous to perform.
Team members
- Brandon Day
- Parke Holmquist
- Alex Henry
- Josh Castellaw
- Cristina Bechard
Introduction
For a pre-teen with limited mobility and function in one of her arms, life can be difficult. From holding books to straightening her hair to helping her mother cook, there are certain aspects of life that are harder for her to experience than it would be for others. The purpose of this project? To give a little girl as much of her life back as possible, through the design, engineering, and production of prototype devices that she can use to make her day a little easier. Ranging from graspable tools to a fully functional support-brace designed for the elbow, the products will be designed to give her the ability to perform tasks that otherwise would’ve remained incredibly tedious and time-consuming for her. The designs will take into account the need for concern for comfort as well as utility of the devices, with versatility and concern for the child’s growth being considered as well.
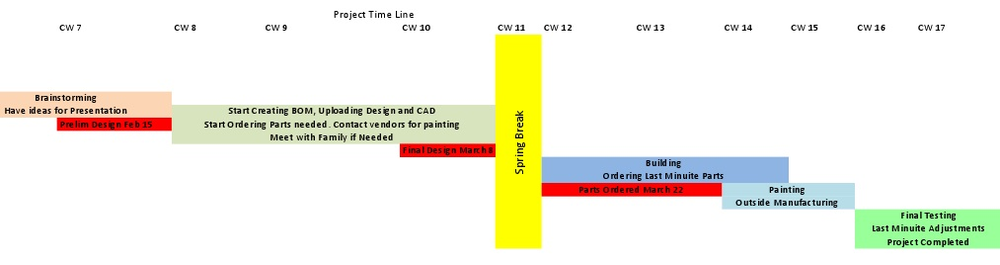
Project Timeline
Design Specifications
Needs to be able to:
- Wash hair
- Put hair up
- Pull pants on
- Put on deodorant
- Fold laundry
- Cook
- Play the Wii-dancing and boxing
- Paint nails
- Straightening hair
Conceptual Design
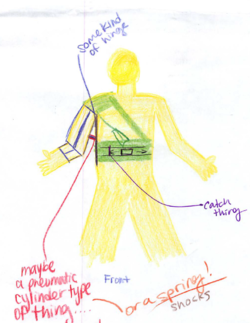
Design some sort of brace that allows her more control over her arm or design individual tools that help her throughout the day.
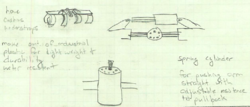
Adjustable and Collapsible Prop
A prop that she can rest her arm on that is higher than her capable reach. It also is collapsible so that she can take it where ever she travels.
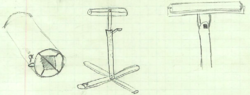
All Purpose Multi-tool
A multi-tool that she would be able to change the heads out for to fit the task at hand. Also can lengthen to help her reach objects that are usually out of reach for her right hand.
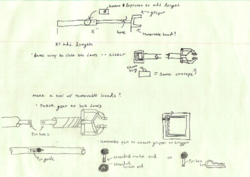
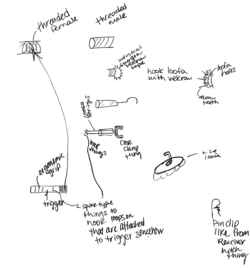
Free Range Brace
A brace that would solve all of her problems with restriction of movement behind her head, above her shoulder, and across her chest.

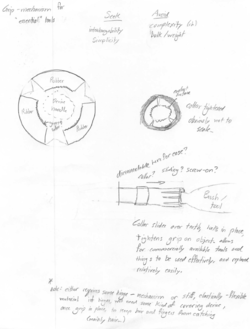
Detailed Design
Description of selected design
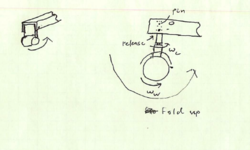
The design we ended up using is none that we had originally thought of in the conceptual design. The machine that we decided on is a modification of an Easy Lift Harness.
Detailed description of selected design
The Easy Lift Harness has a back frame that has shoulder straps and a waist strap. It is heavily padded for comfort and long hours of use. The frame has a pole that extends upwards in the back that has a cylinder connected to it. This cylinder holds up the arm that extends over the user and keeps the weight of the object attached ( in our case the girl's arm) from falling. It gives the object a sense of weightlessness and freedom of movement. Ours will be modified with a shorter arm that extends over the person so it can hold her arm from her shoulder to her elbow. We will have a sling hung from the end that is connected to the supplied bungee that is attached to the frame of the Easy Lift Harness. After we assemble the harness portion of the lift, we will determine if it needs bearings or doesn't depending on if the pole swivels on the back.
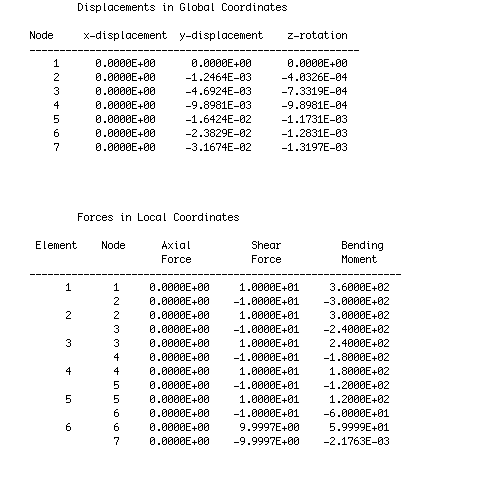
Analsyis
We did a Finite Element Analysis, buckling analysis, and spring analysis of the lift. The buckling is how much force it would require for the rear pole to break under load. The FEA tests how the cantilever beam will hold up under load. The spring analysis will tell us when it will yield.
Engineering analysis 1
Buckling force of pole on pack
Engineering analysis 2
Force acting on lifting arm as a cantilever beam.
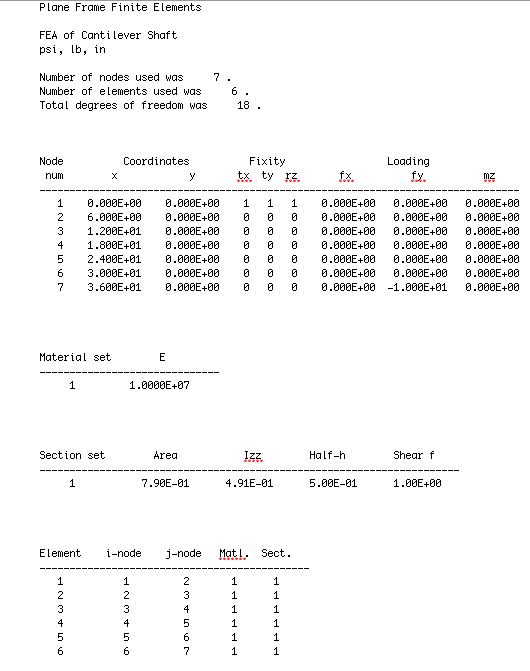
Engineering analysis 3
Spring analysis of the system.

CAD Drawings
The following diagrams are copyright Easy Lift Patent.
Side view of the whole lift
.png/300px-Patent_drawing_(side_view).png)
Rear view of lifting mechanism with example body of person
.png/300px-Patent_drawing_(rear_view).png)
Rear bungee attaches to arm
Pivot point of arm
Bungee attaches to lower mount
Lifting cable attaches to upright arm
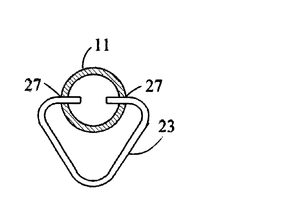
Bearing that we would use if pole doesn't swivel.

Modified Slider to adjust the position of the user's arm

Bill of Materials
- Total Project Cost - $790.80 plus shipping and taxes
- Florida Orthopedics - ELBOW SLEEVE WITH LOOP LOCK - $18.99
- Easy Lift Harness - $324.00
- Purple Aluminum Alloy Spring Clip Hook Carabiner w Keyring (x2) - $3.02
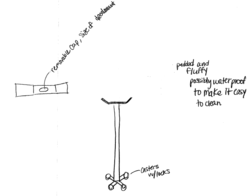
- Ergonomic Hair Brush Amazon - $11.99
- Loofah-on-a-Stick Wal-Mart - $4.88
- Hair Straightener Wal-Mart - $27.97
- Bearing - $300 (pretty sure can find cheaper)
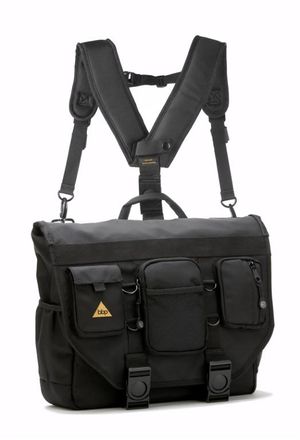
- Ergonomic Backpack (Hamptons Hybrid) - $99.95
Assembly Instructions
Assembly of the Easy-Lift Harness is generally not required. When bought from the manufacturer, the machine is already assembled. You may contact your dealer before purchase to have it shipped disassembled. If you have it shipped disassembled, it will come with a set of do-it-yourself instructions. Essentially it is a three piece puzzle of holes and bolts. There are two bolts attaching a bar one to the actual harness. There is a piece of pvc attaching bar two to bar one using bolts. Bar two is pin-connected to bar three. There is a cylinder attached to bars two and three. The cylinder has three different spots that it can be attached to both bars two and three. Bar three has a toggle that slides along the length of bar three. There is a guiding ring that is bolted to the end of bar three. The rope slides between the guiding ring and the toggle. Carabiner clips are used to attach an elbow brace to the end of the rope.
Fabrication Process
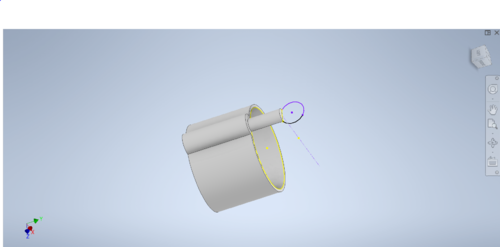
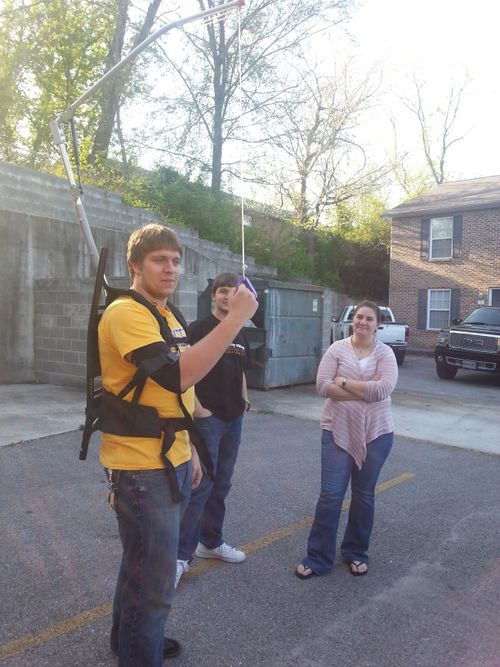
Upon receiving and assembling the Easy-Lift Harness, we noticed some major errors. The first being that the entire assembly nearly touched the ceiling without being on someone's back. (see picture below) We first tried flipping the cylinder, which knocked off several inches, but it was still too tall to fit under the door on an average height female. To modify this, we disassembled the three bars. Bars one and two were taken to the shop, and trimmed down roughly three inches each. The pvc pipe that connects the two pipes was also trimmed roughly three inches. New holes were drilled, and we lost roughly 10 more inches, which easily will fit under standard sized doors on an average height female.
Once the height was under control, we tackled the issue of the user not being able to reach the toggle that adjusts the height of the user's arm. The picture below shows how we have made a 3-D model of a new adjusted toggle that should solve this issue.
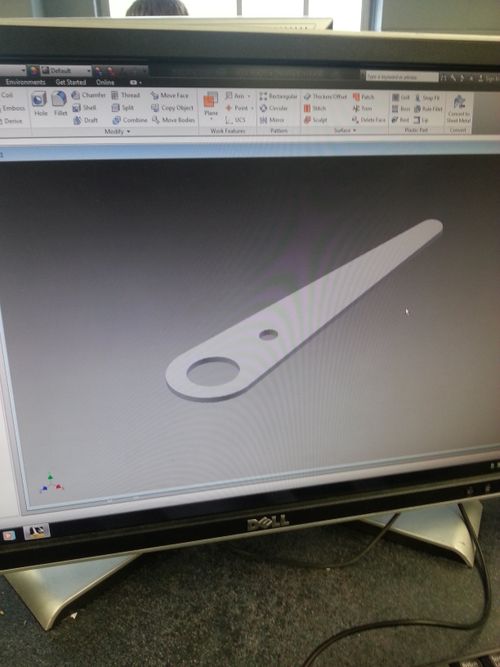
The wonderful men in the shop said to make our toggle, we should use the plasma cutter. To do this, you need a 2-D .dxf sketch of the thing you want it to cut out. The plasma cutter then traces a sketch of your drawing onto the piece of sheet metal with a hot tip that cuts out your piece exactly how you have drawn it. The 2-D .dxf file is shown below.

Once the plasma cutter is finish, it is sanding time. You may use either a belt sander or an air sander. Make sure to sand off all of the rough edges as this will be a handle that could easily cut someone. We used a deburring tool to smooth out the holes. We also used a standard file inside the holes. We used a fine grit sandpaper to finish up, but because the edges were still so sharp, we used a sandblaster to really clean up those rough edges. The piece below is the aftermath of all of the previous steps.

The final step in making the toggle was to coat it in plasti-dip to completely ensure the user could not harm their hand. (see image below)
Completed design
Insert pictures of the final product
Summary and Conclusions
In review, after substantive and substantial research, development and consideration, we have both effectively and efficiently reached our established goals of providing the subject with an easier life in her home, keeping in mind ease of use, growing-concerns, and durability as major factors. The major portion of the project, our modification of the EZ-lift, provided additional support to the subject’s disadvantaged arm. We were able to adapt the device to her needs. The harness for the device, based on our own usage and testing of the said device, provides incredible comfort and relatively symmetric weight-distribution (even for load bearing much greater than is anticipated for the subject). With these seemingly simple modifications to the original device and pairing with an elbow brace (which we also had to reinforce), the subject will be able to support her arm at a height that she can easily specify with the toggle that we designed and fabricated for her. The relatively low weight of the device will allow her to move about easily and for long periods of time, even allowing her arm to bear a significant load if the need arises, which allows us to fulfill her need to have more arm-strength for cooking. In terms of her concerns for application of make-up and taking care of her hair in the morning, the ability of the device to keep her arm at a steady height that she can specify relatively easily will contribute significantly to her ability to effectively reach the top of her head and her hair, and be able to manage it with much more simplicity than she had before the aid of the device. We also purchased some other items to aid her with the tasks that she had mentioned to us at the initial meeting. To help her reach those areas on her back that she couldn’t normally get to during bathing, we purchased a “loofah-on-a-stick” for use in her fully-functional arm. We bought her a well-rated hair-straightener, as well, to aid with straightening her hair with a little more ease. We purchased a hairbrush on a long, curved handle, for use with her fully-functional hand, giving her more ability to brush her hair. Finally, we bought her a special, hybrid backpack, which is wearable both as a normal, two-strap bag and a messenger bag. This hybrid concept allowed her to be able to wear the bag in a style that she likes (normally) but then also to have more access to her locker by use of the bag in the easier-to-load/unload messenger configuration. Through everything that we’ve purchased and designed, we have provided the subject a means of having a much easier time of getting ready for the day, as well as completing otherwise undoable domestic activities. In this way she will have as close to a normal experience as we have the capability to provide her, and for this opportunity, we are incredibly grateful.