Bike Redesign
Abstract
Melissa Draper is in charge of the special needs students at several schools in Putnam County. She helps these kids everyday with learning how to do daily activities and exercises, along with education. We hope to assist in the exercise/play portion of these activities. Melissa’s students have a pump and go bicycle that is not currently working. It was not very user friendly, and was not designed to last. We plan to design a newer pump and go trike that will be user friendly and fun for the kids to get some exercise on.
Team members
Problem Statement/overview of the need
Many of Melissa’s students need to get exercise and learn to play. They currently have some pieces of equipment to assist with this consisting of a bike that needs some work. The current bike that is up for redesign will be a challenge to not have to start from scratch. Her students need to be able to exercise while feeling like it is playtime and the current bike just does not accomplish this. It is bulky, and not appealing to the eye which is hard to get the kids to use. Melissa would enjoy having something that they will treat as playtime as opposed to exercise. She hopes that her students can be proud of the bike as they navigate the hallways getting some exercise in. She is not worried about having seat adjustability or steering, but we do plan to put those at the bottom of the to do list in case it will not take too much effort or design constraints to add these features to the bike.
Design Specifications
Our design of the bike will need to be light, fun, and easily operated. We plan to make our first priority being that the bike is fun for the students. Being special needs, many of them will not use anything that they do not like. With this, we hope to make the bike as personal to them as possible. The bike will be designed for high school students. Melissa has to be able to pick up the front end to maneuver the kids to where they can ride so it can not be too heavy. Also, we plan to have a steering mechanism that can be limited by her with the use of a pin lock. We plan to take the old bike and make it more functional and smaller.
Background research
The “row and go” style bike came about for use on the railroads in the form of a “handcart,” which later evolved into the Irish mail cart. The technology has since advanced and found its way into other markets as well. More recently, these bikes have been used for children and for people with disabilities that do not allow them to operate a normal bicycle. The market for therapeutic “row and go” bicycles that are not stationary (ex., basic stationary bike at a gym) is very minimal. However, there are mainly 2 markets for mobile “row and go” bicycle’s, one being adult bikes with only 2 wheels and the second being small child bikes, usually consisting of three or four wheels (toddler age). Neither of these two apply directly to the project we are faced with, but we believe that we can learn from the current designs on the market and design a “row and go” bike to accommodate high school size kids.
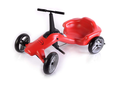
Power Pumper Bike: $399
Row-n-Go Bike: $1100
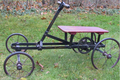
Irish Mail Cart
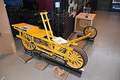
Handcar
Conceptual Design
Schematics
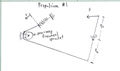
Propulsion #1
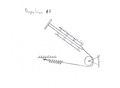
Propulsion #2
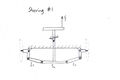
Foot Steer
Design Concept 1
This is a design concept for the propulsion method,and it consists of 4 links, the frame, handlebars, connector link, and sprocket. The handlebars are pinned with a revolute to the frame with about one quarter of the bars below the frame, and the bottom of the handlebars is pinned with a revolute to one end of the connector link. The other end of the connector link is pinned with a revolute near the edge of the sprocket, and the center of the sprocket is pinned to the frame via a revolute. These connections will allow the rowing motion of the handlebars to translate into rotation of the sprocket. The sprocket may be resistant to turning when the handlebars are either fully extended or retracted, but in any other location or while moving, this propulsion method will be very efficient. This method will also generate power from both the pushing and pulling of the handlebars.
Design Concept 2
The design shown below incorporates an adjustable seat mechanism that accounts for leg and torso length together. For steering on this design, we are using a simple version of the foot steering schematic where the feet directly apply rotation to the front set of wheels. This would be a limited steering solution to the outside of the radius of the steering mechanism causing your legs to bump into the frame after a certain amount of turning. For propulsion. We will be using the propulsion #1 schematic shown above. This is the most efficient method that we derived from the concept of the power pumper.
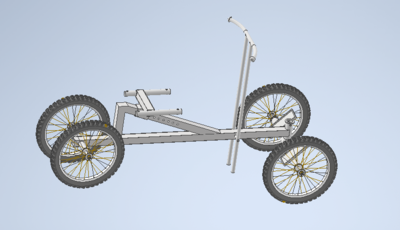
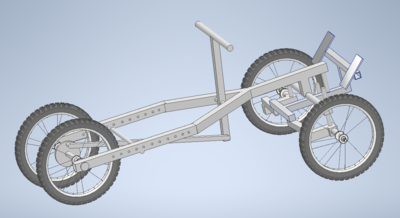
Design Concept 3
This design is a lot like the previous. The frame on this design is sloping backwards and incorporates foot steering, but it uses control arms for a better turning radius than the second design concept. Because of the backwards sloping frame, the seat will be lower to the ground; therefore, the rider's legs will be closer to horizontal. This is important as it will allow the rider to generate more turning force with his or her legs and provide greater overall control over the steering of the bike. We are also using the propulsion method from "Design Concept 1," which will eliminate the use of chains and in turn, make it a little more user friendly.
Evaluate concepts/select candidate
As of now, we are leaning toward design concept 3. This design uses a simple yet effective propulsion method and will be easier to steer than the second design concept. We also believe this design will look the best and be the most comfortable to operate. The simplicity and efficiency of this design are the reasons we rated it as our current choice for our best design concept. We believe this design will best meet the requirements given to us.
Detailed Design
***NOTE: Due to current conditions with COVID-19, we could not proceed with the build of this bike.***
Therefore from this point on, we will outline the plans we had for this project to the best extent possible.
Description of selected design
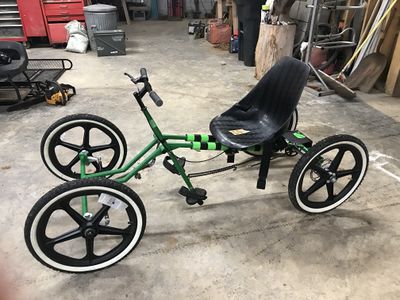
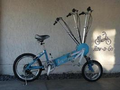
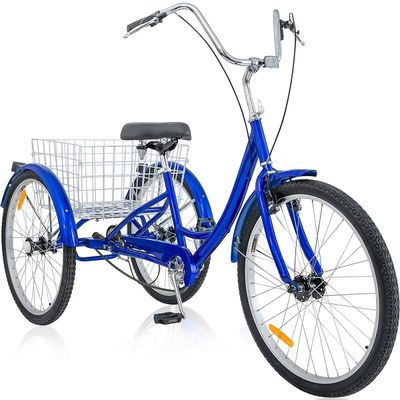
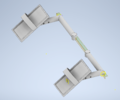
Above we had 3 initial designs that we had planned to fabricate from scratch, which would have been great but very time consuming. So as we researched bikes more, we came to the conclusion to purchase a trike and modify that trike to what we needed. The picture below is a good representation of the bike we were planning on purchasing.
Detailed description of selected design
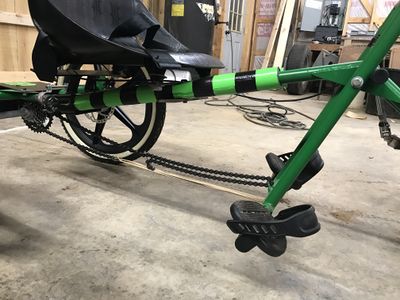
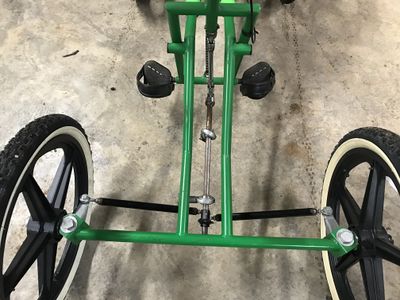
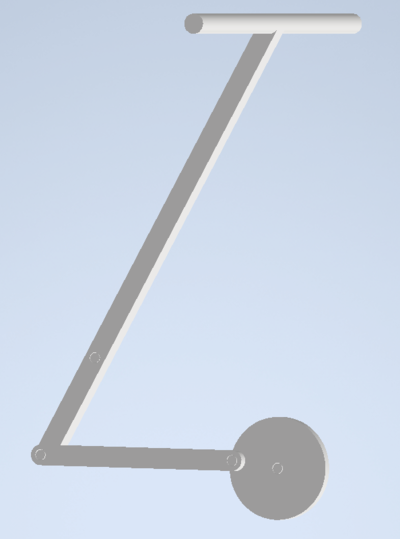
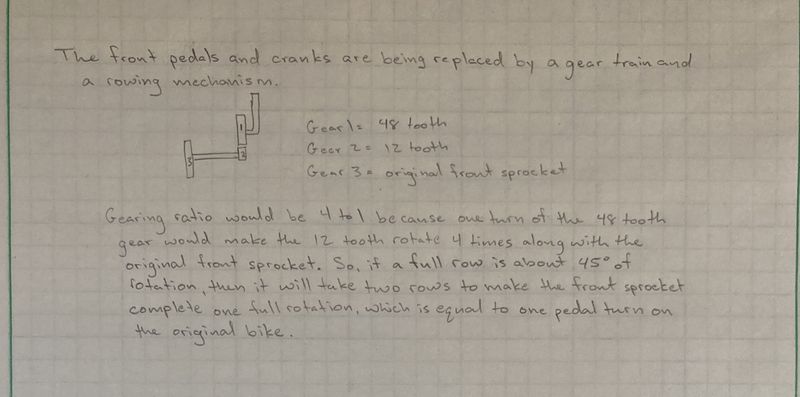
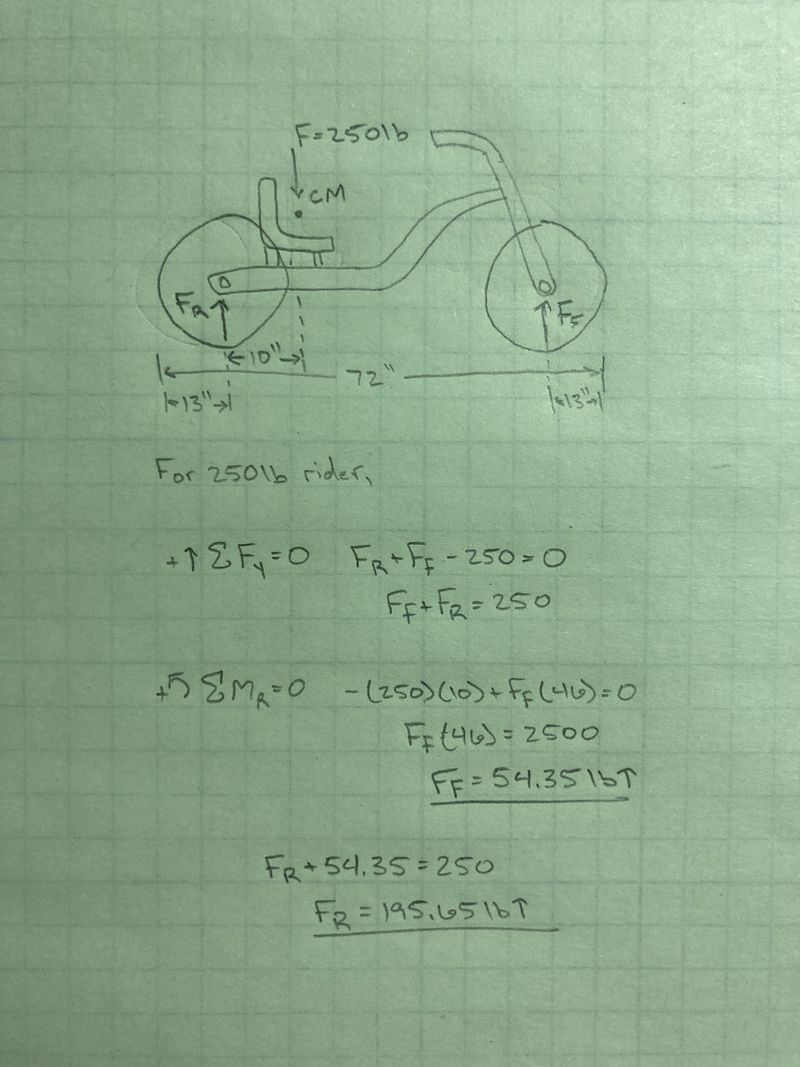
As stated earlier this bike needed to be a 'row and go' bike and that aspect of this build was going to be the most important part. Using as much material from the purchased bike was important so the rowing mechanism was going to involve the existing handle bars with a fabricated arm that would connect to the frame of the bike with a pivot point (revolute joint). The arm was going to be telescoping because of the size difference in the children Melissa works with. After removing the peddles, the end of the telescoping arm would be connected to the a 48 tooth gear, which is in mesh with a 12 tooth gear, which drives a shaft connected to the existing sprocket. This gearing set up is the propulsion method we decided that we would go with. Steering the bike wasn't an important aspect for Melissa unless we already perfected the propulsion method and had time. The design to steer the bike was a simple modification to the existing front forks and the collar where the normal handle bars would have been. Static foot peddles where going to be added no matter what to give the children a way to hold their feet in place and allow them to create force with their upper body. With the foot peddles attached to the front forks, we would fabricate a rod the could fit the existing collar so that when the child moves his/her feet they could steer. A little more modifications to the rod and collar would allow Melissa to lock the steering in any direction or she could remove to pin completely to allow the full range of steering. The final modifications were going to be a telescoping seat with a backrest and a seat belt and to remove to basket from the back of the bike to add a lift handle. Melissa liked having the ability to manually pick up the bike so we wanted to make sure she still had the but just a better version than her existing bike.
Analysis
Engineering analysis 1
Engineering analysis 2
CAD Drawings
Insert drawings of all parts and the assembly
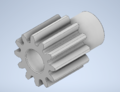
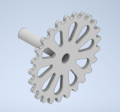
12 Tooth Gear
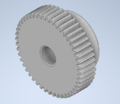
48 Tooth Gear
Crank Arm
Drive Shaft (Front Sprocket)
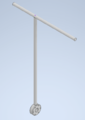
Steering Mechanism
Moc Frame

Full set up of our Cranking/Propulsion Method
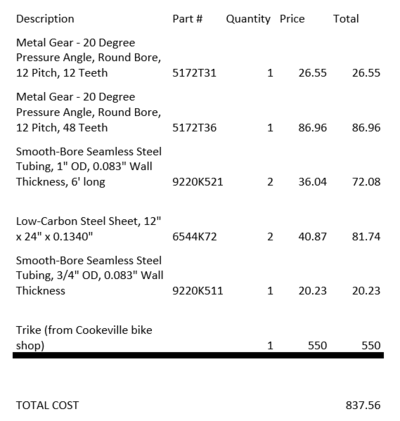
Bill of Materials
Please see the proposed bill of materials list below.
Assembly Instructions
***No assembly instructions were going to be needed, as we would have had the bike completely finished when Melissa received it.***
Fabrication Process
***No pictures are available due to the conditions causing us to not complete the bike.***
Testing and implementation
***No real world testing was possible, along with no delivery and client use of our product.***
Photos of Completed design
***No pictures of our final product due to the current conditions***
Instructions for safe use
1.) Make sure child is secured in the seat properly with the seat belt.
2.) Check the steering column per the child's steering ability.
3.) Check surroundings to make sure it is safe to operate the bike.
Project Summary, Reflection
This project was something we were all interested in and excited about but due to the conditions this semester we were unable to complete this project. This had everything needed to be a really great project and something each member could learn from on this team. We all would have loved to see the satisfaction of the children getting on the bike and racing it down the halls or out in a parking lot. Hopefully this is a project that gets resubmitted and another group that is as excited about it as we were can carry it out to help this client. Even though we did not get the hands on fabrication experience as previous semesters, each of us still had the opportunity to learn to work as a team. Also meeting our client and her telling us what she wanted and didn't want in this bike, gave us the opportunity to get out of the 'school' mindset of engineering and get more into the 'real world' engineering mindset. Overall we are disappointed this project and semester didn't pan out the way we had hoped it to but there were many skills and abilities that we as team still got to practice and learn during this project.