Communication Doll V2
Abstract
Alyssa Conger, a local speech therapist, has expressed a need for a therapy doll to be used when working with children. She has found that social interaction with children through play is vital for their development at an early age. Our goal is to develop a tool that can be used by children with speech disabilities that will allow them to communicate warnings, emotions, and desires. A successful outcome will be achieved if children are able to use our device to communicate, and subsequently learn these key phrases themselves.
Team members

- From left to right:
- Dennis Combs
- Matt Fuller
- Dalton Laws
Problem Statement/overview of the need
Children who experience speech development disorders cannot express thoughts and desires to those around them. Products currently exist that children can interact with, but they are designed to announce some hypothetical emotion, and collect a response from the child. To help children express their own feelings, we will design a doll that remains silent unless the user interacts with buttons on the doll. Once these sensors are activated, the doll will speak. Placing sensors in key areas as specified by a speech therapist will help children associate emotions and desires with spoken language. Our goal is to allow disabled and struggling children to communicate key things, such as “I need help, Let’s go to the bathroom, and This Hurts”.
Design Specifications
For our design we plan on utilizing a doll roughly 12 to 24 inches in height, and one with the capacity to fit an Arduino combined with a battery pack, speaker and numerous sensors inside. The sensors we plan to use will either be buttons or pressure sensors. The sensor wiring will be protected by wire tubing to prevent breakage. After the sensors are triggered, it will output a phrase that is designated by the coded sound fileswe have recorded and input into the code. The Arduino, speaker, and battery will be housed in a 3D Printed case that will fit inside the doll to hide the components. In the design we plan on having the doll completely wireless, eliminating the need for an exterior computer/power source. The battery pack will use rechargeable batteries or a battery pack that can be charged directly from wall.
Background research
It is a common practice in speech therapy to use dolls to assist with language development. Using dolls to stimulate play is beneficial for language development, as they can demonstrate representations for words and actions. The range of options for dolls that respond to a child’s physical input is limited. “Tickle Me Elmo” is one example of a doll that responds to a user’s input, but the usefulness of this product for speech development is limited. Another product of note is “Little Mommy”. These dolls are designed to feature an action and help children learn a response. For example, the doll will announce, “My knee hurts”, and the doll’s knee will glow red. The child can then respond by placing a magnetic bandage on the doll’s knee. The doll will subsequently thank the child.
An interactive playing experience has been explored with these products currently on the market. However, there are no dolls designed to help children express pain, desires, or feelings. Children who cannot express these using language will benefit from a doll that can receive a physical input and speak for the child until they may be able to do so themselves.
Conceptual Design
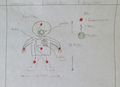
Design Concept 1
Pros: Simpler. fits needs.
Cons: Pressure Sensors. No wire tubing. Pressure sensors have 1 function.
Design Concept 2
Pros: Wire Protection. Dual function Buttons.
Cons: All components stuffed into doll. Needs to be plugged into wall.

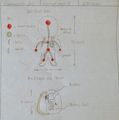
Design Concept 3
Pros: Electronics stored separate from Doll. Dual function Buttons. Ease of use working on electronics.
Cons:Slightly more complex
Evaluate concepts/select candidate
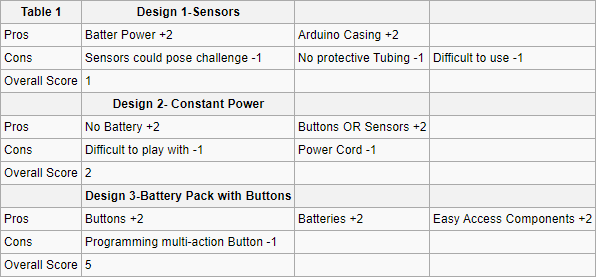
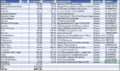
We decided to use our third design concept involving the doll using a battery pack and multi function buttons. This allows us to be able to stay as close as possible to what Ms. Conger desires out of this tool. Design one uses pressure sensors, which not only could be difficult to program, but could also pose an issue for a young child to use effectively. We decided to avoid this option for this purpose. Design two provides an easy way to power the Doll; however, it comes at the cost of having the mobility a child should have and expect with a toy, especially one that is meant to be their voice. Table 1 has been attached outlining the ideas with a simple +2/-1 system that helped us decide our course of action. +2 points were added for a pro and -1 point was removed for each con.
Detailed Design
This section will describe a detailed design process
Description of selected design
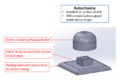
After analyzing the three design concepts, we found that design concept 3 fit our design specifications for what we needed in this project. The backpack provides the advantage of storage over the other two designs. Design Concept 3 also allows us to not need a direct connection to a wall for a power source.
Detailed description of selected design
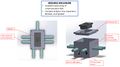
The backpack allows us to store most of the electronic components in a separate compartment. The backpack also allows us to store a battery pack so that the doll can be transported without needing to be plugged directly into a wall. The tubing around the wires provide added protection and support to the wires run through the body of the doll. Having the battery being stored in the backpack, will allow the doll to feel more like a doll. A slight addition to the third concept is that there will be 7 sensors in the doll. The 7 button sensors will be located in the head, stomach, both hands, lower back, foot and knee. We found that these button locations will be the most optimal for what we want the doll to achieve. The button will send a voltage to the Arduino and will output a programmed related phrase. The Wires protected by the tubing will run to the center of the doll where the Arduino will be located. The Arduino will be protected by a 3D printed case that will also house Expansion board and the speaker.
Analysis
Describe three types of analysis to be performed on the design
Engineering analysis 1
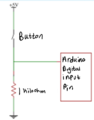
Switch Circuit
Engineering analysis 2

Arduino Expansion Board
Engineering analysis 3
CAD Drawings
Arduino Enclosure
Button
Bill of Materials
Assembly Instructions
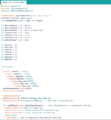
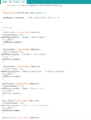
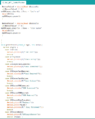
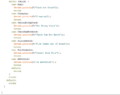
- We first Worked on getting a functioning 7 Button code.
- Recorded 7 phrases for different locations of the doll with different contexts.
- Had 3D prints made for the button housings and Arduino case.
- Began gluing buttons to the button housings and piecing together the Arduino case.
- Along with closing up the arduino case we also had a speaker attached to the case and soldered in to the board
- After gluing we test the buttons thoroughly to see if they worked
- Soldered the 7 button circuit to an expansion board.
- Then soldered 7 signal wires and power wires exiting the case through appropriate holes.
- After fully soldering everything we needed inside the Arduino box, we then closed up the box by screws.
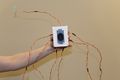
- Opened up doll and removed stuffing and pre-drilled the holes needed for the buttons on arms, legs, back and stomach.
- Insert Arduino case and wires into doll and funneled the wires through the holes around the doll.
- soldered the buttons to the signal wires and then glued down the arms and legs buttons to their appropriate area and phrase.
- After finishing the gluing process, we then re-stuffed the doll and cut a hole in a backpack that is attached to the doll for the external battery source.
- We then put on clothing onto the doll that will in future be glued down in places so it wont be removable
- Stitched the doll up after completely stuffing the doll and then glued down the final buttons on back and stomach for their final positions.
Fabrication Process


Testing and implementation
Describe testing, delivery, how used/received by the family
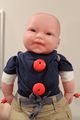
Photos of Completed design
Instructions for safe use
Do not use the device unless supervised by an adult that fully understands the safe use of this product. Keep doll away from water/liquids due to the electronic components. Remove battery/turn off when not using.