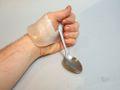
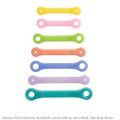
Custom spoon and fork
Abstract
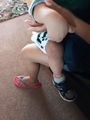
Joel is an 18-month old who was born with Amniotic Band Syndrome (ABS), meaning that he was born with bands wrapped around his arms and legs. This caused deformations in his toes and fingers. He currently only has control of his left and right thumbs and left index finger. He is in need of a custom eating device.
Team members
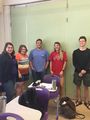
From left to right: Katheryn Arnold, Lauren Pittman, Hunter Van der Voort, Shelby Penning, Ethan Lewis
Our Case Worker: Miriam Espinosa
Problem Statement/overview of the need
Joel is in need of a utensil aide that will help him learn to eat independently and work on the dexterity in his right thumb and wrist. Because the other four fingers on his right hand are curled and underdeveloped, he needs something that is easy for the family to take on and off while not lying directly on the other four fingers.
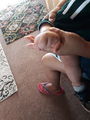
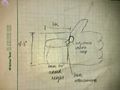
Picture of Joel's hand
Design Specifications
Be able to learn independence, develop wrist strength, needs to be easily washable, expandable for growth, comfortable, safe and secure joints
Wrist diameter: Thumb length: Thumb pressure ability: Hand diameter:
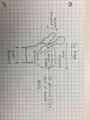
Wrist Mold Idea

Wrist Strap Idea
Different sizes for holes for strap
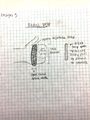
Wrist Wrap Idea
Wrist Wrap Idea 2
Conceptual Design
Design Concept 1
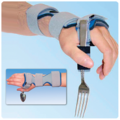
Wrist Wrap with Pocket Design
Design Concept 2
Wrist Cast Design
Design Concept 3
Velcro Strap Design
Evaluate concepts/select candidate
Rating 1-10
| Design | Adjustability | Adaptability | Comfort | Washable | Durability |
|---|---|---|---|---|---|
| 1 | 10 | 10 | 9 | 10 | 6 |
| 2 | 1 | 9 | 5 | 7 | 10 |
| 3 | 9 | 9 | 4 | 3 | 3 |
Design 1: 45/50 Design 2: 32/50 Design 3: 28/50
Winning design: Design 1
Detailed Design
This section will describe a detailed design process
Detailed description of selected design
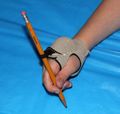
We are taking design concept one and altering it due to lack of exact measurements. We are sticking with flexible structure so the device is able to grow with him and compensate for the measurements. The device will have a neoprene fabric strap that will wrap around his wrist and an adjustable Velcro loop for the utensil. A flexible TPU filament pad will be inserted on the top of the band for added height and increased angle for the utensil in the loop. The attachments will be sewn onto the fabric and the wrap will be secured with metal snap buttons. The fabric will be a pasture green and will include little Velcro patches so Joel can "play" with his tool and attach little farm animals to it. The neoprene fabric satisfies our washable specification and gives more structure than just a plain spandex or cotton fabric. A pressure pad will also be used to monitor Joel's thumb strength and to light up an LED light for stimulation. Joel's mother will be able to track his thumb strength to know when he is strong enough for his surgery.
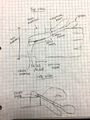
Final Sketch
Analysis
Describe three types of analysis to be performed on the design
Engineering analysis 1 - Determining Sewing Method
This test will help us determine which sewing method we will use for the fabric. Below is a chart from the article, "A study of the improvement of foam material sealing technology for wetsuits." There are 10 variations of sewing methods, varying in pattern, overlapping, gluing, and seam sealing. Each type was tested for water resistance, a main priority for our device. The table below displays the results of the test, indicating that [GB(S)] has the highest water resistance. However, we don't have the accessibility to seam seal; so the sewing method we will use is ZF. ZF is a zig-zag stitch with flat lock stitching.
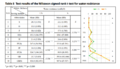
Citation : "Oh, H., Oh, K.W. & Park, S. Fash Text (2019) 6: 25. https://doi.org/10.1186/s40691-019-0181-5"
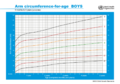
Engineering analysis 2 - Child Growth and Development
The chart below represents the growth of a boys arm as he grows from 3 months old to 3 years old. This is helpful to our group because it is going to help us with measurements to design our device for the 18 month old as he grows. Joel is having surgery when he is around 3 years old so one of our primary goals is to allow the device to grow with him. By having an idea of how much he'll grow within that time frame we are able to custom the device where he can use it until he has his surgery.
Engineering analysis 3
CAD Drawings
Our device is made entirely of fabric and stitching, but to give a visual here is a rigid 3-D model and the model of the pressure pad.
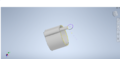

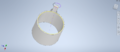
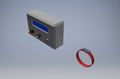
Pressure Pad
Bill of Materials
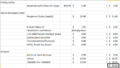
Budget List
Assembly Instructions
The assembly will be done by us, sewing all the pieces together by using zig-zag and flat lock stitching.
Fabrication Process
Insert pictures of fabrication process
Testing and implementation
Describe testing, delivery, how used/received by the family
Photos of Completed design
Insert pictures of the final product
Instructions for safe use
Provide a clear summary of safe use for the family. Do not use the device unless supervised by an adult that has been fully understood the safe use of this product.