Hear on Demand
Abstract
The overall goal of this project is to use 3D scanning and printing to accelerate the manufacturing process of children's hearing aids with the goal of reducing lead times to less than 1 day.
Team members
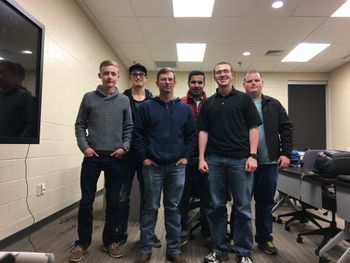

Talal Almutairi

Jon Cardenas

Alex Dye

Anthony Kratz

Matthew Owens

Chris Stringer
Problem Statement/overview of the need
Current lead times for production of children's hearing aids can be in excess of 4 weeks. Children out grow hearing aids at an accelerated rate compared to adults. In some cases, children can out grow their hearing aids in as little as 4 weeks and appointments for new hearing aids can take an additional 4 weeks to schedule. Thus, some children run the risk of going over 8 weeks without a properly fitting hearing aid. The overall goal of this project is to use 3D scanning and printing to accelerate the manufacturing process with the goal of reducing lead times to less than 1 day.
Design Specifications
- Material should be very flexible and have good gripping properties.
- Hearing aid should not extend too far into the ear canal.
- Hearing aid MUST have a snug fit to seal off the ear canal to prevent audio feedback.
- Material should be approved for medical use.
Background research
A company called Widex currently manufactures 3D printed hearing aid shells. These hearing aid shells are the style of hearing aids that have in-ear electronics. They manufacture these by taking a silicone impression of the patients ear and scanning the impression to a computer program. This program converts the 3D scan into an image that is ready to be printed. They are using an SLA 3D printer to make these shells. There have been over 10,000,000 3D printed hearing aids sold so far.
The current 3D printed hearing aid shells seem to be more focused on perfect fitment rather than manufacturing time. After the impression is taken the digital image still has to be sent to a manufacturer, causing the production of the hearing aid to take longer. The current 3D printed hearing aids are shells with all of the electronics inside the shell. These are different from ours where the electronics will be completely behind the ear and the part we would be manufacturing would just be an ear insert with a hole for the tube.
Sources:
http://www.sonova.com/en/features/3d-printing-technology-improved-hearing http://www.widex.pro/en/evidence-technology/technological-excellence/camisha https://audicus.com/hearing-aids-3d-printing/
Conceptual Design
The basic idea of the project is to 3D scan a hearing aid, then to 3D print said hearing aid into a scaled version. We connected these two processes via an algorithm.
Overall Approach
The overall goal is to be able to take the scanned model and scale it multiple times in software, print and deliver multiple hearing aids of slightly increasing size. Thus allowing the patient to choose the optimal fitting hearing aid, and decreasing the frequency in appointments for new ear molds.
It's important to note that, with scanning, each scan and any scan manipulation could be outsourced or automated for expedited completion.
Scanning Concept 1: In-Ear Scanning
In-ear Scanning: A scanner is used to directly scan a child's ear canal and obtain a 3-D model.
- Pros:
- Easy
- Potentially fastest option
- Fully Dimensioned
- Least Intrusive overall
- Cons:
- Scanner Capability
- Requires expensive equipment
- Requires Children to stay still
Scanning Concept 2: Scanning a New Earmold
New Earmold: Use an earmold kit and take a new earmold of a child. Scan this earmold and replicate.
- Pros:
- On-site
- Fully Dimensioned
- Potentially Best Fit
- Cons:
- Most Intrusive
- Requires Children to stay still
- More steps and work for doctor or therapist
Scanning Concept 3: Scanning a Professional Earmold
Scan a Professional Earmold: Scan at least one professionally-done earmold and adjust in software for growth.
- Pros:
- On-site
- Quick
- Professional Fitting
- Cons:
- Potentially Worst Fit
- Dramatic Shape Changes
Production Concept 1: FDM Printing
FDM Printing: Use a FDM type 3D printer to print a hearing aid from a scanned model.
- Pros:
- Fastest Method
- Simplest Production Process
- Cons:
- Potential Dimensional Accuracy/Stability Issues
- Expensive/Difficult to source materials
- Additional finishing process
Production Concept 2: SLA Printing
SLA Printing: Use an SLA type 3D printer to print a hearing aid from a scanned model.
- Pros:
- Increased accuracy in printing
- Cons:
- Limited materials
- Longer print times
Production Concept 3: Print & Cast
Print & Mold: Use a 3D printer to print a "negative" mold of a hearing aid. Use the 3D printed mold to cast "positive" hearing aids in final material.
- Pros:
- Wide material selection
- Cons:
- Longest production process
Evaluate concepts/select candidate
Earmold Acquisition Decision Matrix
| Criteria | In-Ear | New Mold | Pro Mold |
|---|---|---|---|
| Estimated time to output | 5 | 3 | 4 |
| Estimated Post-Processing Time | 1 | 4 | 4 |
| Detail Captured | 1 | 4 | 5 |
| Size of Materials | 4 | 2 | 3 |
| Expense | 1 | 3 | 4 |
| Ease-of-use | 3 | 2 | 5 |
| Repeatability | 2 | 3 | 5 |
| Dimensional Accuracy | 1 | 3 | 5 |
| Patient Comfort | 2 | 2 | 4 |
| Totals | 20 | 26 | 39 |
Production Methods Decision Matrix
| Criteria | FDM | SLA | Cast |
|---|---|---|---|
| Estimated time to output | 4 | 2 | 1 |
| Estimated Post-Processing Time | 5 | 4 | 1 |
| Resolution | 5 | 5 | 3 |
| Material Management | 4 | 3 | 2 |
| Material Selection | 1 | 4 | 5 |
| Material Expense | 3 | 3 | 2 |
| Device Expense | 3 | 3 | 3 |
| Footprint | 3 | 4 | 3 |
| Ease-of-use | 3 | 4 | 2 |
| Repeatability | 3 | 5 | 2 |
| Dimensional Accuracy | 4 | 5 | 2 |
| Customer Support | 4 | 4 | 2 |
| Totals | 42 | 46 | 28 |
- 5= most desirable ~ 1= least desirable
Winners:
Professional Earmold
SLA Printing
Detailed Design
Description of selected design
The Head on Demand production process will involve 3 steps:
- Scanning of an existing, conventionally manufactured hearing aid using a 3D laser scanner.
- Processing, including digital scaling, of the 3D file produced by the 3D scanner.
- 3D printing of the hearing aid using an SLA type 3D printer.
Detailed description of selected design
Step-by-step Process: 1) Place the current hearing aid on the scan platform where the innermost part of the hearing aid is facing away from the base of the spike. If the hearing aid is clear, be sure to use the packaged chalk duster, so the part can be seen by the scanner. Turn on the scanner.
2) Open the scanner software and calibrate the scanner. Start the scan. Align the scans if not self aligned. Regenerate the mesh to fill in the gaps from the imperfect scan. Repeat the scan and cycle. Fuse the scans and export the file.
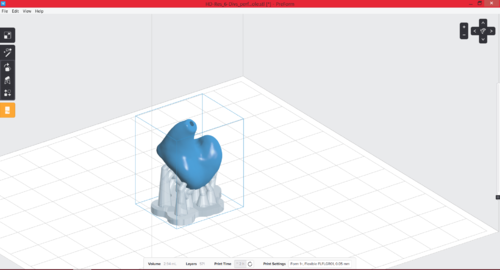
3) Open Meshmixer and upload the stl. file. Make the part solid, use the smooth function and add a hole for the plastic tube. Place the hole so it matches the old hearing aid. Export the part.
4) Turn on the printer. Insert the liquid resin into the tray up to the designated line. Import the part file to Preform (printer software) and arrange the hearing aids on the platform. Generate the automatic supports through the printers software. Select print.
Analysis
To complete the Hear on Demand project we primarily needed to consider 3 things; a printer, a scanner and a reasonable material. We needed the printer to print smooth parts, a scanner to take well developed scans and a flexible material.
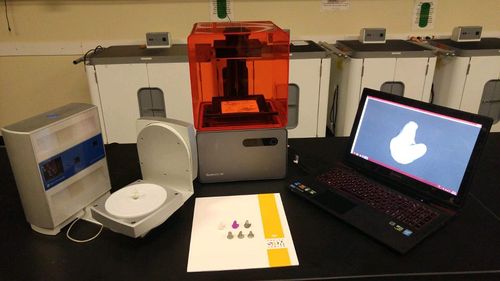
Engineering Analysis: 3D Scanner
For this project, we needed an easy-to-use and accurate way to scan the earmolds. We determined that the NextEngine HD Scanner suited our needs best. It provides a resolution of up to 40,000 points/in². This resolution provides the most dimensionally-accurate and detailed 3D model of the earmold compared to comparable scanners. The scanner software is user-friendly and provides powerful functionality to prepare the scan for post-processing, such as trimming extraneous data points and fusing the scans into a single file. The scan itself requires minimal preparation, and the majority of the scanning process is automated.
Engineering Analysis: Material
For this project we needed to match as closely as possible the material of conventionally manufactured hearing aids. The current hearing aids are being cast using silicone so they are very flexible and have enough "grip" to stay inside the ear. We chose to use the FormLabs Flexible resin because it is flexible once cured and demonstrates properties similar to that of silicone. An added benefit to using this flexible resin with an SLA printer is when printed, the resin retains dimensional and thermal stability which is in contrast to similar materials used in FDM printers.
Engineering Analysis: 3D Printer

For this project we needed a 3D printer that would meet the following requirements:
- Affordable
- High Resolution
- Support for Users
- Wide Range of Materials available
- Compact
We decided to go with the FormLabs 1+ SLA 3D printer. The reason we chose the FormLabs printer is because FormLabs produces the most advanced SLA 3D printers on the market and provides support for their printer. SLA (Stereolithography) 3D printers use resin that is cured by a laser rather than extruding plastic filament. By using this technique SLA printers can achieve much higher resolutions than a standard FDM (Fused Deposition Modeling) printer. An SLA printer can print resolutions of up to 25 microns layer thickness while FDM printers only print up to 100 microns layer thickness. SLA printers also have a wide range of materials available. One of the materials that is already on the market by FormLabs is their flexible resin. This is a resin that when cured has flexible properties. For making ear pieces that fit snuggly into the ears the flexible properties will help the ear piece to make a tight seal with the skin.
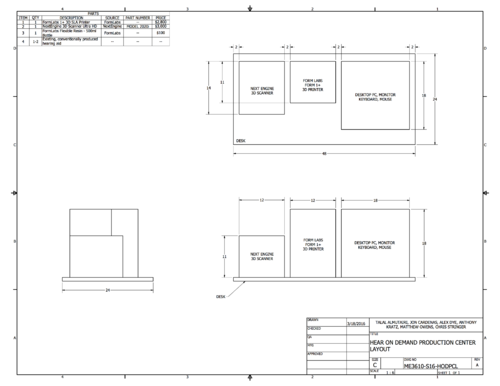
CAD Drawings
Bill of Materials
| ITEM | QTY | DESCRIPTION | SOURCE | PART NUMBER | PRICE |
|---|---|---|---|---|---|
| 1 | 1 | FormLabs 1+ 3D SLA Printer | FormLabs | -- | $2,800 |
| 2 | 1 | NextEngine 3D Scanner Ultra HD | NextEngine | MODEL 2020i | $3,000 |
| 3 | 1 | FormLabs Flexible Resin - 500ml Bottle | FormLabs | FLGPGR01 | $100 |
| 4 | 1-2 | Existing, conventionally produced hearing aid | -- | -- | -- |
| 5 | 1 | Meshmixer - 3D Software | AutoDesk | -- | Free |
| 6 | 1 | Desktop PC | -- | -- | ~$1000 |
Assembly Instructions
Scanner: There are two cables. One needs to to go to a power source, the other to the computer. Install software if needed.
Printer: There are two cables. One needs to go to a power source, the other to the computer. Install software if needed. The SLA printer will need to have the fluid poured into the tray to the given max line.
Computer: Plug in the power cable and receive the previous cables.
Fabrication Process
Testing and implementation
At first we found the desktop scanner worked well with the hearing mold shape. However, we wanted to see if you could scan the inside of an ear in hopes of skipping the process of having a readily available mold impression, yet we were unsuccessful. The desktop scanner worked well but it did not create the perfect scan, to combat that we proceeded to test a series of softwares to produce a complete solid (filed) meshed scan. We found that scaling the scan to be a huge issue, with such a complex shape of the hearing aid. To solve this problem we created and tested/ printed 3 optional designs one more compliant than the next, to achieve a more scaleable hearing aid mold. We proceeded to print with two different qualified materials in hopes that we could find one that best suites our needs. By doing so, we found that the properties of the Formlabs Flex are more desirable than the other material's.
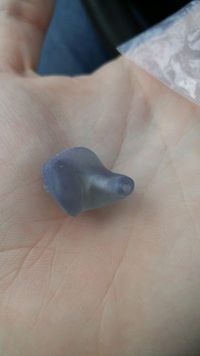
Photos of Completed design
Instructions for safe use
Do not use this system unless fully trained and aware of associated dangers including, but not limited to:
- the moving parts in the scanner and printer.
- laser light emission by the scanner and printer.
- hazards associated with the uncured resin.
Adult inspection of the earmold for damage should occur before a child inserts an earmold into their ear. Do not attempt to use a damaged earmold.
Project Summary, Reflection
Through testing and research, we have determined that the FormLabs printer and NextEngine scanner combination provides the most cost effective and expedient production of hearing aid molds for children at this time. This hardware combined with the ear growth algorithm and manipulation software provides a long term solution to the lead times currently faced by audiologists and therapists. We believe that once this system is implemented, the overall quality of life for affected children will be greatly improved by reducing the amount of time required for a fitted earmold to be available.