Light sensory device S15
Abstract
The client in our project is mostly blind. She can see well-lit colors, and her favorite color is purple. She wants a device that will enable her to be visually stimulated, but also wishes to have more than just sight incorporated into the project - a multi-purpose sensory device.
It is our goal to deliver a product that will entertain her, while also helping the development of her fine motor skills, and improving reaction time.
Team members

From Left to right:
- Ian Dove
- Wes Copeland
- Ethan Little
- Andrew Norton
- Nic Young
Problem Statement/Overview of the Need
This project is going to be an at-home game for the client. As she already has a great deal of visual stimulation at school and a toy that is designed to help students with visual disabilities - the design needs to be somewhat portable, while maintaining applications over portability. An under-clocked bop-it is the basic design of this project.
Design Specifications
1. Multiple devices to pull, twist, bop, or squeeze in order to exercise fine motor skills.
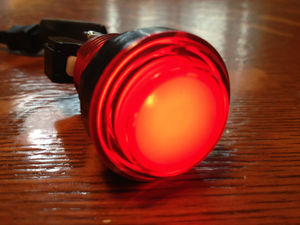
2. "Stand-by" Lights - To act as a between-games waiting element.
3. Multiple types of surfaces on the device to help make a physical connection with the function of each apparatus.
4. Weight/Portability - The device needs to be small and light enough so that it can be transported by a child.
5. Audio - to provide functionality for the game and the ability to play music.
Background research
- Basic Description of Need:
- -There is not much in the toy market designed to help children that are visually impaired.
- -What few toys are available, most of them are very expensive and difficult to set-up or configure.
- -Our goal is to provide our client with something that the market cannot offer: A toy/sensory device that works for HER.
- Further Description
- The client has a Bop-It game already that she enjoys, but the bop-it is too fast-paced, and she often
- gets frustrated. Therefore, one of the game modes in our device will be a bop-it style game that allows her
- to play at a slower pace.
- What we found already on the Market:

- Final Notes On research:
- We decided to design this project completely from the ground up, because there is a serious lack of options
- on the market. While there are a few interesting toys, there seems to be a large age gap in the area of
- interest to this project. We didn't want the device to seem too childish for the client, but also want the
- device to challenger her as she gets older still.
Conceptual Design
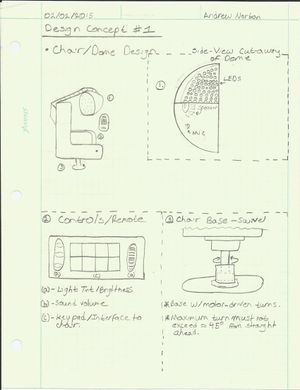
- (02/02/2015)
  At this point, our design will consist of a chair (possibly with motors to turn the chair) attached to a dome-shaped element that

  will act as the visual stimulation unit, incorporating LEDs and sound to give an immersive experience.
- (02/18/2015)
  After talking with the social worker at the client's school, it has come to our attention that the client would prefer a device

  that more closely resembles a toy/entertainment device rather than something that will not move from one spot. The device will be

  needed at home, so we will make it portable (rechargeable batteries) with the ability to be a stand-alone speaker for her music.
Design Concept 1
- This design used a chair and dome/screen as the main apparatus for delivering stimuli. The dome or screen would feature LEDs for visual stimuli, and speakers would be attached to the chair for music. A controller of sorts would be used to play games and adjust the music, allowing complete immersion into the media being used.
- This design was eventually deemed too involved for us this semester... there would have been a lot of electrical work and programming in addition to the mechanical devices needed on the swivel base. All of this would be possible, but very labor intensive and time consuming. Not to mention the dome needed a lot of conceptual work.

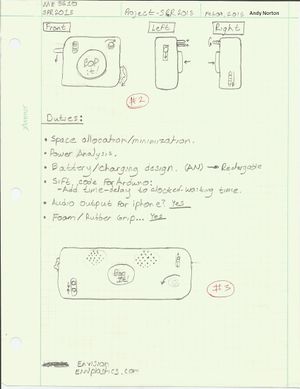
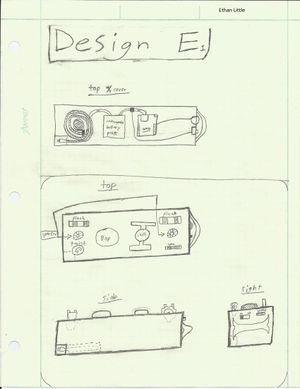
Design Concept 2
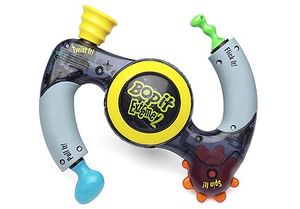
- This design is more like what was being worked on last semester.
- This design is basically a slowed-down bop-it game, with sound clips of Taylor Swift (client's favorite Singer) incorporated. The design of the toy is a lot different from the original toy however, using more inputs, more game modes, and a layout aimed at setting in your lap, or on a surface while you play it.
- The design features several bop-it style inputs, speakers, a sturdy handle, buttons to control game mechanics (power, game speed, etc.), and the circuitry and power utilities needed to run the device.
- Most of us being Electrical Engineering students, this is the direction we decided to take. This is our best project model, and our final design will resemble the following drawings:
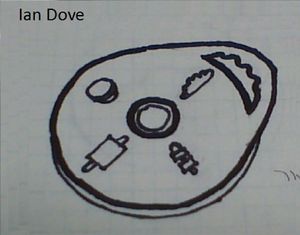
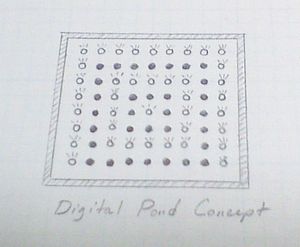
Design Concept 3
- This was an early design concept that relied heavily on the client's ability to see colors and differentiate between them. After talking with the family, social worker, and the previous team, it became apparent that this would not be the best product for the client.
- The client already has a device similar to this one at school, so a little more variety would be best.
Evaluate concepts/select candidate
The following table is an unscientific evaluation of the designs' ability to meet the needs of the client. The ability to do so is given a rank between 1 and 5 (1 being the least favorable and 5 being the highest).
| Concept | Portability | Immersiveness | Senses Incorporated | Ability to complete in time allotted |
|---|---|---|---|---|
| Design 1 | 0 | 5 | 4 | 1 |
| Design 2 | 5 | 3 | 3 | 5 |
| Design 3 | 5 | 1 | 2 | 3 |
Final Tally:
- Design 1: 0 + 5 + 4 + 1 = 10
- Design 2: 5 + 3 + 3 + 5 = 16
- Design 3: 5 + 1 + 2 + 3 = 11
- Design 1: 0 + 5 + 4 + 1 = 10
The results of the evaluation indicate that we should pursue the second design concept.
Detailed Design
Description of selected design
- Project Design Concept 2 is our final design choice. In this design, a "Bop-It" style design is implemented. There are a series of inputs that react in different ways, depending on the game mode in use.
- Game Modes:
- "Bop-It" game type with more inputs designed specifically for the client's needs.
- "Creative Mode" where the user is able to play notes on a range of octaves.
- "Sound Test Mode" where the user can play with the sound samples heard within game mode.
- "Bop-It" game type with more inputs designed specifically for the client's needs.
Detailed description of selected design
- Input Devices:
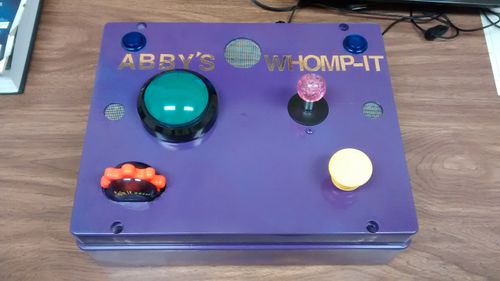
- Massive Button - Front - (Functions as the "Bop-it" input)
- 8-Directional Joystick - Front - (Functions as a game mode selector, and Octave selector respectively)
- "Twist-It" Mechanism - Front - (Twisting mechanism as game input that exercises fine motor skills)
- "Spin-It" Mechanism - Front - (Spinning motion to follow similar motor skill improvement as the "Twist-It")
- Six [6] "Squeeze-It" buttons - Front/Top - (Mechanism to help grip strength and fine motor skills)
- Massive Button - Front - (Functions as the "Bop-it" input)
- Specific Game Mode Operation:
- Bop-It: In this game mode, a Bop-It style game is implemented where the required input is told to the user by audible and visual means
- (the input is "Told" to the user through the speakers, and the device to be manipulated is lighted using Ultra-Bright LEDs). The only
- way to fail is to let the clock run out (time allowed is longer than the original bop-it game), and giving the wrong input does
- nothing (rather than resulting in failure).
- Creative: In this game mode, the user plays notes by pressing each input device. By changing the orientation of the joystick, different
- octaves are generated, creating a large range of possible notes.
- Bop-It: In this game mode, a Bop-It style game is implemented where the required input is told to the user by audible and visual means
Analysis
The Analyses to be conducted / that have been conducted are:
- Cost / Availability Of Parts Analysis
- Optimization of Internal / External Space (Electronics)
- Minimization of noise in Circuitry (RLC Circuits)
- Cost / Availability Of Parts Analysis
Engineering analysis 1
- Colors of lights, buttons and input devices had to be changed/altered due to lack of availability.
- Cost is always a constraint; Thus, after the necessary electronics were purchased, the remaining elements were
comparatively cheap.
Engineering analysis 2
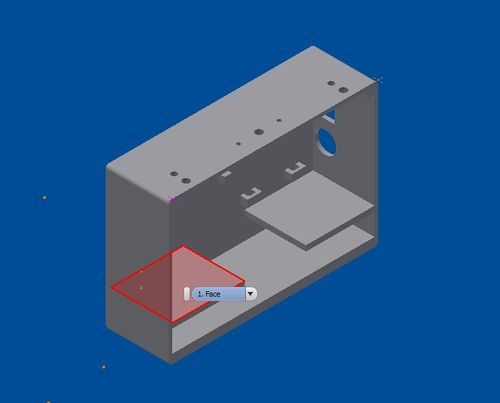
- CAD Drawing has been changed several times to minimize surface area of the face, due to project enclosure dimension limitations.
- Position/Location of input devices changed to account for the physical shape of enclosure used.
Unfortunately, we were unable to get a 3D-Printed box for this project, and had to use the backup enclosure. This was not a
deal breaker, however, and everything still works as planned, and looks just as good as the original design.
Engineering analysis 3
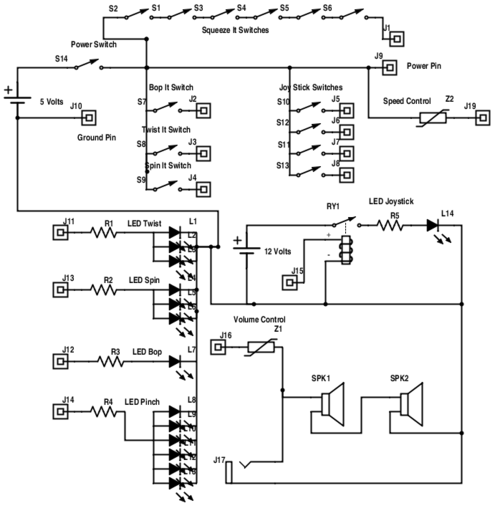
- Ohms law was used to calculate the ratings of the resistors used for the LEDS. We used 100 ohm resistors for each LED.
 There was a lot of testing and retesting in this project due to the wiring conventions we adopted. After we realized the wiring and

software issues we had, we were able to single out the problem and figure out a solution. Most of the work done after the design was

completed was debugging the code and figuring out the "hidden grimlins" that were plaguing the game.
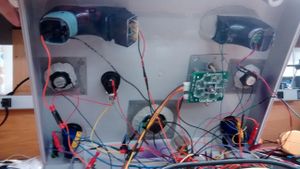
- This is the schematic of the circuitry that will drive the main game of our design.
Engineering analysis 4 - Sounds - Voice Shield
- This project has a LOT of software and programming involved. As such, it was imperative from day 1 to begin the programming.
- Andrew Norton was in charge of programming the Voice Shield to interface with the Arduino, so that commands and prompts.
would be given to the user, and the user can then respond by giving the desired input.
- The voice shield records sounds in real-time, and saves them to specific memory locations. As such, the level of input audio.
had to monitored closely to avoid clipping of the sound being recorded, because this would cause replayed audio to be unclear
and rather unpleasant to hear.
- In addition to this, there were a few complications using the voice shield. For instance, the sound bytes cannot be recorded in sizes smaller than 1 second each, so we had to figure out a way to allow the Arduino to continue working while the sounds are playing. This was accomplished by forcing the Arduino to play a NULL sound, and then moving on in the code when the sound has initiated, thus freeing up the Arduino for other tasks.
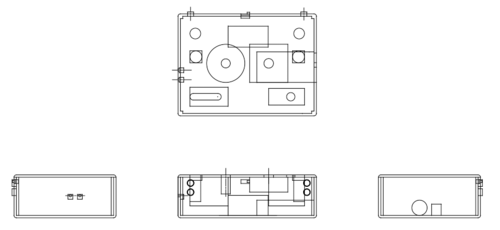
CAD Drawings
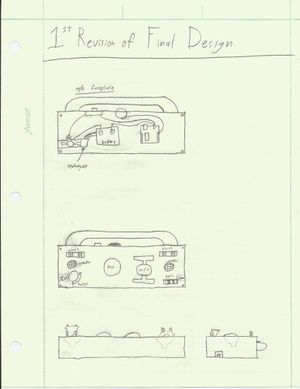
CAD Design Rev 1:
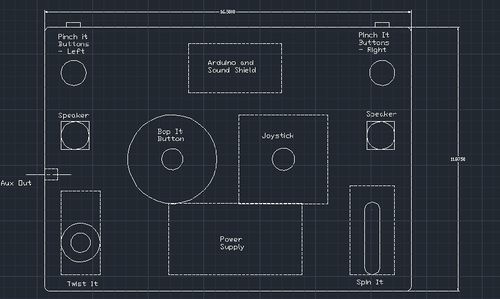
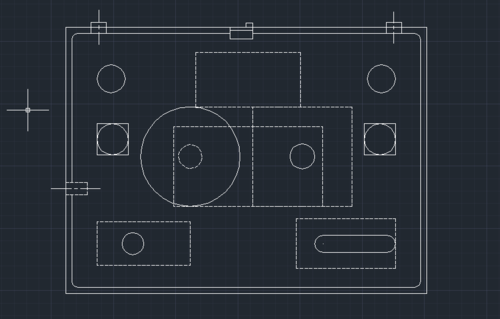
- Face/Top View:
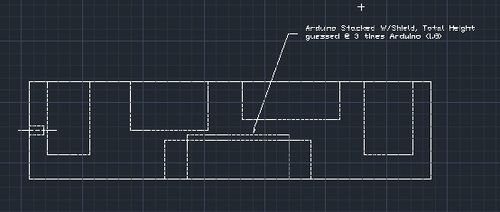
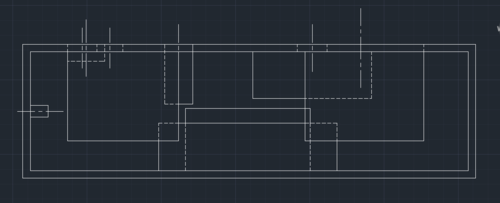
- Front View Rev 1:
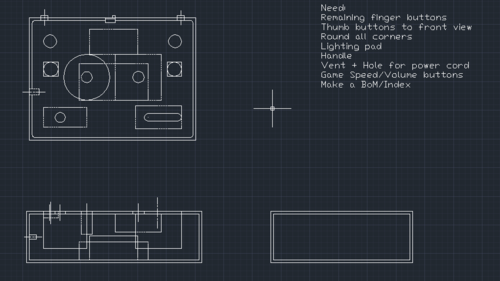
- Updated Full View Rev 2:
- Updated Face/Top View Rev 2:
- Updated Front View Rev 3:
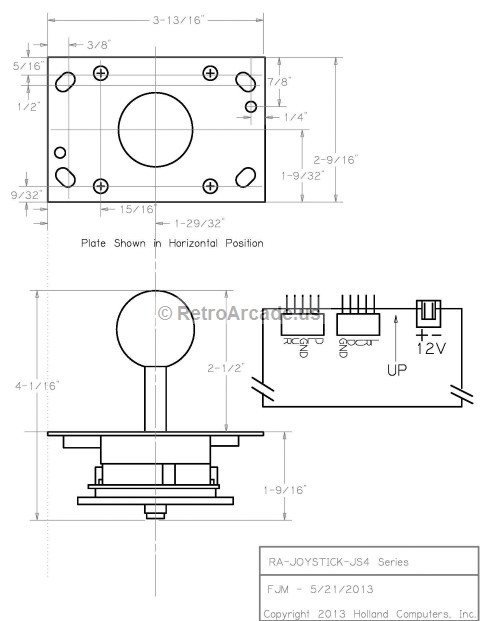
- Joystick Dimensions (No change):
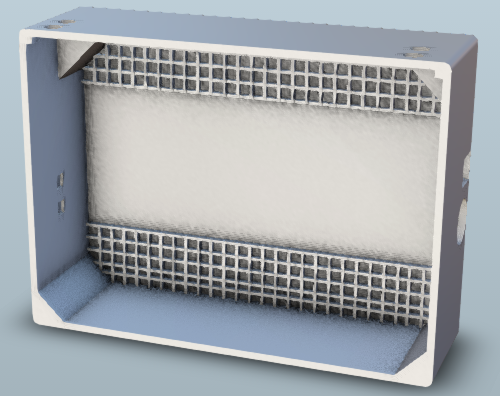
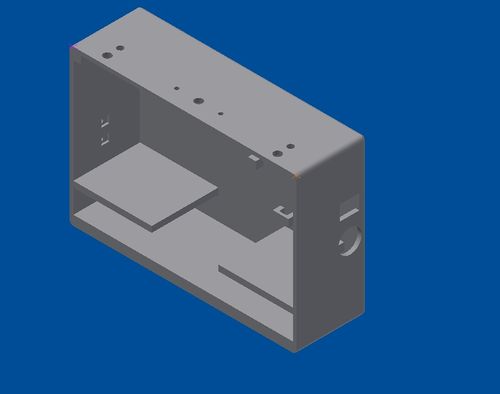
- Updated Inside View Rev 4
- Updated Box Lid Rev 4

- Updated Box Rev 4
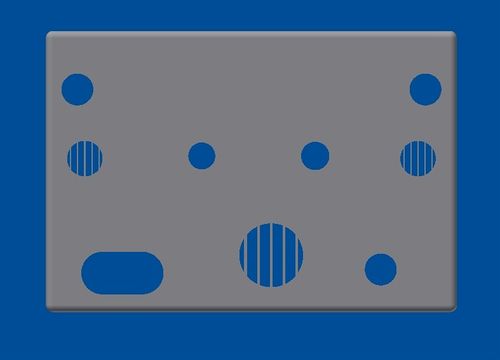
Final 3D-Printer Drawings
- Final Box - Face:
- Final Box - Back:
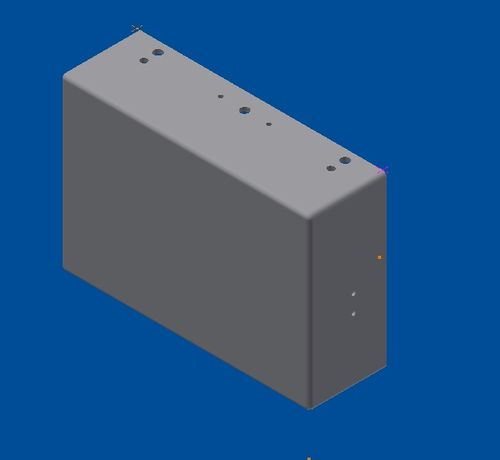
- Final Box - Bottom-left View:
- Final Box - Bottom-right View:
Bill of Materials
| Class | Item Name | Description | Source | Quant. | Price | Total |
|---|---|---|---|---|---|---|
| Switch | Twist it | From old Bop-it | a Bop it | 1 | Free! | Free! |
| Switch | Bop it | Large green button, self lighting | Adafruit | 1 | $9.99 | $9.99 |
| Switch | Squeeze it thumbs | Blue translucent buttons | Paradise Arcade | 2 | $2.75 | $5.50 |
| Switch | Shift it joystick | Joystick, pink, self lighting | Ebay | 1 | $24.95 | $24.95 |
| Switch | Spin it | From old Bob-it | Bop It | 1 | Free! | Free! |
| Lights | LEDs | Ultra bright white LEDs, 6 to a bag | Spark Fun | 1 bag | $9.95 | $9.95 |
| Lights | Thumb LEDs | LED lights for thumb buttons | Paradise Arcade | 2 | $1.75 | $3.50 |
| Controls | Power Switch | Turns item on/off | Pololu | 1 | $5.95 | $5.95 |
| Audio | Small Speakers | 1-1/4"Diam. | Parts-Express | 2 | $3.65 | $7.30 |
| Audio | Large Speaker | Diam. | from Bop it | 1 | Free | Free |
| Boards | Arduino Mega | Main Board | Adafruit | 1 | $45.95 | $45.95 |
| Boards | Voice Shield | Audio Board | Spikenzilabs | 1 | $55.95 | $55.95 |
| Power | Power Supply | Seasonic 250SU 250W 80Plus 1U Server Power Supply | Amazon | 1 | $47.70 | $47.70 |
| MISC | Wire | For Connections | Already Had | As Needed | Donated | Donated |
| MISC | Resistors | 47 ohm | Already Had | 6 | Donated | Donated |
| MISC | Case | Gray Plastic Box With Lid | Tier1 Automation | 1 | $48.00 | $48.00 |
| MISC | Heat Shrink | To Cover Solder Joints | Lowes | 2 bags | Donated | Donated |
| MISC | Bullet Type Connectors | To Connect components | Lowes | 2 boxes | Donated | Donated |
| MISC | Spray Paint | Krylon Cover Max Plum | Already Had | 2 cans | Donated | Donated |
| MISC | Spray Paint | Krylon Nickle | Already Had | 1 Can | Donated | Donated |
| MISC | Plastic Screen | To Cover Speakers | Already Had | 3 | Donated | Donated |
Assembly Instructions
Plug in the power cord then follow written Instructions below.
Fabrication Process
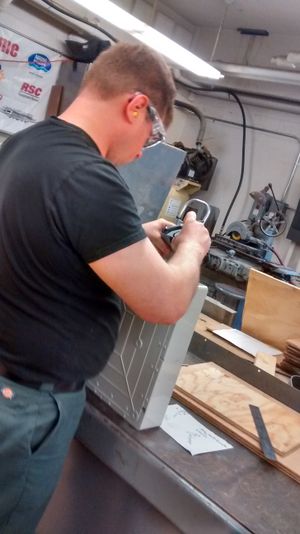
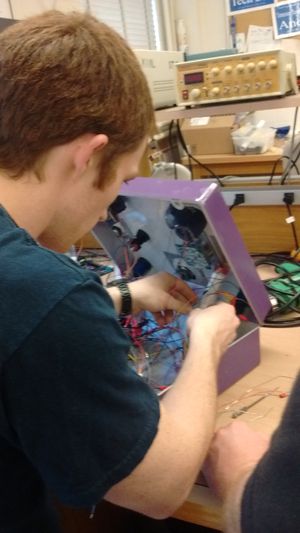
- Ian Dove Working on Box:
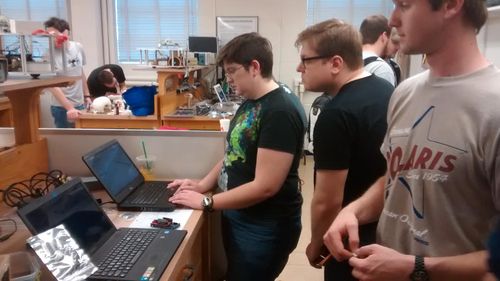
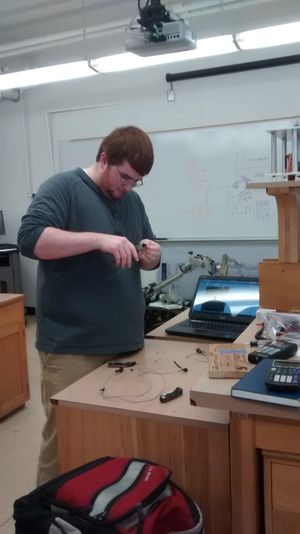
- Working in the Mechatronics Lab:
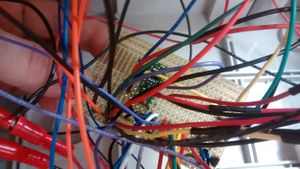
- Working on the wiring and installation :
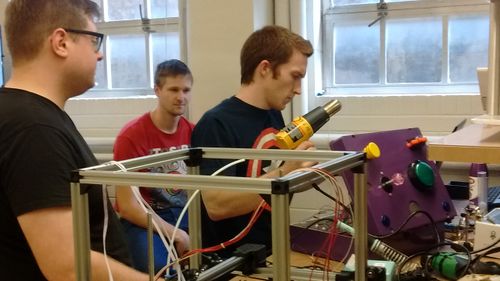
- Close up on wiring work:
- Wes Stripping Wires:
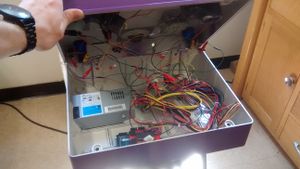
- Inside the Box:
Testing and implementation
- Testing involved countless hours of debugging the code, testing the gameplay, and repeating the process. It was a long and arduous process,
but it was well worth the effort to get everything perfect for the client!
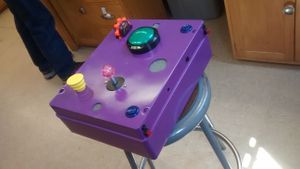
- When the "Whomp-It" was given to the client, she was more than pleased with our design, and was very happy that she would get to take it
home. It is my hope that she gets as much enjoyment out of it that we got by building it!
- The client seemed excited to get to work playing it and we hope she enjoys it for years to come!
Photos of Completed design
- Box: Left Side:

- Box: Right Side:
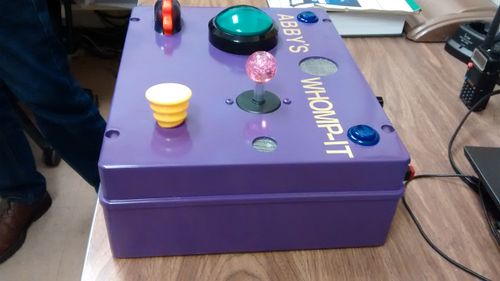
- Box Face:
Instructions for safe use
For safe and proper use follow these instructions
1. Attach the power cord to the device.
2. Press the Power button
3. Choose one of three modes by selecting one of lit button combinations.
- Game Mode
- Music Mode
- Sound Test Mode
3.1 Game Mode - Select by pressing the Tap button.
- Wait for instructions then give appropriate response.
- (Many input combinations are involved when asked for by the game mode.)
- Wait for instructions then give appropriate response.
3.2 Music Mode - Select by pressing all six Squeeze It buttons simultaneously.
- The Joystick controls the notes and combinations of the Spin and Tap buttons control which octave the user wishes to play.
- The Joystick controls the notes and combinations of the Spin and Tap buttons control which octave the user wishes to play.
3.3 Sound Test Mode - Select by activating the Twist It
- This mode allows the user to play with the sounds heard during game mode.
Supplemental
The Volume knob adjusts volume of the large speaker at all times.
The Speed knob adjusts the speed of the game when user is playing in the game mode.
To quickly change between modes turn off then turn on the device. Then pick the desired mode.
- Otherwise the user can wait 30 seconds. Then the player can choose the other mode if so desired.
When not in use the device will turn itself off after some time has passed.
Warning: The power button will turn off the device at any time when pressed. Even if it is pressed accidentally.
- Product testing is limited to proper function.
- Intended Use Only
- Product testing is limited to proper function.
- Instructional Video:
https://www.youtube.com/watch?v=5w4mUezP0bc
- Example of Game played in the dark:
https://www.youtube.com/watch?v=19LmeFYu2QI
If further questions exist, please refer to the operations manual.
Project Summary, Reflection
Final Version of the Program Code
- I know I speak for the whole team when I say that we had a blast making this project. It was a learning experience with a lot of "ups and downs"
and we are all better Engineers and better people for this project. After seeing the excitement on the clients face, I would happily do this
again in a heartbeat.