Mechanical Horse V2
Abstract
The child has no leg and upper torso mobility. We will refer to this child as Josef. He needs a mechanical horse that mimics a horse's movement for therapy. Currently, other options for therapy are not well designed for limited mobility, take extended amounts of time to mount, are cumbersome to have around the house, and are uncomfortable for Josef. He needs a mechanical horse that can be mounted quickly and safely while also being comfortable.
Team members

- Team Members: Brandon Patel, Ben Sexton, Josh Steele, and Thilina Achchillage
- Continuation of Project from Fall 2019 by: Collin McCuiston, Zachary Layne, Kelvin Encalada, Nathaniel Coleman, David Montero Olivares
Problem Statement/overview of the need
A family with a child who suffers from mobility, balance, and posture issues has traditionally used horse riding therapy to help treat their child’s cerebral palsy and epilepsy. The current therapy program that the family is a part of is very inconvenient due to its location being very far to travel with a child who has Josef’s condition, as well as the fact that many aspects of the treatment cause discomfort to the child. Therefore, the family needs a therapeutic toy that not only replicates the benefits of the horse therapy at home, but also supports the child’s condition without any discomfort or safety hazards. Based on feedback from the family from the previous attempt of this same project, most everything seemed to look good except the overall size. The size of the previous iteration was quite large and wouldn't really fit in a typical home. The horse still needs to have the ability to grow with the kid, but can't also be 5+ feet in length.
Design Specifications
1. List of design specifications. Some of these must be quantitative and measurable. You should be able to use these to compare design options.
The major design requirements are that we minimize the space that the horse takes up while maintaining horse like characteristic, safety to the rider, and that it is easy to perform maintenance.
Size requirements: The horse as is is currently to large for daily use. The clients living room is currently filled with various equipment for the care of Josef. It would be beneficial for the horse to be as small as possible while maintaining the horse riding mechanism. Additionally, the client would like the horse to be able to adjust based on the size of the child, so that Josef can continue to use the horse while growing. We are currently planning the total length of the horse body to be 3 feet, with the attached horse head allowing more room to lay down. However, this can change a bit. Additionally, the client would like the horse to sit lower to the ground than currently, somewhere around 32 inches in height, so the client can lift Josef onto the horse easier. The total width of the horse mechanism would have to be less than 31 inches to fit through the door. One minor concern regards the stirrups. The stirrups need to be ridged in order to keep Josef's legs straight to maintain circulation of blood in his legs, and they need to be able to rotate and extend to best fit the various positions Josef takes on the horse.
Safety to the rider and the operator are also very important to our design. The movement mechanism needs to be created so that it contains the least amount of safety hazards due to pinching of body parts between moving objects and mechanical failure. The horse needs to be sturdy enough for regular use without fear of breaking. Since Josef does not have full control control of his body, he must not be able to catch any body parts in any moving mechanism by accident.
The last major concern is the how easy the maintenance of the horse is. This horse is being designed to last several years with little to no interference from TN Tech personal. The client needs to be able to fix any mechanical issues that arise with very little cost or expert mechanical training, and without having to recontact Tech to send someone out to fix it.
Background research
1. What exists already, similar products 2. availability 3. identify gaps in existing products or technology to be addressed
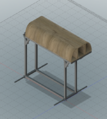
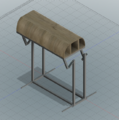
Here is the current horse as designed last semester.
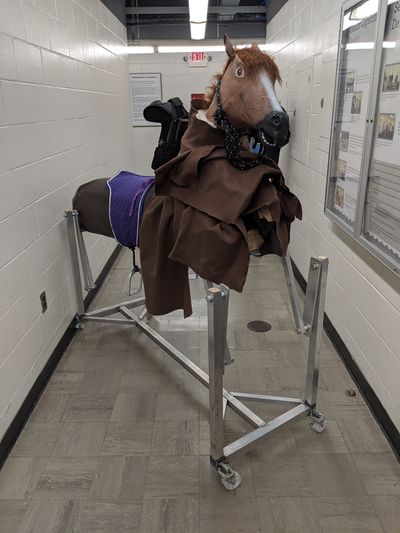
As you can see, this horse is quite large and does not seem very child-friendly.
The swinging arms also rub on each other and inhibit free movement of the mechanism
https://equicizer.com are the leaders in the home horse industry
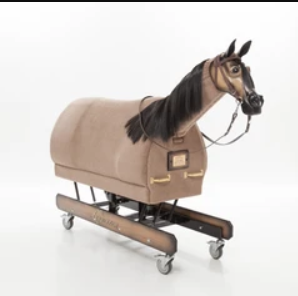
From their website:
- "Get back in the tack or improve your position and develop the muscles you need to create a happy and harmonious ride with your horse.
- Thousands of Equicizers are used by equestrians around the world in private homes, businesses, barns, gyms, rehab and therapeutic riding centers delivering fitness, weight loss and riding confidence! Discover how you can build a better foundation for your riding in the comfort of your own home without the monthly expenses of a real horse."
Conceptual Design
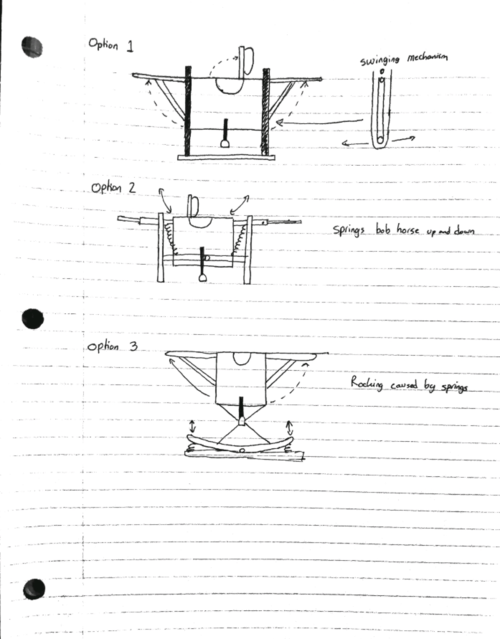
Option 1 is the current swinging mechanism of the mechanical horse, as designed last semester. It is based on two swinging bars, one connected to the base, and one horse, which are linked together. They produce a pendulum motion like that mimics the movement of a horse. This is the simplest of the three designs, and a lot of the design work has been completed with this method, but there is still some fine tuning needed with the arms.
Option 2, the horse is allowed to pivot around the bottom of the horse’s trunk. Four springs are attached to the horse’s trunk, one to each corner. This would allow the horse to rock back and forth, in a see-saw manner. This is the most complicated of our designs, and also could pose some safety risks to the child.
Option 3 is based on rocking horses. The horse is attached to the base by a set of rockers. These rockers have springs placed at each end, which push their end of the rocker up, while pushing the other end down. This would rock the horse back and forth. This design is a good combination of simplicity and easy to produce, but the upkeep of this horse could be complicated.
Evaluate concepts/select candidate
Detailed Design
Keep everything the same from previous semester, except:
- Reduce the length of the body to 3ft, and reduce the height to 32 inches
- Removable horse head made kid friendly
- Non rotating back wheels (more stable while swinging)
- Bigger vest/ locking seating mechanism
- Improved/fix swinging mechanism (less rubbing/sway to stop )
- Improved stirrup (adjustable, but ridged)
- Needs to support 170 lbs
Description of selected design
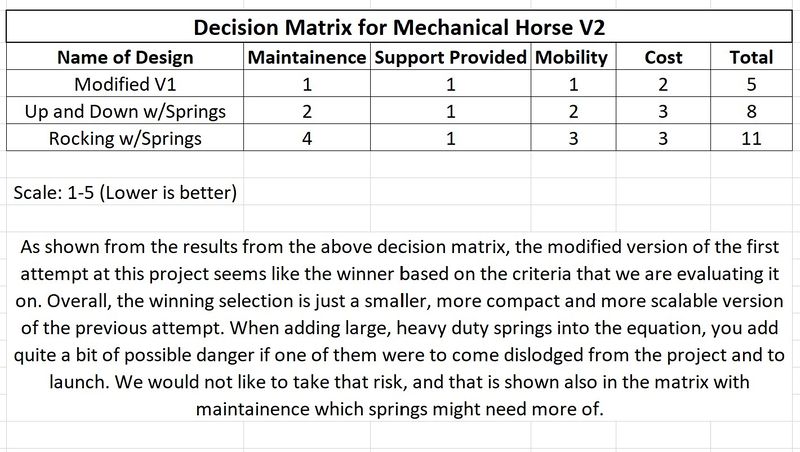
As shown from the above Decision Matrix, we have decided to work on modifying the model from the previous semester as it wasn't bad, just didn't fit the criteria like it needed to for the family. The overall size is being reduced so that it can be easily placed within the individuals living room area. The vest that was used from the previous semester was too small, especially to be able to grow with the kid, so the new design fixes that with a larger version of what was used. The head on the previous example was not the most kid friendly, so that is revised in our design for more visual appeal. Also the stirrups needed to be made ridged but also height adjustable as the kid would have problems with a flimsy stirrup.
Detailed description of selected design
As mentioned above, we chose to make some modifications to an already pretty stout design from the last iteration. The size and aesthetics are the major changing points of the design. First of all, the size of the last iteration was way too large in length and unnecessarily tall. This made the horse hard to transport as well as move around in the house for use. The height also made it more difficult for the child to be set into the harnesses as well as to be taken off. These are both addressed in our final design by reducing the overall length to around 3ft and reducing the standing height slightly. On to aesthetics, the horse was more or less functional but without much visual appeal or actual representation of an actual horse. Our plan was to make the overall shape more rounded and shaped like a horse to make it seem more realistic. We also want to change out the horse head, as the last iteration had a mask horse that can come off as creepy. We have not found a specific way to do so yet, but are still developing a plan for making it more kid friendly. We are planning on using a lot of the material from the last iteration to save on costs. The aluminum frame can be cut up and used as part of our own frame, as well as some of the wooden body can be used as we can cut and shape it to our needs. The mechanism for swinging is also staying similar as the motion was alright, just had some issues with rubbing up against each other when moving, that is going to be fixed with our design with some better spacing between aluminum members of the frame and swinging members. Better caster wheels have also been researched so that the horse wont move as it is swaying. As of now, the horse likes to move on the ground even with the brakes on as it is swinging.
Analysis
Each of these three analyses is key to understanding how the horse will respond to active use. Our first analysis determines the degrees of freedom that the horse's motion has, which shows how close to an actual horse's movement is in comparison to ours. Our second analysis determines the amount of force required to tip the horse over, giving the maximum force that can be applied to the horse. Finally, our third analysis shows the amount of force applied to the horse's joints, and whether or not they can handle the weight.
Engineering analysis 1
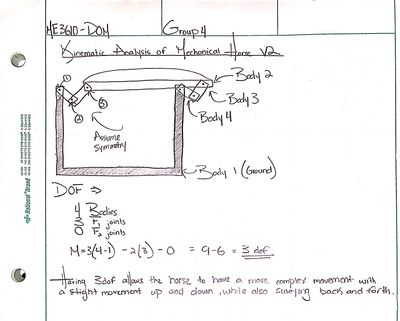
Here is a picture of the GIM analysis
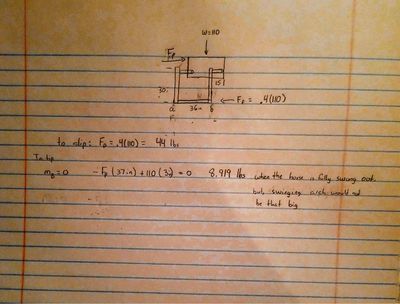
Engineering analysis 2
Required forces for tipping are calculated (With the child sitting on the horse)
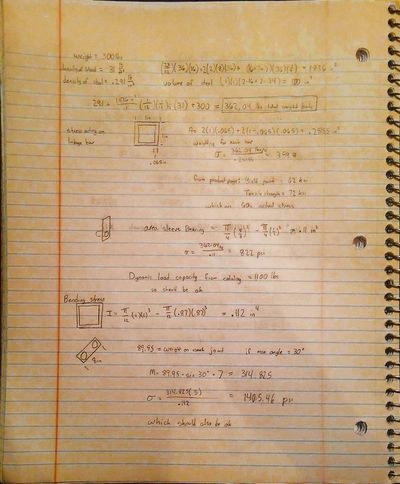
Engineering analysis 3
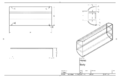
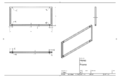
CAD Drawings
Orthographic view of the front of the main horse assembly consisting of the horse body and supports.
Orthographic view of the back of the main assembly.
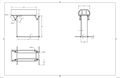
Drawing with some dimensions.
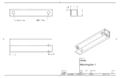
This is the part of the horse that the child will sit on.
This is the "Skeleton" of the horse. It supports the weight of the mechanism
Linkage that connects the body of the horse to the frame.
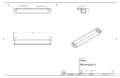
Linkage that connects the body of the horse to the frame.
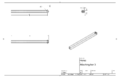
Leg that swings out to give more stability when the horse is being used.
Bill of Materials
One 2x8 8ft wooden boards, Lowes, UNSPSC code 30103600,$9.48
One 1in*1in 24ft Steel pipe, www.metalsdepot.com, T11116, $25.68
One 1in*1in 12ft Steel pipe, www.metalsdepot.com, T11116, $16.01
One .5in*.5in 4ft steel pipe, www.metalsdepot.com,T11218, $8.20
Four TITAN 2-in Rubber Swivel Caster, Lowes, Model # 4035299NN, $5.48
One 8'*4' 1/4 inch thick plywood, www.plywoodcompany.com, sku: 25BEND84, $30.17
One 8'*4' 23/32 in thick plywood, www.homedepot.com, Model # 201428, $29.18
12 5/8 in outer diameter - 1/2 inch inner diameter sleeve bearing, www.mcmaster.com,2868T106, $1.51 each
One MAGARROW 65" × 1.5" Utility Straps with Buckle Adjustable 4-Pack, www.amazon.com, $11.99
One Linzy Hobby Horse, Galloping Sounds with Adjustable Telescopic Stick, Brown 36", www.amazon.com, $11.76
2 Yards of Airtex 0.5 16 oz High Density Foam, www.joann.com, Item number 2180313, $14.99
One Everbilt 1/2 in diameter, 36 in long steel round rod, www.homedepot.com, $6.63
Total cost = $204.13 without shipping
This did not include the cost of screws or fastening devices.
Additionally, we could reuse some parts from the original horse, but we created this list assuming that we would have to buy all the components. The overall prive would be lower if we reused some parts.
Predicted Assembly Instructions
1)Cut plywood and 2x8 to size, fasten as shown in the CAD model to create body frame
2) Attach foldable plywood on top of frame created in step 1
3) cut two 16 inch and two 34 inch sections of the 1in*1in steel pipe. Weld together to create base frame for the body
4) Fasten wooden upper frame to steel lower frame
5) drill four 5/8in holes into the steel lower frame, one on each corner
6) cut four 7in and four 8in sections of the 1in*1in steel pipe. Cut two 5/8in holes in each section, one on each end.
7)attach one 7in and one 8in, which are connected together using sleeve bearings, to the lower frame, on each corner
8) Cut four 29in, two 28in, and two 7.25in sections of the steel pipe. Weld the 28in and 7.25in sections into a rectangle, and weld the 29in sections upright on the corners of the rectangle
9) cut four 7.75in sections of the .5in^2 pipe, and weld them the bottom of the base, extending out from the sides, and attach the wheels to ends, on the bottom
10) Drill 5/8in holes the top of the 29in sections, and attach the body to these holes, connecting the body to the base through the free end of the 7in/8in links
Fabrication Process
Unfortunately, we were unable to complete the construction of the project due to the COVID-19 virus. We did not have the required tools to complete the project at our respective homes.
Design Ideas for a Team Going Forward
1) Use as much of the original horse as possible (steel pipes from the frame, some of the wood, joints in the swinging arm)
2) Make sure that the wheels lock solidly
3) a removable back brace to allow the child to lay down on the horse
Contact Info
If you have any questions regarding the design, please contact us at: Ben Sexton (615)-967-5617 brsexton42@students.tntech.edu Josh Steele (615)-838-6779 jpsteele42@students.tntech.edu Brandon Patel (954)-614-9922 bppatel44@students.tntech.edu