Mobile Sensory Toy
Abstract
The child is in need for a play area to stimulate the senses and provoke movement. This play area needs to be able to help the child learn to better navigate different obstacles. It also needs to have different types of sensory inputs that will help the kid to look around and to stretch his neck. We have found that this project will greatly benefit a local family that is in great need. The outcome of this project is to develop a potentially life changing piece of equipment for our child. In constructing the play area, it will teach us many lessons that can help us not only in real life applications, but also in the industry.
Team members
.jpg/600px-DOM_Group_(2).jpg)
Left to Right - Chandler Kerley, Nicholas Vazquez, Bradley Andrews, Paxton Smith
Acknowledgements: Dr. Canfield
Problem Statement/overview of the need
Our client is a family with a 1 year old child who was born prematurely. The family is looking for a play area that will help further his development as he grows older. The therapist has asked us to design an area that he can begin to crawl around on. They have asked for stairs, a slide, and sensory materials on the play area.
Design Specifications
1. The therapy area has to be optimized to provide as many different positions for the child's therapy sessions.
2. The therapy area should be feasibly mobile.
3. The therapy area should have a variety of materials.
4. The therapy area will be lightweight.
Background research
1. There are a few different products that we have looked at and explored; however, they do not meet the design parameters that we have. Some of these products would be good to build on, but they are different than what we are actually needing to develop in order to fulfill the needs that have been set before us.
2. These products are readily available, but it may not be very economical for us to follow through with these to start our project.
3. Some gaps in these products are that they do not fit our parameters and are not exactly what we need.
Conceptual Design
Summarize your conceptual design process. Develop at least three concepts.
Design Concept 1
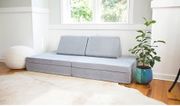
This design is pretty simple and would incorporate a storage/play area underneath a couch with sensory and mobility attachments. We would make a slide and a set of stairs that would help during therapy that could be stored underneath the couch in the play area when they are not being used. This would be a little difficult to use because it probably could not be lifted by one person alone depending on the material used to build the couch. It would; however, meet the requirements of including the whole family and being something usable for years to come.
Design Concept 2
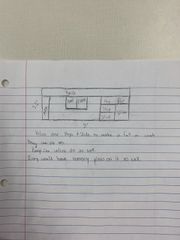
This design would basically be a couch made of different shapes that velcro together and can be taken apart to be used during therapy sessions. This would be a very simple and somewhat neat design, but might be a little difficult getting everything to fit together well and be comfortable to use as an actual couch. This would also incorporate different materials for sensory stimulation and therapy use.
Design Concept 3
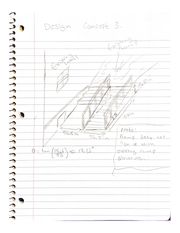
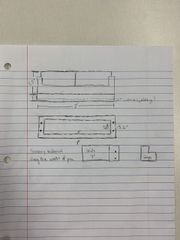
This design is kind of interesting. It would actually include a slide and two sets of steps. The steps would fit together and fit into the 1ft section on the top view of the couch. The slide would be accessible by removing a top cushion from the right side. The slide would have some plastic resin so that it would actually be usable and not tear up the material of the couch. This would almost look more like a multiple piece ottoman and not a couch.
Design Concept 4
.jpg/180px-Design_4(2).jpg)
.jpg/180px-Design_4(1).jpg)
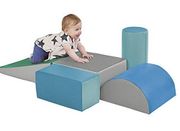
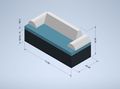
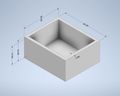
This design is a lot like The Nugget, but we will do some tweaking to the designs to make it much more usable for therapy sessions and what the family needs. There will be two main bases, one will be a storage container and the other will be an all foam mat. They will both have a much smaller mat on top of them that would be much easier to move and carry around for activities around the house or outside. There will be two sets of stairs, a slide, and a few other miscellaneous pieces that will be used to help with therapy sessions. When the slide, half cylinder(semicircle), and whatever else needs to be stored away are not being used for therapy sessions they can be put in the base with storage and all the other cushions and shapes can be put together to make it into a make shift couch(like the drawing pictured)
Evaluate concepts/select candidate
| Design # | Safety | Adjustability | Manufacturability | Cost | Total |
|---|---|---|---|---|---|
| 1 | 6 | 6 | 5 | 6 | 23 |
| 2 | 8 | 5 | 5 | 8 | 26 |
| 3 | 6 | 3 | 6 | 6 | 21 |
| 4 | 8 | 9 | 8 | 7 | 32 |
- Scale is out of 10
- Higher the cost, the more economical it will be
We are leaning more towards Design 4 because it seems like the most doable and usable for the family.
Detailed Design
This section will describe a detailed design process
Description of selected design
The design that we have chosen to build is mostly inspired by our fourth concept design. The couch would be assembled by making a wooden frame for the base and making the upper half and other accessories out of foam wrapped in a cloth material with a water and stain resistant treating. The top half would be versatile in turning into various shapes that the child could use during therapy and turn into a traditional couch when needed.
Detailed description of selected design
The base would be constructed using plywood and be covered in cloth or painted. The base would also be hollow on the inside to be used as storage space.
The top would consist of a base mat that would be sit on top of the base and function as the seat. The top would also consist of a top rest that is also removable to allow the child to climb on it or double as a slide when repositioned.
The side rest will be two half cylinders that would be used for the child to do tummy time on.
The couch would have extra accessories that can be attached to the side or the front. An example is a pair of stairs that could be attached to the side using the velcro strap.
Analysis
We will be analyzing the cost of production, overall weight, how impact absorbent the foam will be, and the way that the pieces will stay together. The analysis on the foam will be done using v34 EverFlex Foam.
Engineering analysis 1 - Cost and fabrication
The more research we do, the higher the cost and the harder the production seems to be on the design that we have chosen to follow through with. We realized that we would not be able to easily produce a good looking and quality piece of furniture on our own, so we thought we should look into outsourcing our design. One place that we found that produces replacement cushions has a website where we put in all of our dimensions of our foam and it then gives an estimated cost based on the foam of our choosing, the material covering, and a few other aspects. This seemed like a really good idea, until we got to the total that was almost $2,000. However, that would include everything but the storage container and the stairs made and shipped straight to our door. We would then make the storage container and stairs out of some type of wood that would look nice and be sturdy enough to support a load.
Engineering analysis 2 - Weight
If we were to go with the foam from this place it weighs 2.6 lbs/cubic ft. This is a big plus for the overall weight of our design. The box will be made of plywood in order to reduce weight. The couch and its components can be completely taken apart and moved. The box itself may be heavier than the rest of the pieces, but it is meant to be the one stationary part of this design.
Engineering analysis 3 - Impact Absorption
This product would have stupendous impact absorbing due to it being made almost entirely out of foam. Once an impact occurs it would be able to bounce back to its original shape. The part of this design that would have the worst impact absorption would be the box. After we made the box though we had planned to wrap the wood in a layer of foam. Then wrap it in the covering that the rest of the couch is covered in. With this extra layer of protection it would be able to absorb a more forceful impact and still hold together.
Engineering analysis 4 - Connections
One of the ideas we had was that the cushions, the arms, and the other accessories are going to be attached by velcro. This would probably be the best way to attach these pieces to one another based on the way that they are supposed to be used. The box will have hinges that attach the top of it to the rest of the box. This top will also keep the couch from bowing down into the box itself. The sides of the box will be held together with screws. The fabric that covers the couch and the box will be sewed together. The velcro will also be sewed onto the fabric in order to better hold the pieces into place.
CAD Drawings
Assembled Parts
Storage Container (x1)
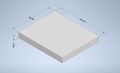
Big Mat (x1)
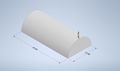
Half Cylinder (x2)
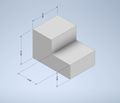
Steps (x2)
Slide (x2)
Top Mat (x2)
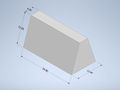
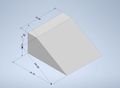
Long Triangle (x2)
Bill of Materials
| Part | Location | Cost | Quantity | Total |
|---|---|---|---|---|
| Cushions | foamorder.com | $2,000 | 1 | $2,000 |
| Hinges (2-pack) | Lowe's.com | $3 | 1 | $3 |
| Lifter Arms (2-pack) | Amazon.com | $22 | 1 | $22 |
| Plywood | Lowe's.com | $25 | 4 | $100 |
| Screws (330 count) | Lowe's.com | $25 | 1 | $25 |
| Cloth (Dark Gray Twill) | Etsy.com | $2 | 12 | $24 |
So our total cost would be roughly $2,150
What Changed Due to COVID-19
Due to the eradication of large group meetings, we were not able to follow through with the production of the design. It made it very difficult to get together and meet to build our design because we were not allowed access to the shops at TNTech. We unfortunately had to decide not to follow through with the fabrication and production process and we could not deliver for the family because of this.
Advice for the Next
Our advice to you would be to plan better and communicate more with the family and one another. This is not an easy task and, unless redesigned, will not be something you can build on your own unless you are good with upholstery. If you need any advice or would like some help, we would be more than happy to help any way that we can.
Assembly Instructions
Fabrication Process
Insert pictures of fabrication process
Testing and implementation
Describe testing, delivery, how used/received by the family
Photos of Completed design
Insert pictures of the final product
Instructions for safe use
Provide a clear summary of safe use for the family. Do not use the device unless supervised by an adult that fully understands the safe use of this product.
Project Summary, Reflection
This project has given us a great amount of understanding and experience that we didn't have before. Although we did not get to finish the project we still learned quite a bit. Given a new perception on what it takes to design and create something useful for somebody. We have learned to work with others and the aspects of having multiple different strengths and weaknesses. We have learned that not everything that you design should be fabricated. I believe that we can take things that we have learned from this project and use them in our future careers. This project has been quite a joy to work on and I thank Dr.Canfield and our project's family for giving us the opportunity to work on this project.