Playground Ramp
Abstract
The purpose of this project is to build a set of stairs and a ramp so all students will have easier access to the playground. The current ramp leads students into the parking lot instead of to the playground. The school would like to have stairs for the other students to practice climbing and so the teachers can take all students out the same door when going to the playground.
Team members

Paxton Phifer

Zachary Hall

Micah Midgett

Jason Pastor
Problem Statement/overview of the need
A school in Crossville would like to have a new ramp and set of stairs built so the all students can get to the playground at the back of the building. One teacher currently escorts most students out the front of the building to use the stairs and then around the building to the playground. The other students who need access to the ramp require another teacher to take them separately through the back of the building and down the ramp that ends in the parking lot. The school would prefer to take all students out the back of the building through the same door and wants to have both stairs and the ramp to accommodate all students.
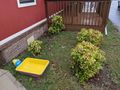
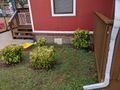
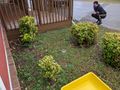
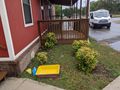
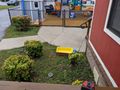
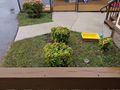
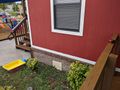
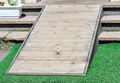
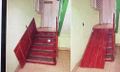
Below are some pictures taken on 9/24/2020 when preliminary measurements were taken.
Design Specifications
1. The school wants both a ramp and set of stairs in this location.
2. The ramp and stairs need to lead to the playground, not to the parking lot as the current ramp does.
3. The ramp and stairs should not block the crawl space door and septic drain/clean out.
4. The stairs must be designed in consideration of the younger children who will be using it. The height of each step and number of steps will be different in this case than a normal set of stairs.

Preliminary Measurements for Concept Designs (taken on 9/24/2020)
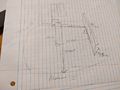
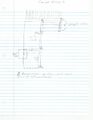
Rough Drawing of the Layout
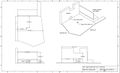
Approximate Work Area from Preliminary Measurements
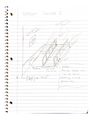
Rough Drawing of the existing handrail
Rough Drawing of the area with measurements
Background research
At the school, there is already a ramp that loops around and ends into the parking lot next to the building. What the school wants is to have a ramp that goes straight into the playground and some stairs for the kids to practice on. We plan on giving them both a ramp and a set of stairs.
In our research we found multiple ways to fulfill this need. The most expensive method would be to build both a ramp and a stair side-by-side. However, other ideas we had were to build a removable ramp, a fold out ramp, or some other ramp mechanism that allowed there to be both a ramp an a stair usable in the same space.
There are also many design constraints that are governed by building codes that we must keep in mind and abide by in our planning and construction.
They are as follows:
All ramps must have a rise:run ratio equal to or greater than 1:12.
And ramp of a rise:run less than 1:20 must have railing.
The railing must be at least 35 inches tall and extend beyond the length of the ramp or stair.
The ramp must have a landing at the top and bottom of its length as long as the ramp is wide.
Ramps that are to be used by wheelchairs must be 35 inches or more in width at the beginning and end of it's length and be no less than 24 inches along the duration of its length.
Here are some concept ideas we discovered and considered in our research.
Movable Ramp
Flip Up Ramp
Conceptual Design
Design Concept 1
The design of this ramp involves a ramp that flips out over the stairs to provide a way for any less-able children to be transported over the stairs while also being able to be stored against the side of the building via a hinge and latching mechanism that secures it against the building. Metal legs would be able to be flipped out to provide support for the ramp when it is in use, but will fold up against the bottom of the ramp when the ramp is stored. The design meets the design criteria, but may be less useful than a permanent ramp. The biggest up-side of this ramp is that it conserves space and does not block the crawl-space or the septic clean-out. This design will lack the strength of a permanent ramp, but would be no less safe. The biggest issue with it would be it's relative complexity if this style of ramp was not needed, and the railing, which is required for all ramps of a rise:run greater that 1:20, would be obvious and still standing when the ramp was not in use.

Design Concept 1
Design Concept 2
This design features a fixed ramp and set of stairs. The ramp is next to the building so wheelchair users can go straight down the ramp without having to make a turn on the middle landing. This design had some inspiration from the Spring 2020 group, but the ramp and stairs have been switched to prevent extra movement for a wheelchair on the middle landing. This design allows the septic tank clean-out to be easily accessible with nothing covering it up. This design does however cover up the crawl space door. To keep the crawl space accessible, we will have a small, hinged hatch that will allow someone to open it and get to the crawl space. It will be braced to retain its structural integrity and have adequate supports when it is closed to prevent flexing under load. We would have to develop a way to make it easy to move while also keeping it child-proof with some kind of latching mechanism. This design will also have a concrete slab poured to support the ramp and connect both the ramp and stairs to the sidewalk at the playground.
Design Concept 2
Design Concept 3
Ramp and Stair with ramp away from wall. This design is the simplest design, however it will cost the most out of the three. In this deign, the new ramp will not line up with the existing ramp structure and also it will need to have two railings rather than one which makes this design more secure than than Design 1 and Design 2. This design's structure gives us the advantage to remove the need to have a dedicated access point for the crawl space, which still needs to be accessible as requested by the school principal. This design allows wheelchair users to have the advantage to go straight down from the ramp to the playground, which in this design, is right in front of the ramp.
Design Concept 3
Evaluate concepts/select candidate

Manufacturability: How easy it will be to make and assemble. Easiest to build and assemble will be close to a 5 and hard to cut pieces with tough to make cuts will be close to a 1.
Simplicity: How complex the design is. Simpler designs will be close to a 5 and complex designs with moving parts will be close to 1.
Safety: How safe the design is for both the students and teachers to use. Safe designs with few pinch points, sharp edges, special considerations, etc… will be close to a 5 and designs with possible hazards or safety concerns will be close to a 1.
Ease of Use: How easy the ramp and stairs are to use. Easy designs that have few moving parts, require less maintenance, etc... will be close to a 5 and designs that require extra steps or would become a hassle to use will be close to a 1.
Meets Requirements: How many requirements are met with the design. All requirements will be close to a 5 and no requirements met will be close to a 1.
Even though all the proposed designs would provide the needed service, We ultimately decided on Design 3. There are a few reasons for this, but the largest being security, durability, and ease of manufacture.
Design 2 provides the ramp in a better placement than Design 3, however the access to the crawl space would be limited, and the construction would be significantly more difficult due to the need for a secure latch mechanism that would still allow access under the building.
Design 1 provides the ramp in the more optimal location as well, and allows the ramp to be securely stored when not in use. But the complexity of its construction as well as the extra labor needed by the teachers at the school to unlatch and set up the ramp and then store it afterwards is not necessary when a permanent ramp would be safer and accomplish the same task.
Design 3, although it requires more material due to the extra railing and support needed and the fact that the ramp does not line up perfectly with the existing ramp, is still more secure, easier to manufacture, and meets the needs of the school better than the other two.
Detailed Design
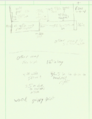
We started out by taking some final measurements to find the exact locations of the sidewalk, road and existing hand rails. Those dimensions are needed to calculate the amount of concrete we will need and to determine the longest possible run for the ramp.
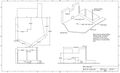
Work Area Measurements
Description of selected design
Since this is an access ramp to a playground. In addition to making a safe, functional ramp, we intend also to make the ramp something that the children would like to play with or would enjoy as well. A few ideas that we had for this were to add attachments to the handrails that the children could play with, to involve the children at the school in some of the final decoration (Hand painting the floor etc) Or a variety of colorful, sensory additions to the ramp that makes it less like an access ramp and more like an extension of the playground.
Some of the interactive designs for the ramp and the stairs are shown below:

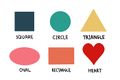
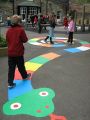


In the images shown above, the different shapes, color, and the alphabet would give the kids in this school a more fun way to learn and to interact with each other and it would also encourage them to learn as they see these figures, colors, and shapes on the ramp. These designs will be considered for both the ramp and the stairs.
The following images will be considered for the railings design. These will also give the kids the encouragement to learn and have fun with the ramp and railings design.


Detailed description of selected design
Analysis
Describe three types of analysis to be performed on the design
Engineering analysis 1
This analysis will evaluate the design with respect to code standards. Since the original ramp will not be torn down, we will not need to consider this as an “access ramp” by code standards, but we will follow them as close as possible in all areas. The stairs we will be adding will also follow the associated stair standards while being designed primarily for the younger students who will be learning to use them. This section will be broken down to evaluate our decisions for the design based on the individual standards.
- Slope of the Ramp:
The slope is defined as the rise in elevation with relation to the length the ramp spans in the form of: rise : run = slope. The International Building Code (IBC) defines an accessible ramp for individuals with disabilities as a surface with a slope between 1:20 or 5% and 1:12 or 8.33% [1]. Due to the constraints of the given area, the best slope we can get is 1:8.14 or 12.3%. To make our ramp fall within the IBC specifications, we would have to redesign the entire layout at the back of the building, including but not limited to: existing sidewalk placement; existing ramp and landing locations; and the existing asphalt driveway. This complete redesign is not feasible for our group to do in one semester. Therefore, we will be leaving the existing ramp as the access ramp, which will allow us to continue with our design as a ramp to the playground that would not have to follow the access ramp slope restrictions. We will be utilizing all the space we have to ensure the slope is as minimal as possible.
- Ramp Rise:
An access ramp is made up of a ramp and its landings. The ramp must have a landing after (at most) 30 inches of elevation change [1]. This means that a ramp that climbs 60 inches would need three landings, one at the top, one at the bottom, and one at 30 inches above the ground level. Our ramp will only cover 16 inches of elevation change and therefore does not need any extra landings, other than the existing middle landing for the top of our ramp and the sidewalk as the bottom landing of our ramp.
- Cross Slope of the Ramp:
The cross slope of the ramp must be limited to or less than 1:48 [1]. In short, the ramp needs to be level from side to side. This is easily achievable as long as we construct the ramp correctly and verify the supporting structure is level before adding the floor planks.
- Ramp Width:
An accessible ramp needs to maintain a width of 36 inches at the narrowest section to continue to be an accessible ramp [1]. Our ramp is going to be constructed using two existing hand rails that are 52.5 inches apart, which is wider than the requirement to be an accessible ramp. We will not have exactly 52.5 inches due to handrails being added and keeping our ramp narrow enough to leave the septic clean out uncovered, but there is plenty of room in our design for all of these features and still maintain the width of 36 inches.
- Ramp Landings:
The landings must have a slope of at most 1:48 or 2% in any direction, be as wide as the ramp, and be at least 60 inches long [1]. The existing middle landing has enough area that it can be as wide as we choose to make our ramp and poses no concern for not meeting width standards. The ramp will be using the existing sidewalk and middle landing as the landings for this ramp. We do not have control over the slope of these existing landings; however, they are within the slope standards for the IBC. The length of the middle landing is approximately the width of the ramp at 52.5 inches. Again, this is not easily changeable for our group within the semester time frame. We will maximize the area to get the most out of it, but we will not be able to get the full 60-inch length out of the existing landing.
- Ramp Handrails:
The current ramp has circular hand rails between 35 and 36.5 inches from the floor to the center of the handrail. They fall within the IBC’s standards for handrails, since it claims they must fall between 34 and 38 inches above the ramp’s surface and be at least 36 inches apart [1]. We will attempt to match the height of the existing handrails to make it an easier transition to each ramp for the students. Our ramp will be much greater than 36 inches in width, allowing us plenty of room for two hand rails 36 inches apart and 1.5 inches away from the wooden support structure. The handrails must also stick out into the landings by at least 12 inches [1] by the IBC’s standards. Unfortunately, we will not be able to meet this specification due to the area of the existing landings. The middle landing will be obstructed by this extension of the hand rail and pose more of a hazard to users than benefit. The same issue arises at the lower sidewalk landing due to the sidewalk being a given width and highly trafficked. We can make the handrail wrap around the ends of the wooden support structure, but sticking out is not an option. Hand rails must also follow the specifications pictured below. We will use a railing similar to the existing to keep the transition between ramps relatively easy for the students.
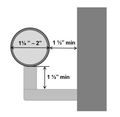
Hand Rail Spacing Specifications
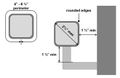
Hand Rail Style Specifications
- Ramp Edge Protection:
Our ramp will need to have a curb or barrier to keep a 4” ball from falling off the side of the ramp. This can be done in the form of a curb with a height of at least 4 inches or a barrier that extends down to less than 4 inches above the ramp’s surface [1]. We can implement this in our ramp’s design by using a similar wooden support structure that the existing ramp and landing has.
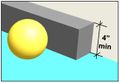
Curb Specifications
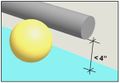
Barrier Specifications
- Stair Width:
The width of the stairs must be at least 44 inches wide [2]. Our stairs will be in a space that is 48 inches wide, which meets this IBC specification.
- Headroom:
Each stair must have at least 80 inches of clearance from the front edge of the stairs to the ceiling directly above that point. Our stairs will be outside with no covering them, meaning there is nothing above them.
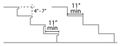
- Riser Height and Depth:
Each step must not have a rise less than 4 inches or greater than 7 inches [2]. They must also be at least 11 inches deep [2], measuring the area of the step not covered by the next step. The stairs must also have less than a 0.375-inch difference in rise or depth on all stairs in the stair case [2]. We will be building stairs to go down a 16-inch drop; therefore, we will need to have three or four steps in the set of stairs. We will make the rise of each stair as low as we can to make them easy to climb for the younger students. We can make the stairs slightly deeper than 11 inches to make them easier to climb, being careful to not confuse the students by making them too deep. If we build the steps uniformly and checking the supporting structure is level, it should be easy to keep them within the 0.375-inch difference tolerance. This would mean making a three-stair set at 5.33 inches between the stairs or a four-stair set at 4 inches between the stairs.
Stair Riser Specifications
- Riser Construction:
The risers/stairs must be solid or have gaps of less than one-half inch to prevent a sphere of a diameter of one-half inch from passing through [2]. We can build the stairs with planks close enough together to minimize the gap and have a less than one-half inch gap between them.
- Stair Landings:
There must be a floor or landings at the top and bottom of each stairway, and at every 12 feet of elevation change or less [2]. The landings must also be as wide as the stairway and no longer than 48 inches [2]. The middle landing and concrete path we will pour are wider than the stairs and they will be at least 48 inches long at each landing, meeting these specifications. The stairs will only climb 16 inches, which means we will not need any additional landings.
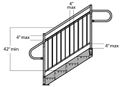
- Stair Guards and Hand rails:
Guards are required on all stairs that have open sides and must be at least 42 inches tall [2]. The guarding needs to have vertical slats with no more than a 4-inch gap between them [2]. The guarding must also be close enough to the stairs such that a 4-inch ball cannot fit between the guarding and the stairs and fall out of the stairs [2]. Our stair design will be between the building’s outermost wall and the ramp’s supporting structure. It does not need a guard, but we will put one on the ramp side to hold a hand rail. Both existing wooden support posts are taller than 42 inches, which will work for the wooden guard structure and hold the hand rails. We will also use hand rails similar to what is being used on the ramp so it is easy for the students to go between the stairs and the ramp and place them on both sides at the required 4 or less inches from the top of the guarding [2].
Stair Guard Specifications
- Sources:
[1] “Accessible Ramp | Code Requirements EXPLAINED,” Building Code Trainer, Nov. 2019. Accessed on: Oct. 13, 2020. [Online] Available at: https://buildingcodetrainer.com/accessible-ramp-code-requirements-explained/
[2] “IBC STAIRS CODE & REQUIREMENTS,” Upside Innovations. Accessed on: Oct. 13, 2020. [Online] Available at: https://upsideinnovations.com/ibc-stairs-code/
Engineering analysis 2
Engineering Analysis 2 will be done in tandem with our first drafting of a final design. We will complete our final design and then run some calculations on bending in the floorboards, bending on the handrail connections, and compression on the ground support beams. I don't expect there to be many problems when running these, but we may have to adjust our connection types on some parts for extra safety.
Engineering analysis 3
Engineering analysis 3 will be done in tandem with the CAD drawings. we will use the SolidWorks loads analysis tool to analyze our final design after completing the final drafting.
CAD Drawings
Insert drawings of all parts and the assembly
Bill of Materials
qty, item, description, source, part number, price
Assembly Instructions
Fabrication Process
Insert pictures of fabrication process
Testing and implementation
Describe testing, delivery, how used/received by the family
Photos of Completed design
Insert pictures of the final product
Instructions for safe use
Provide a clear summary of safe use for the family. Do not use the device unless supervised by an adult that has been fully understood the safe use of this product.