Sitting device F13
Contents |
Abstract
Designing and constructing a sitting device to provide lateral support for a 1-3 year old child with cerebral palsy in any shopping cart.
Team members
- Jessica Musser
- Seth Bradburn
- Scott Bender
- Matthew Sisk
- Chance Holt
- Chance Williams
Problem Statement
We want to design a sitting device that provides lateral support and has an attachment for toys for a toddler with cerebral palsy that will fit into the child seat in a shopping cart. The sitting device will be used for a minimum of 1-2 years.
The toddler tends to lean to the left and does not recognize the functionality of her left arm. Without a lateral support, she is not able to sit up straight. Attaching a toy to the left side could encourage her to use the left arm.
We will develop design ideas by brainstorming. Then, we will analyze those ideas and choose those that best fit our needs and requirements.
Design Specifications
- Must fit into the child seat of a shopping cart.
- Product life – 1 to 2 years
- Lateral support no wider than XX"
- Toy attachment
- Easy installation (use with one hand)
- Compactibility
- No pinch points
- Lightweight and durable materials (under 1kg)
Conceptual Design
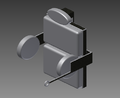
Design Concept 1
- Lateral supports will rotate inward
- Adjustable width
- Female/Male buckle clips will be available for the family to attach harness
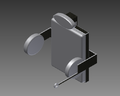
Design Concept 2
- Top and bottom back supports will fold to make the device more compact
- Extended head rest
Design Concept 3
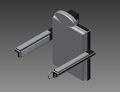
- Lateral bars for side support
- Adjustable head support with wing nuts
- Female/Male buckle clips will be available for the family to attach harness
Estimated Budget
Evaluate concepts
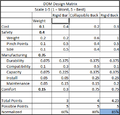
After evaluating all the designs, it was determined that the best design was a rigid back design with a few improved features. These features would make the design the most basic, lightweight, and feasible option.
Detailed Design
Description of selected design
- The design will be lightweight, 1 kg or under.
- It will be fully adjustable to child seat of any shopping cart.
- The lateral supports will be adjustable for the growth of the child.
- There will be a toy attachment on the left lateral support to motivate the child to use her left arm.
- The cushion will be made from memory foam covered with a water resistant fabric for comfort and durability.
- The handle will be attached to the back of the device for easy carrying and installation with one hand.
- All pinch points will be located on the back of the device where the child cannot reach.
- Sharp edges will be deburred and corners will be rounded.
- Product Life = 1 to 2 years
- The sitting device will be made out of different materials, all being durable, resistant to corrosion, and resistant to fluctuations in temperature.
Detailed description of selected design
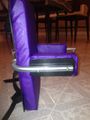
Isometric View:
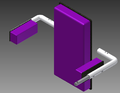
- Detachable Lateral Supports
- Memory Foam Cushion
- Water Resistant Fabric
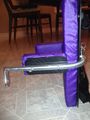
Back View:
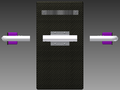
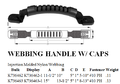
- Handle for Easy Maneuverability
- Two Single Action Ball-Lock Pins
- Carbon Fiber Back Support
- Aluminum Arms
- Nylon Handle
Side View:
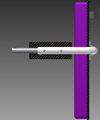
- Extension Rod with Carabiner for Toy Attachment
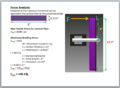
Analysis
The three types of analysis we will be completing for this project will be a structural analysis, safety analysis, weight analysis.
Structural Analysis
- Analyze the effects of applied loads in areas of concern.
Safety Analysis
- Analyze device for any potential safety hazards.
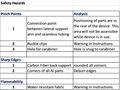
Weight Analysis
- Analyze weight of device to check if it meets the requirement.

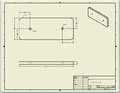
CAD Drawings
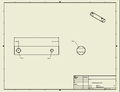
Nylon Handle w/ Handle Caps:
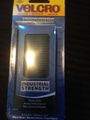
Velcro Strips:
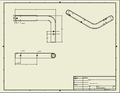
Right Side Aluminum Arm:
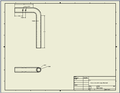
Left Side Aluminum Arm:
Extension Rod:
Back Mounting:
Back Cushion:
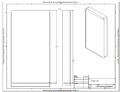
Side Cushion:
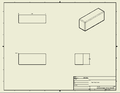
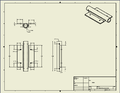
Back Plate:
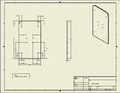
Side Plate:
Bill of Materials
Assembly Instructions
Only assembly required is width adjustment of lateral supports.
There are two width options, which can be adjusted by removing the Ball-Lock Pins from the back bracket. The innermost holes give a width of 9". The outermost holes give a width of 10".
- After choosing the desired width, line up the holes on the back bracket with the holes in the lateral supports.
- Insert Ball-Lock Pin to one side at a time.
- Push through the holes while pushing the button on the Ball-Lock Pin down.
- Once the shaft of the pin is in place, release the button.
Fabrication Process
.JPG/120px-Work1_(1).jpg)
.JPG/120px-Work1_(2).jpg)
.JPG/90px-Work1_(3).jpg)
.JPG/90px-Work1_(4).jpg)
.JPG/90px-Work1_(5).jpg)
.JPG/90px-Work1_(6).jpg)

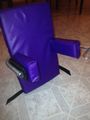
Completed design
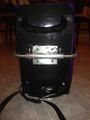
- Used Loctite Threadlocker on all bolts.
Instructions for safe use
How to install device to shopping cart:
- After adjusting the desired width of the lateral supports, place the Sitting Device into the child seat of the shopping cart with the cushions facing forwards.
- Buckle the straps on the back of the sitting device to the back support of the shopping cart.
- Tighten the straps to prevent movement of the sitting device.
- Use the provided buckles in the shopping cart to restrain the child to the seat.
Fabric Care:
- Cushions are detachable and covered in a water-resistant fabric.
- Blot area that needs to be cleaned with water only. Detergents can remove the nylon coating on the fabric.
- Do not soak cushion.
Caution: Keep Sitting Device away from open flames. Fabric, cushions, and carbon fiber are flammable. Also, take care when closing the buckle clips on the straps to prevent pinching.
Do not use this device unless supervised by an adult that fully understands the safe use of this product.
Summary and Conclusions
- Our team designed, constructed, and fabricated a sitting device that is adjustable to any shopping cart for a 1-3 year old child with cerebral palsy. This design provides the necessary lateral support for the child to sit upright in a shopping cart. It also provides ease of shopping for the parents/grandparents. It was made adjustable, comfortable, and eye pleasing, using single-action ball-lock pins to adjust width, memory foam for the cushion, and a fabric color that the family chose. The device also allows for a toy to be attached to the left lateral support to stimulate the child to use her left arm, which could potentially increase the strength of her left arm.
- Each member of our team, using his or her strengths, contributed to the completion of this project. Each person gained knowledge of the design and manufacturing process to implement and actualize a customer request. Throughout this process, each person was willing to learn, and there was a free exchange of ideas during the design process. During the build, each person learned from one another how to implement the ideas for the design. Each person communicated effectively with one another to ensure there was no confusion when creating parts for our design. There were some issues with the build, and, as a team, we were able to make decisions together in regards to what needed to be changed. Although there were some issues with the build process, our team succeeded in developing our design into a usable product for our customer.
- Overall, our team gained experience in working together, and we were able to utilize our strengths, share existing knowledge, improve on weaknesses, and ultimately succeed.