Swinging cradel S13
Contents |
Abstract
Designing an indoor swing for a four year old.
Team members
Ethan Asberry
JR Lackey
Josh Mayo
Edward Tidwell
Introduction
Our group met with the family for our project to gather some of the information we needed. The boy that we are doing this for had an old swing that fit his needs before, but he had grown too large for it. In the end we decided to improve upon the old design, trying to make the new swing be usable for him for as long as possible. The boy has had a history of severe seizures that needed to be taken into account for the new swing.
Design Specifications
List the design requirements and specifications in detail The new design must compensate for his bigger size. To do this we will add support bars to the swing frame as well as use a stronger material. The frame still needs to be fold down for portability and to save space when not in use. The seat needs to function as swing seat, rocking chair, and stationary chair. The seat cover needs to be removable and washable.
Conceptual Design
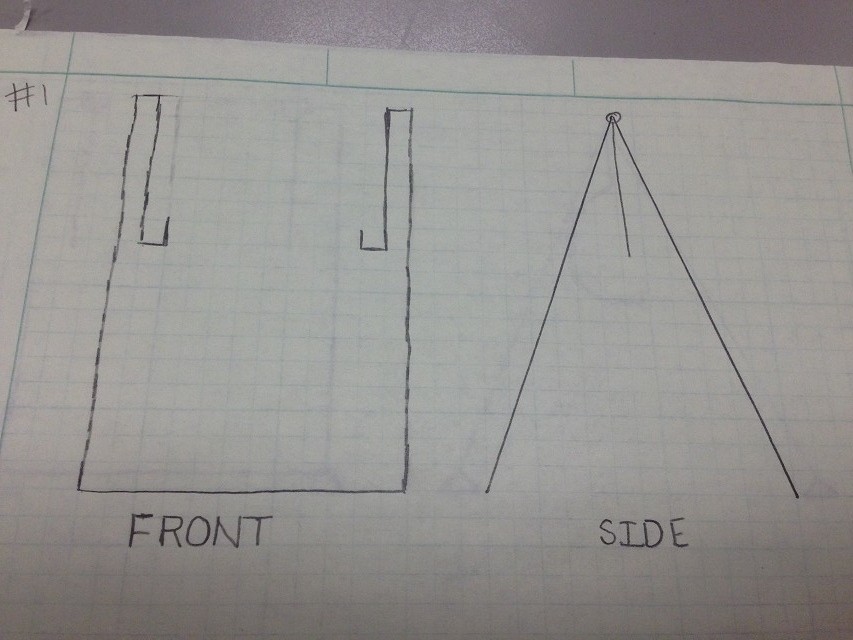
We were told to work off this design and make it larger and stronger to fit the child's growing size.
Frame Design Concept 1
The first design of the swing frame took the original frame given by the family but includes construction by stronger materials.
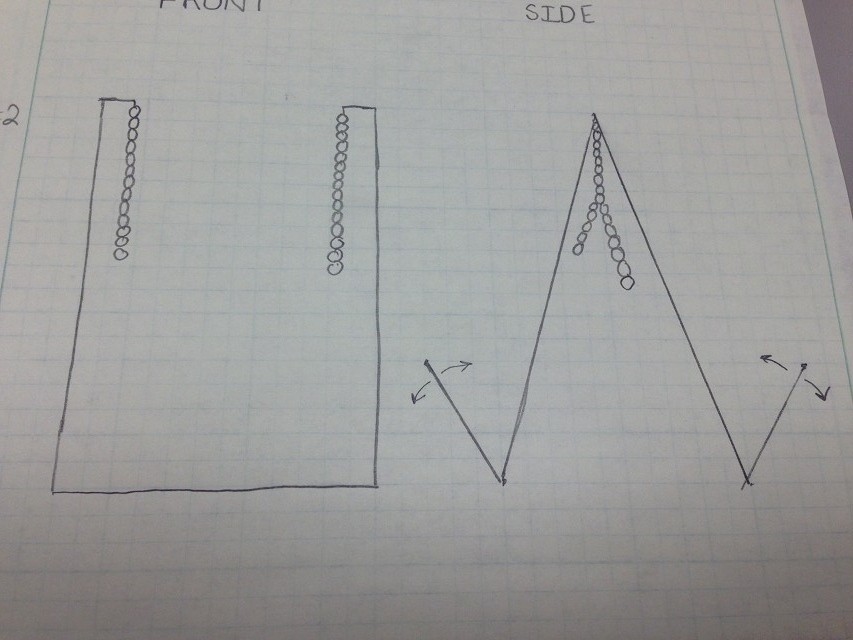
Frame Design Concept 2
The second design concept keeps the A frame of the outside support but uses chains wrapped in plastic that would directly connect to hooks on the chair. It also used feet that folded down from the body to reduce frame tipping.
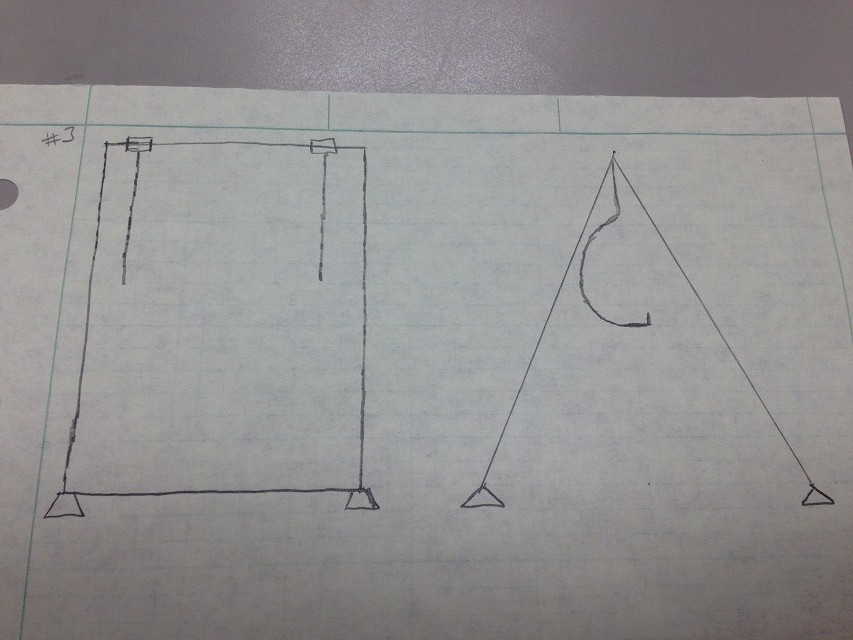
Frame Design Concept 3
The third design adds a support bar across the top, hooks the attachment arms and uses a peg and sleeve system to attach the cradle to the frame. It also adds rotational feet to the base similar to a ladder's for extra support to reduce tipping.
Cradle Design Concept 1
This cradle is very similar to the original design, with a scaled up design and built with stronger materials.
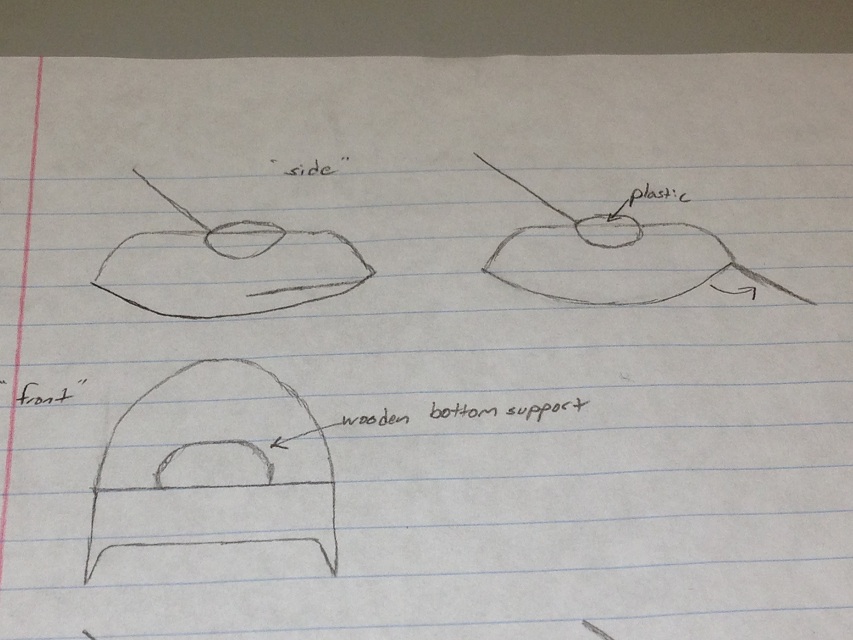
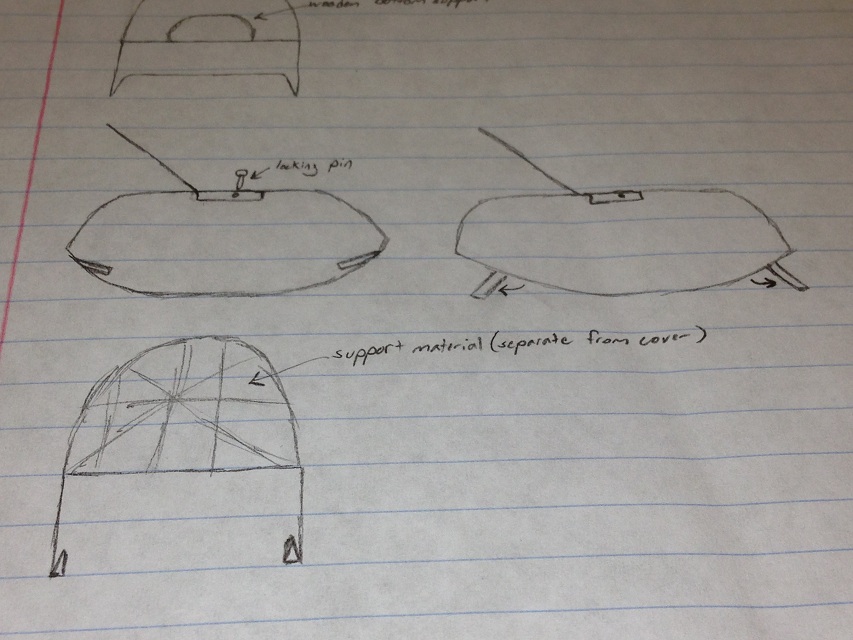
Cradle Design Concept 2
For this design, we added a nylon mesh under the cloth seat cover to give Lil Johnny additional support. The arm rests cover the swing's arms in a peg & socket fashion with a lock pin to keep the seat secured to the frame. Small folding legs have been added into the rocking brace in place of the current rocking stop. The new setup creates a chair instead of a cradle upon removal from the frame.
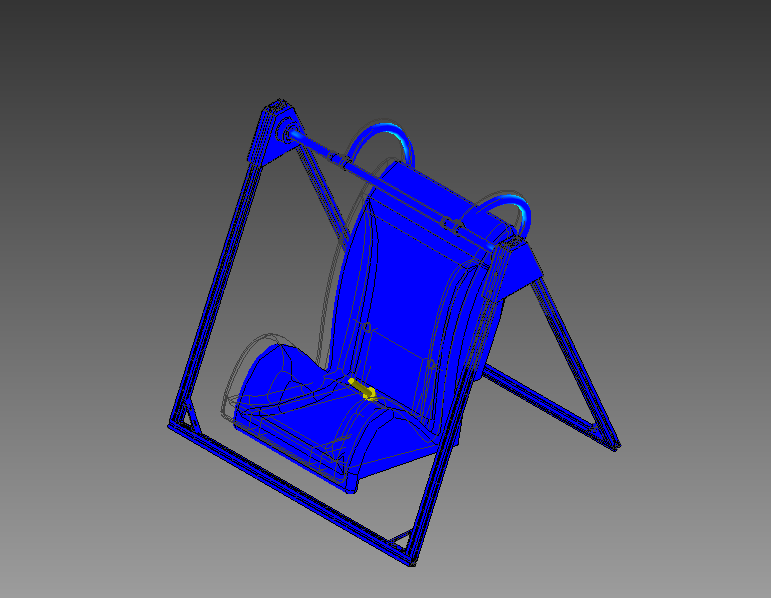
Detailed Design
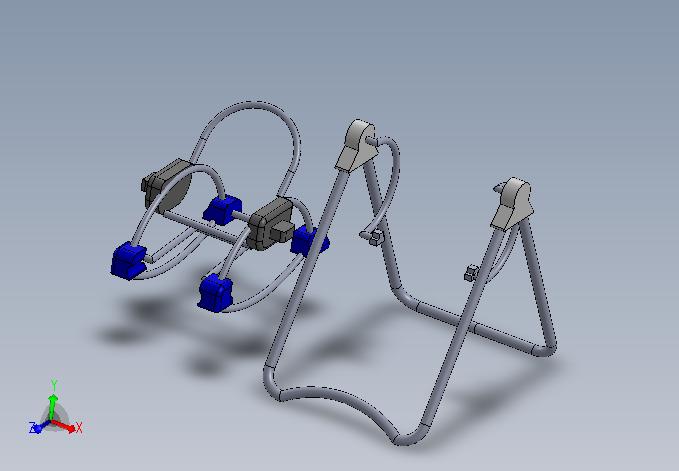
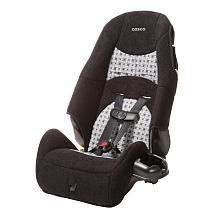
Swing design concept 3 with a car seat as the cradle was chosen as the final design. Four aluminum bars will support a cross bar from which two solid arms hang to hold the cradle. The Cosco High Back Booster seat is modified to act as a rocking chair or a stationary chair with fold-able pegs to prevent rocking, when removed from the swing frame . The chair has a locking mechanism to fix the chair to the frame during the swing's operation.
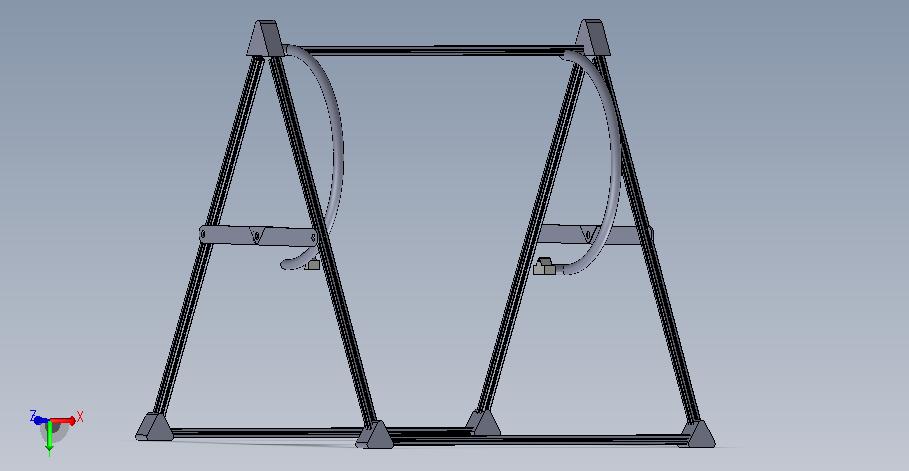
Frame
The frame we designed is a simple outdoor swing set-up. Four aluminum beams hold up an aluminum bar from which the swing hangs. The four support beams are 1" in diameter and 36" in length. This configuration is high enough to allow a child of 80 lb to swing freely and support the child's weight. Ratchet mechanisms in the peaks of each side make for efficient and easy storage. Braces on each side of the swing add stability and can fold when the swing is put away. An equilateral triangles at the end of each arm locks into the cradle, with an intersecting pin to secure the connection.
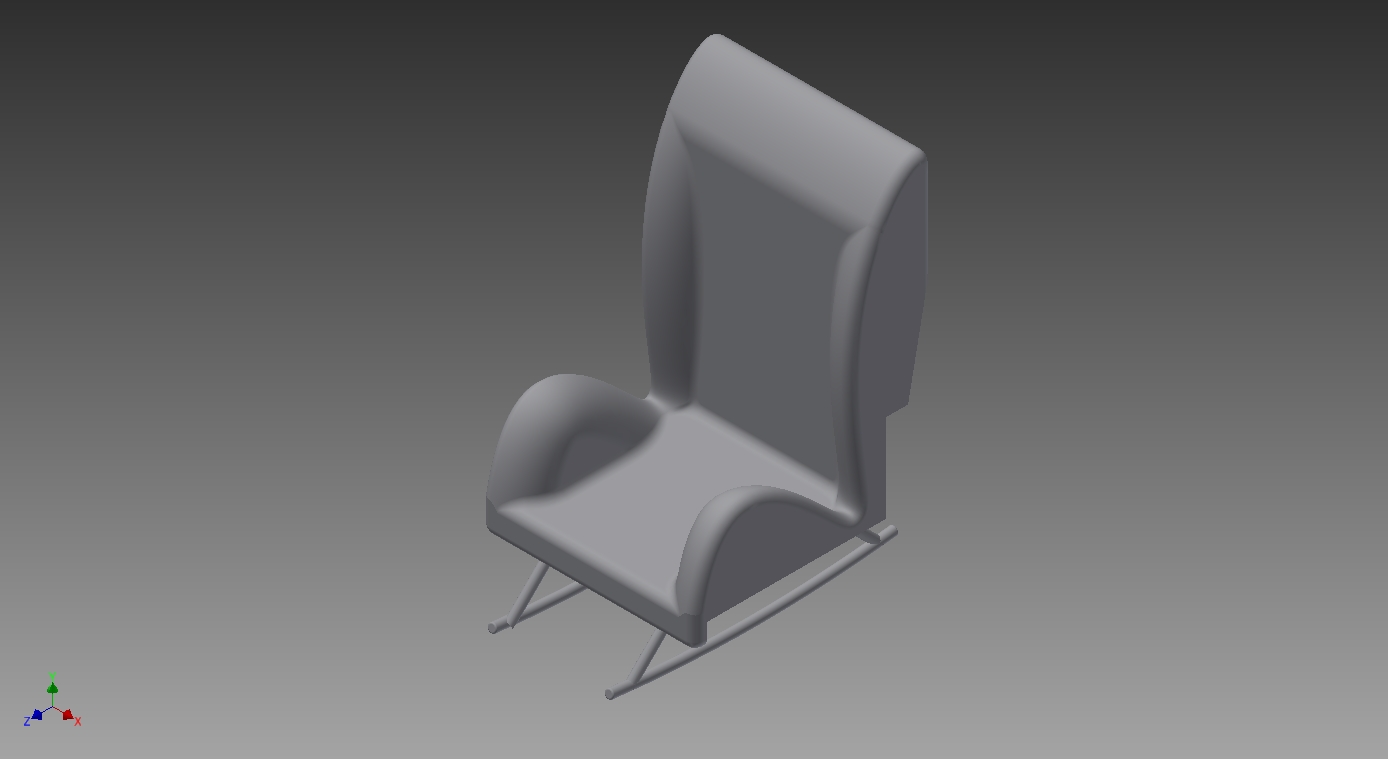
Cradle
The Cosco High Back Booster seat was chosen because it not only gives the child ample space to grow, but is also sturdy and open enough to allow for easy modification. Attached to the seat are two lengths of 3/4 inch aluminum bars connected to runners for the rocking chair. Two support braces connect the metal lengths securely to the plastic of the chair. Aluminum forms in the arm rests of the chair inter-lock with the swing to fix the two together, a pin is then inserted to secure the connection. Straps included with the chair can suitably hold the child.
Analysis
Three types of analysis performed on the design:
Engineering analysis 1
Dynamic Center of Mass
This dynamic center of mas calculation confirms that while swinging, the child will not move the swing set across the floor.
Density of Aluminum = 167 lb/ft3 * ft3 / 1728 in3 = 0.0966 lb/in3
Weight of Support Beam(s) = 4.06 lb
          Overhead Bar = 2.32 lb
          Swing Arm(s) = 2.97 lb
          Seat with Child(max) = 88.0 lb
Position 1
CM = Σ(m*ṙ)/M
   = [(4.06 lb(-10.5i+18.2j)in)+(4.06 lb(10.5i+18.2j)in)+(2.32 lb(0i+36.4j)in)+2(2.97 lb(10.6i+25.8j)in)+(88 lb(21.2i+15.2j)in)]/(4.06+4.06+2.32+2.97+2.97+88.0)lb
   = 18.5i+16.5j in
Position 2
CM = Σ(m*ṙ)/M
   = [(4.06 lb(-10.5i+18.2j)in)+(4.06 lb(10.5i+18.2j)in)+(2.32 lb(0i+36.4j)in)+2(2.97 lb(0i+21.4j)in)+(88 lb(0i+6.40j)in)]/(4.06+4.06+2.32+2.97+2.97+88.0)lb
   = 0i+8.84j in
Position 3
CM = Σ(m*ṙ)/M
   = [(4.06 lb(-10.5i+18.2j)in)+(4.06 lb(10.5i+18.2j)in)+(2.32 lb(0i+36.4j)in)+2(2.97 lb(-10.6i+25.8j)in)+(88 lb(-21.2i+15.2j)in)]/(4.06+4.06+2.32+2.97+2.97+88.0)lb
   = -18.5i+16.5j in
Engineering analysis 2
Stress Analysis of Frame
The following image shown an Inventor stress test on the frame under a 100 lb load to simulate the stress created during use of the swing.
The lack of red on the structures shows that there are no structural failures in the swing.
Engineering analysis 3
Center of Mass of the Child in the Swing
The center of mass of the child in the swing is very important for verifying the design of the swinging arms as well as making sure the swing will act as a cradle instead of pushing him out.
Making the origin at the top of the linear portion of the arms,  the centers of mass for the individual regions are:
	center of mass of the arc (rA) = (5, 0)in
	center of mass of the bar (rB) = (0, 9)in
	center of mass of the hook (rH) = (1, 18)in
Knowing that the density of stainless steel is 0.2710 lb/in3, the masses for the arm are as follows:
	mass of the arc (mA) = 5.348 lb
	mass of the bar (mB) = 6.017 lb
	mass of the hook (mH) = 0.6685 lb
	mass of the arm (MA) = 12.034 lb
Computing the center of mass for the arm (RA):
	RA = [(m*r)A+(m*r)B+(m*r)H]/MA
	RX = [(5.348*5)+(6.017*0)+(0.6685*1)]/12.034
	RX = 2.278 in
	RY = [(5.348*0)+(6.017*9)+(0.6685*18)]/12.034
	RY = 4.557 in
	RA = (2.278, 4.557)in
For the chair, it is estimated that the mass of the chair and child (MC) combined will equal to  100 lbs and the center of mass for the child-chair system (RC) is (7, 21)in.
So for the entire system, the center of mass (K) is:
	KX = [(2M*R)A+(M*R)C]/(2*MA + MC)
2MA is used because there are two arm bars to support the chair.
	KX = [(2*12.034*2.278)+(100*7)]/124.068
	KX = 6.084 in
	KY = [(2*12.034*4.557)+(100*21)]/124.068
	KY = 17.81 in
	K = (6.084, 17.81)in
CAD Drawings
Bill of Materials
| Item Name | Quantity | Source | Price |
|---|---|---|---|
| Cosco High Back Booster Seat | 1 unit | Walmart | $39.87 |
| Extruded Aluminum | 4 50" Pieces HFS6-3030-1270 | Misumi | $50.80 |
| Extruded Aluminum | 2 32" Pieces HFS6-3030-820 | Misumi | $16.40 |
| Triangle Brackets(w/hardware) | 4 Sets HBLDSW6-SET | Misumi | $31.28 |
| Free Angle Brackets | 4 pieces HBLTBA30 | Misumi | $17.52 |
| Socket Head Screws | 15 pieces CBM6-12 | Misumi | $4.48 |
| T-Nut | 16 pieces HNTT6-6 | Misumi | $7.36 |
| 3/4" steel unthreaded pipe(1' length) | 4 pieces 7750K112 | McMaster-Carr | $21.44 |
| 3/4" steel unthreaded Pipe(3' length) | 3 pieces 7750K192 | McMaster-Carr | $49.02 |
| Steel ball bearings | 2 pieces 6384K84 | McMaster-Carr | $34.50 |
| Steel pipe (1' long, 2"ID) | 7767T84 | McMaster-Carr | $34.99 |
| Steel Pipe (6' long, 1"OD | 7767T231 | McMaster-Carr | $11.78 |
| Heavy Strap Hinges | 2 pieces 64167 | Lowe's | $6.94 |
| 16 gauge weld steel (12"x24") | 2 pieces | Lowe's | $35.00 |
| Pool Noodles | 2 pieces | Walmart | $6.00 |
| Sum | $367.38 |
Assembly Instructions
Constructing the frame
Step 1: Construct the frame assembly using angle brackets, 2 pieces of 50" and one 32" piece of extruded aluminum and 4 sets of nuts and bolts for each angle bracket.
Step 2: Attach the free ends of the frame pieces together using 4 sets of nuts and bolts and the two hinges.
Step 3. Cut and weld pieces of 16 gauge weld steel plate to assemble the top covers of the hinges.
Step 4. Cut two 1" long pieces of 2" ID steel piping, weld to the inside of the hinge covers, and then press the bearings in.
Step 5: Cut one of the pieces of 1" OD steel to 30" long, then lathe down slightly. Bore out the 1" cast iron t-fittings to slip over this bar to form the crossbar.
Step 6: Cut two pieces of 1" OD steel approximately 34", and one piece approximately 20" long, then thread both ends.
Step 7: After threading the longer pieces into the t-fittings at the top, thread in two elbow joints facing inward, then connect with the 20" piece.
Step 8: Drill a hole entirely through the t-fittings, then hammer in a pin.
Step 9: Bend a piece of steel between the two arms to allow the chair to sit at an angle, and drill two holes through them to line up with the screws in the back of the chair(described below).
Constructing the chair
Step 1: Using 16 gauge weld steel, measure and bend the two brackets that will be bolted into the back plastic supports of the chair.
Step 2: Using 16 gauge weld steel, measure and bend the tighter brackets that will be bolted into the bottom plastic supports of the chair.
Step 3: Weld a piece of square tubing approximately 1.5" square to the back of the two back brackets, after cutting off the bottom edge. This is how the chair will hook onto the frame.
Step 4: Heat and bend two long pieces of 1" OD tubing to fit the rocker angles. This is one of the harder steps. You can use a wooden mold, or we heated ours and bent over a metal barrel until we got the shape we wanted.
Step 5: After lining up the chair to the angle wanted above the rockers, cut 4 pieces of 1"OD steel tubing to form the legs of the chair. Using the bottom brackets of the chair as the attachment, mark the positions and angles of the legs for welding purposes.
Step 6: Weld the legs to the brackets, then weld the rockers to the legs.
Step 7: Drill and tap 2 holes in the back of the back bracket, then run a bolt through each facing outward. These plus a wingnut on each will allow the chair to be pinned into the frame.
Step 8: Cut the pool noodles, then place over the rockers. Electrical tape was used to allow for easy change in case the pool noodles wear out.
Safety Instructions
- Do not use swing if the seat has not been properly attached
- Keep arms inside the cradle when swing is in motion
- Do not use swing if the frame legs are not fully extended
- Make sure the seat belt is on properly and tight against the passenger
Fabrication Process
Insert pictures of fabrication process
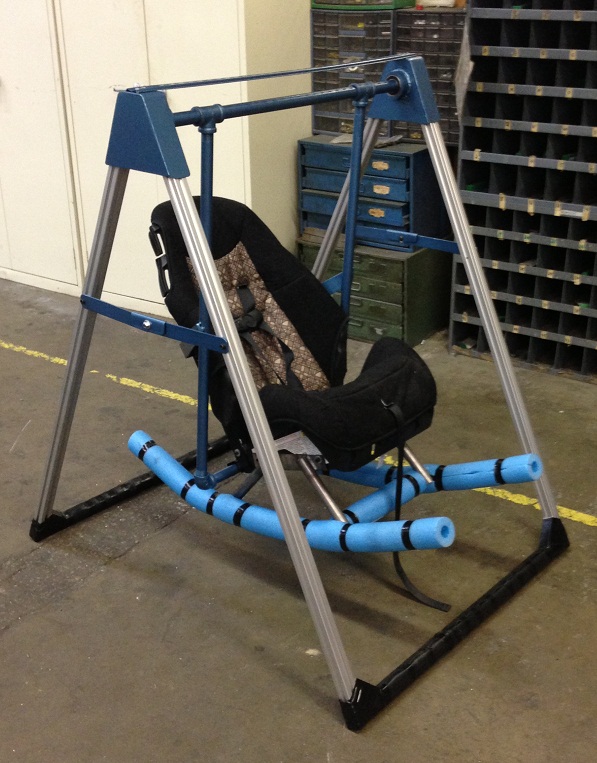
Completed design
This is the finished design with the cradle attached to the swing frame.
Summary and Conclusions
When approached with this project, our task was to build a stronger version of the pre-existing swing and cradle. We wanted to keep the frame free at the top, like the original design, but we realized after inspection that the child's weight was causing these parts to bend inwards because it was too much downward force for the parts to handle. We wanted to keep this open top design, but realized that in order to account for an older child we would need top support. The child also had a tendency to tip himself over when rocking because he was rocking with so much force, and we wanted to account for this issue as best as possible.
Having found no pre-existing frame, we had to fabricate from the ground up, but we succeeded in our task in having a much stronger swing and cradle system. JR, at approximately 160 pounds, was able to rock successfuly and smoothly in the chair when it was on the ground. Due to the rocker arms flattened shape at the back as opposed to a full arc, he also found it extremely difficult to get the chair to tip backwards. We believe that this design will continue to last for the family for several years until the child outgrows the current chair and an alternative solution can be found.