Worldwide team-Arm Stability device
Abstract
The client of our project is a 13 year old kid, whose name is Brandon, with some physical limitations. His therapist and family wanted us to improve Brandon's skills at using a communicating device that Brandon has at his elementary school. Our goal is to deliver one of our concept designs to the family that would potentially help his life needs.
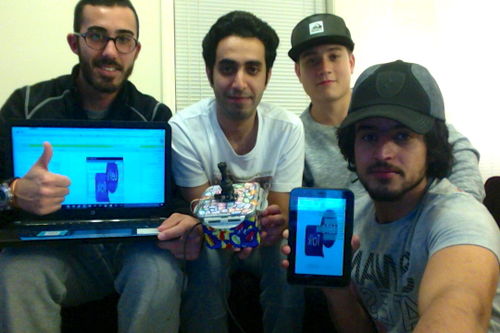
Team members
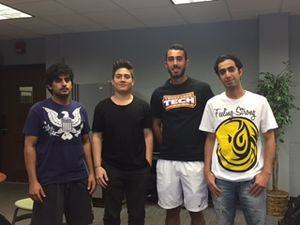
From left to right:
- Dhafer Alsaad
- David Castaneda Zuluaga
- Alberto Esteban Linares
- Abdulaziz Alabdali
Problem Statement/overview of the need
Our project is going to be a variety of mechanisms that will work according to Brandon's situation. Brandon has reduced mobility in his whole body and he is not able to talk. Thus, we are focusing on the mobility of his right hand, specially from the elbow to the fingers, in order to improve his communication capabilities by using a redesigned device. The therapist wanted a design of a mechanism that allows him to press letters, in order to form words, in this communicating device.
Design Specifications
1. 13 years old child that will be using a communicating device.
2. Elementary school.
3. Will need a table to put the device
4. Ideal communicating board with a separate rigid support
5. Connection of joystick to communicating device
Background research
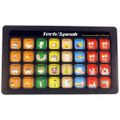
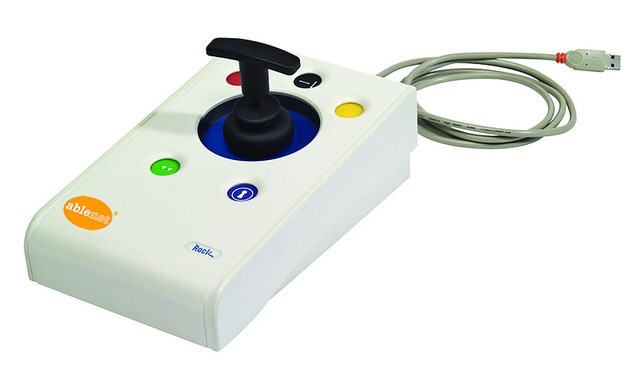
1. Our client has a communicating device at his school, but he is not able to use it adequately due to his limitations. There are a lot of communicating devices available on the market, but for some of our concept ideas, we will have as an example a joystick that a person can move in order to select a desire target, in our case letter to form words.
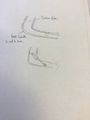
2. We can find several communicating devices varying on their quality. Obviously, the quality will depend on the price. The types of communicating devices and joystick can go from the very simple ones, like the ones shown in the pictures, to the best ones that are controlled with the eyes of the user.
3. Since the condition of our client is specific and different than the ones that most communication devices are created for, we need to adapt to the circumstances.
Conceptual Design
Summarize your conceptual design process. Develop at least three concepts.
Design Concept 1
The main goal of this project is to design a mechanism device for the child in order to use it at school for typing and writing words. This design does not work properly because we found out that the child's problem wasn't hand shaking. He doesn't need a device that hold shaking, but he needs a joystick that will solve his problem and that is going to be introduced in concept design 6.
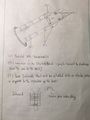
Design Concept 2
This design is a stick with a ring at the end. It is going to go back to its original position when receiving the input. In this design we found out that the child might not be able to move the stick in a right track. So, this problem will be solved in concept design 6.
Design Concept 3
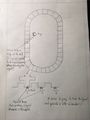
This design has: 1- Keyboard. 2- Rack. 3- support that is fixed to the rack gear. 4- Rack and screen are connected to Bluetooth. 5- Screen connected to the computer.
In this design we were thinking to have a four paths that allow the child to move the support from a path to another to pick some letters from the screen through each path. For example, the first path will have six letters and so on. It needs some work on software but we found a better idea to fix this problem in design concept 6.
Design Concept 4
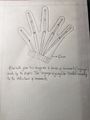
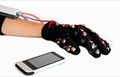
Bluetooth glove that recognize a series of movement ( language ) made by the fingers. The language is going to be created according to the restrictions of movements.
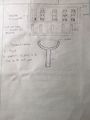
Design Concept 5
Connect the biceps with the forearm trough a hydraulic arm in order to limit the movements of the right arm while using the communicating device that he already has at school.
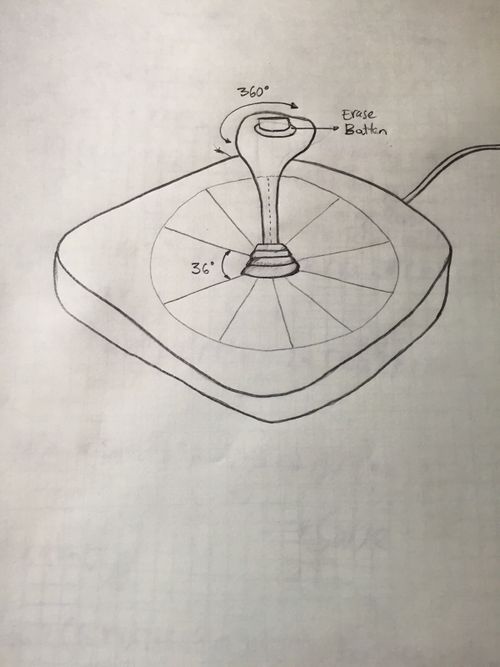
Design Concept 6
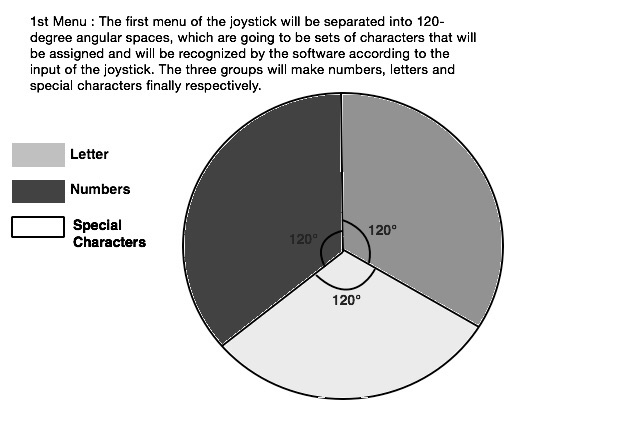
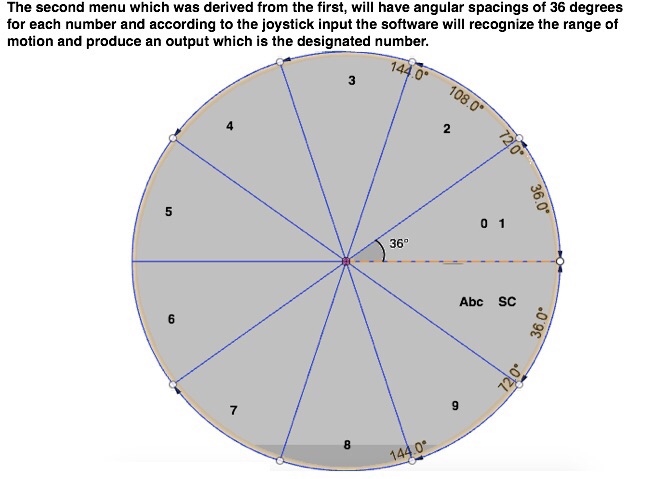
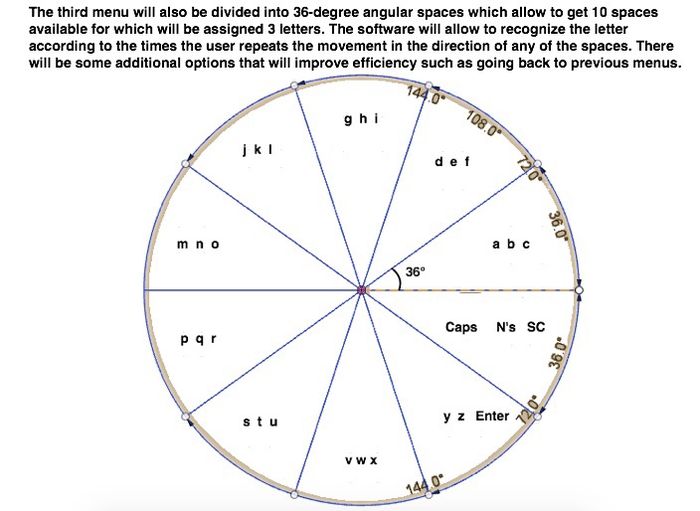
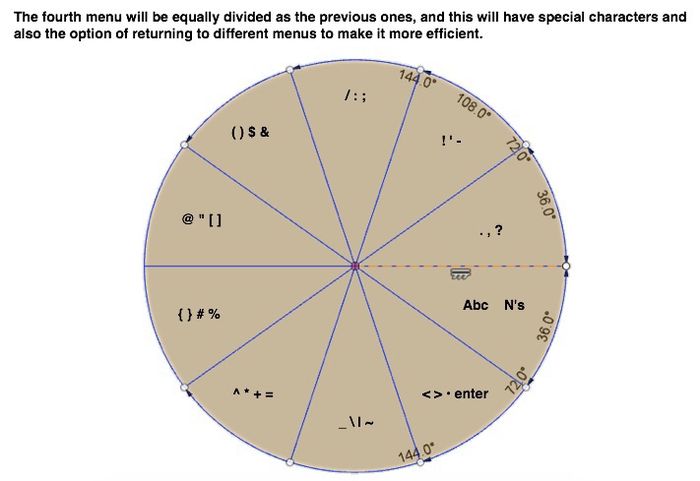
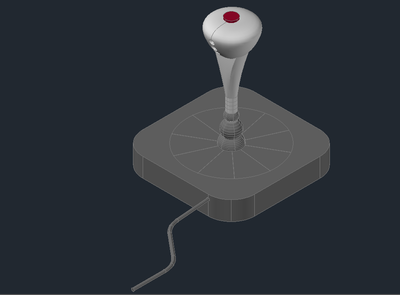
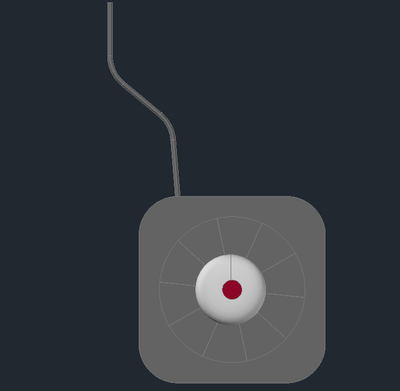
This idea is based on a 360º joystick that works with a simple software that codifies inputs (angular spaces) in order to produce an output, being letters, numbers or special characters. The software is also going to help predicting words.
Evaluate concepts/select candidate
1-Not desirable 5-Desirbale
| Categories | Design 1 | Design 2 | Design 3 | Design 4 | Design 5 | Design 6 |
|---|---|---|---|---|---|---|
| Comfortable | 2 | 1 | 1 | 4 | 1 | 5 |
| Efficiency | 3 | 3 | 3 | 4 | 2 | 4 |
| Design Simplicity/cost | 2 | 4 | 1 | 1 | 3 | 3 |
| Operation Difficulty | 1 | 2 | 2 | 2 | 3 | 4 |
| Probability of Success | 1 | 2 | 3 | 3 | 1 | 4 |
| Total | 9 | 12 | 10 | 14 | 11 | 20 |
We choose Design 6 because it is apparently the best option
Detailed Design
This section will describe a detailed design process
Description of selected design
The selected design was concept design 6
Detailed description of selected design
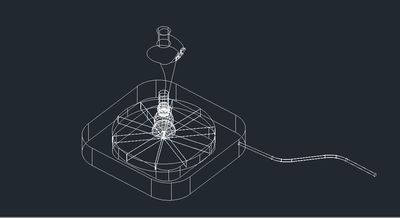
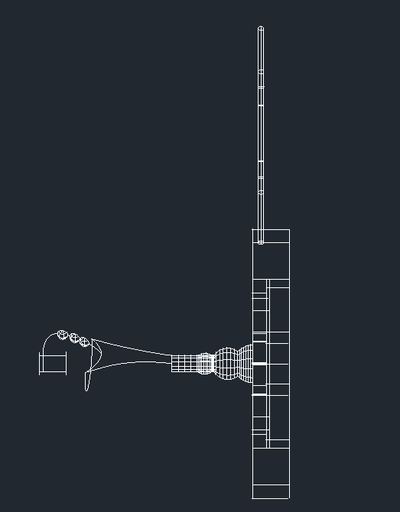
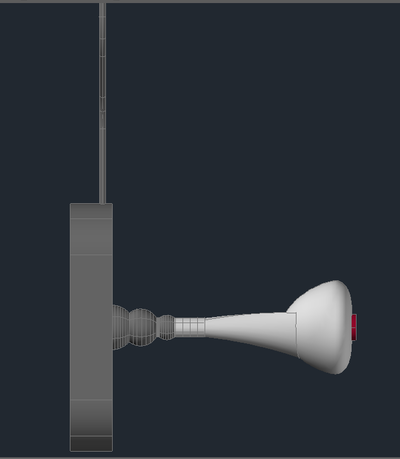
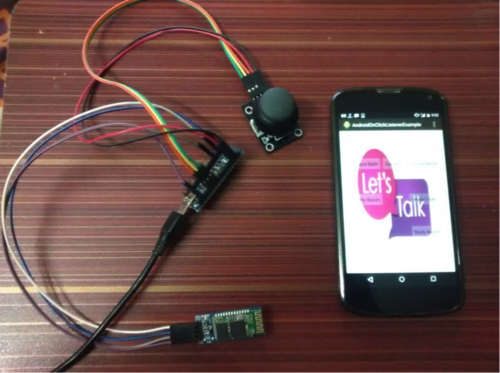
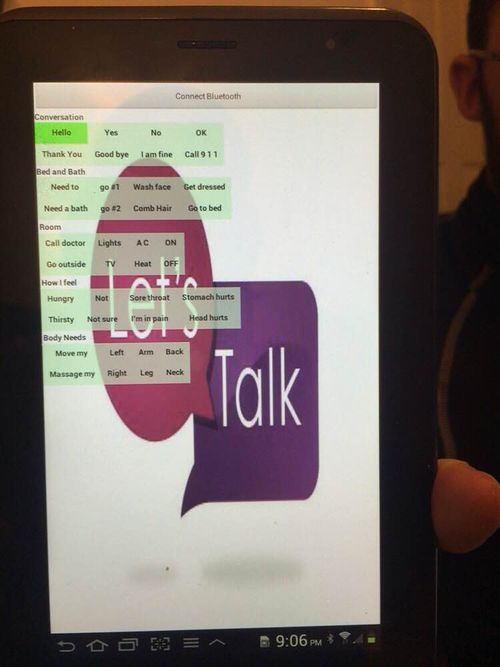
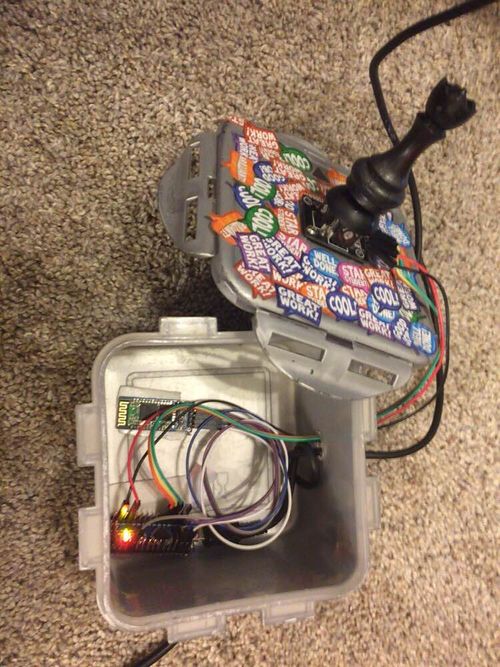
This project consists of four hardwares, a bluetooh chip, a tablet with a downloaded android app called "Let's talk" (which is a graphical interface), an Arduino, and a joystick, and one software which is going to codify different inputs of the joystick. The joystick will be able to move 360º, and it will be able to move in every direction in order to choose the desired target. The way this is going to work is that the joystick will choose targets within the app panel. The way this app works is by clicking the different words that the user desires to select. This app is called App Inventor 2, provided online by MIT. It is a free online software that allows us to edit the previous version of this app. In order to connect the joystick to the tablet, we need to make use of an Arduino. An arduino is a computer hardware that designs and manufactures microcontroller-based kits for building digital devices and interactive objects that can sense and control the physical world. The joystick will have an arrow to indicate where should the user start moving the joystick.
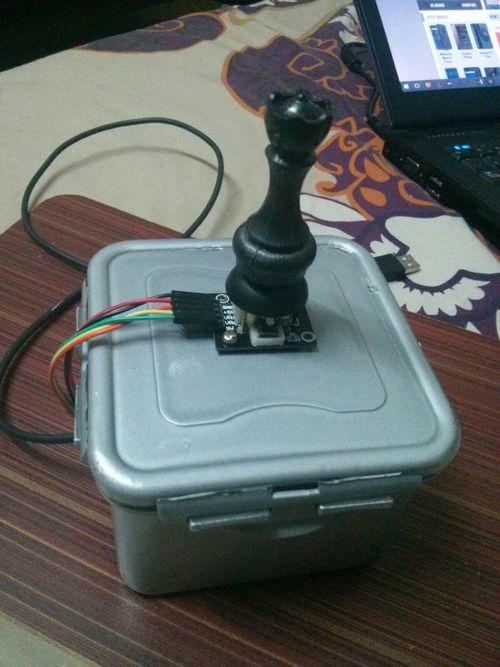
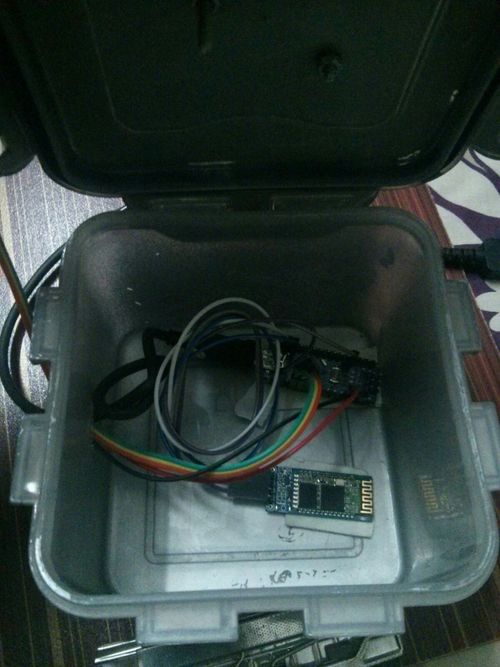
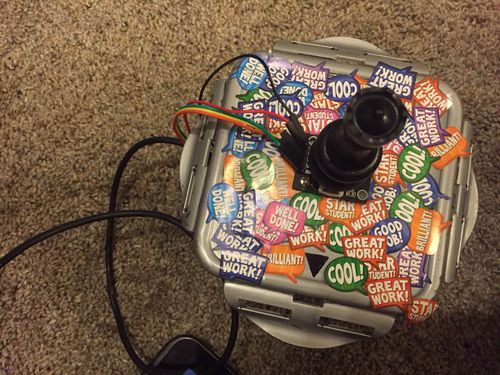
In order to make the device easy to work, we will make use of a box as a support for the device, so we sticked the joystick to the top of a box. The arduino and Bluetooth chip will go inside the box. There will be a cable power going out of the box that should go connected to a plug or to a computer. The joystick will connect to the tablet via Bluetooth. Since our costumer is a 13 year old kid, we thought about taping the box with juvenile themes to make it more friendly.
Analysis
Describe three types of analysis to be performed on the design
Engineering analysis 1
Engineering analysis 2
Engineering analysis 3
Engineering analysis 4
CAD Drawings
Bill of Materials
| Part Name | Specifications | Quantity | Price |
|---|---|---|---|
| Arduino | Arduino Nano V3 w/USB cable | 1 | 30.66$ |
| Cables | 20cm F-F Prototyping Cables | 5 | ~$ |
| Joystick | Chess piece joystick | 1 | 0$ |
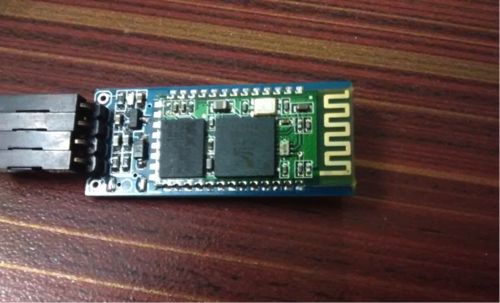
| Bluetooh | HM-Bluetooh Module | 1 | 55.0$ |
| Tablet | Samsung GT P3100 Tablet 7-inch | 1 | 100$ |
| Voltage | Voltage reg. ICs | 6 | ~$ |
Assembly Instructions
1. The pieces bought to make the project are:
-Arduino Nano V3 w/USB Cable
-20 cm F-F Prototyping Cable x5
-Joystick (chess piece)
-HM 10 Bluetooth Module
-Voltage reg. ICs
-Android Tablet.
2. The first thing which needed to be done was connecting the joystick with nano arduino since we needed to control the android application which the external joystick. The joystick has 5 wires connected to the arduino, that represent direction: Up, down, right, left, and button. The joystick is nothing but two potentiometers that allow us to measure the movement of the stick in 2-D. Potentiometers are variable resistors and, in a way, they act as sensors providing us with a variable voltage depending on the rotation of the device around its shaft.
3. After controlling the joystick the next part of the project was to connect the arduino with Bluetooth, because Bluetooth is the medium that connects the joystick with android application. The codes for the Bluetooth are made by the arduino software. Getting the information from the microcontroller (arduino) Bluetooth passes the info like “L” for left shift “R” for right shift “U” for up and “D” for down likewise “B” symbol is used in the code for enter command or when you press the button.
To connect the Bluetooth with arduino, we connected the provided cable to the Bluetooth module as follows:
VCC <--> 5V
GND <--> GND
TXD <--> Pin 0 (Rx)
RXD <--> Pin 1 (Tx)
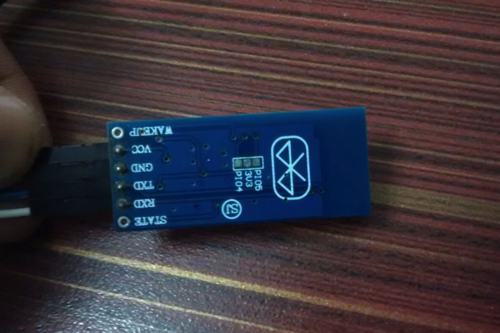
The connections of the Bluetooth module can be confusing since TXD goes to Rx and RXD goes to Tx: here's an explanation. Transmit and Receive refer to each device, therefore a transmission coming out of TXD pin of the Bluetooth module must be received by Arduino on the Rx Pin 0; similarly a transmission going out of Arduino Tx Pin 1 must reach the JY-MCU Bluetooth module on its RXD pin.
The wires that appear in the box have different functions. The USB black wire provides power for the arduino. The nanoarduino is connected to the Bluetooth by 4 wires that represent transmission, receiver, power and ground. The other wires that can be seen are the ones connected to the joystick, and those represent directions: up, down, right, left and button, and all are connected to the arduino.
The software for the programming of the arduino and bluetooth was downloaded from Arduino webpage ---> https://www.arduino.cc/en/Main/Software. Once we downloaded the arduino software, we typed the codes needed to make the arduino work with the joystick.
�.png/500px-Screenshot_(38).png) �
�.png/500px-Screenshot_(39).png)
The app only works for android devices. If the user wants to use the app in another device rather than the tablet provided, they should fist connect the Bluetooth in the device with the Joystick (the Bluetooth name of the joystick finishes in HC-06) and the Password is: 1234.
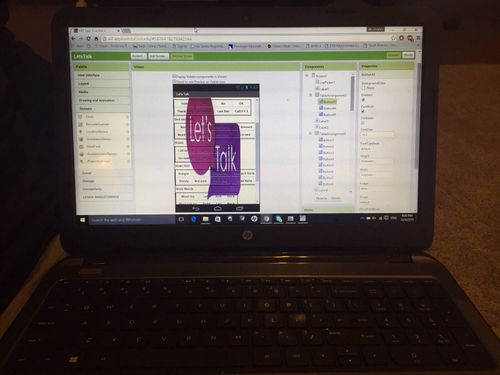
4. Once all the programming and connection of wires among the joystick, arduino, and bluetooth was made, we had to focus on designing the app. We had to build an android application which can be controlled by using that joystick. In order to work with this app, we had to work through App Inventor 2, provided online by MIT ----> ai2.appinventor.mit.edu. We can control all the program that appears on the tablet from here. It takes some time to understand how this app works, but with some work, it is possible to make it work. It is easy to put words on the app. However, the difficult part is to implement the bluetooth to the new words.The android application the predefined buttons are built that shows different instructions and whenever you press the button the voice comes up. So by making a program which helps us to connect the joystick with Bluetooth a user can easily use the android application by using an external joystick.
Let's now explain the steps to work with appinventor: First, go the webpage ai2.appinventor.mit.edu and register with your information. Then, go to projects (upleft corner as showed in the picture below). After this, click in "start new project" and upload the app that Dr. Canfield has. In the left side of the webpage, one can change the "palette," what means adding words, sounds, features, etc. In the right side of the webpage, one can change properties of the app, like the colors, background or the text.
In the righup corner, there is a button that says "blocks." Here, a person can change the codes of commands to make the app work as desired.
�.png/500px-Screenshot_(36).png)
�.png/500px-Screenshot_(37).png)
If the user wants to add more words, they can let us know and we can include more words since the programming required for the app is not easy for a person not familiar with it. Once we include the new words to the app, we will send the app with the new words to their email, and they will just need to download the new app. It will work the same way as it did before with more words included.
Fabrication Process
Testing and implementation
We tested several times our work, since the bluetooh chip did not always work. We are still trying to fix this problem and hopefully will be able to contact the family and deliver the product.
Photos of Completed design
Instructions for safe use
The Bluetooth module may interfere with PC to Arduino communication. In order to solve this, disconnect VCC when programming the board. We did not face this problem, but there are possibilities it might happen.
Project Summary, Reflection
In order to sum up our project, we would have to say that it has not been an easy path. There had been several changes, since the beginning of the project, in the way we should proceed because the needs for our costumer were different than expected.
However, once we got on track to go for a straight idea, we did our best to set everything up. We started buying all the pieces (nanoarduino, bluetooth, etc.); once we got them, we were not sure how to continue. So, after some research we connected first the arduino to the joystick; once this was done, we set our focus on connecting the Bluetooth chip with the arduino, since without the Bluetooth, the joystick would not be able to connect to the tablet. With the Bluetooth, arduino, and joystick working together, our concerns went to get the app ready. This took a lot of programming. It is a slow process because it was the first time we made use of this type of software. But we can agree, that at the end, things worked out well.
We would like to say that this project, even though it did not require many mechanical engineering skills, helped us to learn several things that we did not have idea before. We devoted a lot of time on it, what paid off at the end.
We hope our device will be helpful to the costumer by improving his communicating skills.